
Installation Guide

Utensil and Pot Racks
Models PR-40800, PR-40850
and PR-40900
Page 1
Concept Housewares, A Division of PR Housewares, LLC
www.prhousewares.com Email: info@prhousewares.com
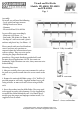
Photo A - Fully Assembled
Photo B - Pan Hook
Photo C - Screws and Anchors
Assembly:
To install, you will need the following:
- Level, pencil and tape measure
- Phillips head screw driver
- Hammer
- Electric drill and 5/16 drill bit
Lay out all the parts accordingly:
- Main unit (See Photo – A)
- Pan hooks, PR-41208 (See Photo –B)
- Package of 2 wall screws and 2 plastic
anchors and plastic key (See Photo – C)
Please consult with your local hardware
store if you have any questions or
concerns about the construction of your
walls or ceilings. ey can assist you in
selecting the proper hardware and
procedures. e generic hardware provided will work
for most drywall applications. NOTE: these units are
handmade, slight variations can exist, always measure twice
before drilling.
Mounting Directions:
1. Measure carefully where you want to mount the rack on
the wall use a pencil to mark where the screws attach to the
wall.
2. Remove the unit and drill holes using a 5/16” drill bit. If
possible mount to wall studs. Supplied anchors have a pull
rating of 20 lbs. or more each and a shear rating of 50 lbs.
each.
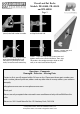
3. Insert the anchors into the drilled holes. ey may need
to be tapped in gently with a hammer. Use the supplied key
to expand the anchor behind drywall. (See Photos B to F
on next page for proper and improper anchor install). Use
supplied screws to attach.