
Installation Guide

Hanging Wood Pot Racks
Models PR-40232 and PR-49232
Page 1
Concept Housewares, A Division of PR Housewares, LLC
www.prhousewares.com Email: info@prhousewares.com
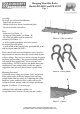
Photo A - Fully Assembled
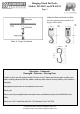
Photo B - Ceiling Hooks
Photo C - Corners
Assembly:
To install, you will need the following:
- Pencil and tape measure
- Phillips head screw driver if needed and pliers.
- Electric drill with assorted bits
Parts:
- Main unit (See Photo – A)
- Package of ceiling hooks (See Photo – B)
- PR-41207 pan hooks used in corners for
mounting (See Photo – C)
- 4 of the supplied pan hooks are used in corners
for hanging the rack to links
- 4 packs of PR-41202 hanging links, pan hooks PR-41207
and swivel pan hooks PR-41213
Please consult with your local hardware store if you have
any questions or concerns about the construction of your
walls or ceilings. ey can assist you in selecting the proper
hardware and procedures. e generic hardware provided
will work for most applications. Always measure twice
before drilling. NOTE: If you have any doubt about your
installation or your ceilings ability to oer the proper
support for your pot rack, please contact a professional.
Mounting Directions:
Determine where ceiling joist (beams, studs) are located.
Place ceiling hooks so that the hanging links will hang
straight down from the ceiling. It is important the ceiling
hooks are secure within the joists so they will bear the
weight of the rack and any cookware. Proper installation
diagram (See Photo – D) on next page.
Additional links and hooks available. See
www.prhousewares.com for a list of parts and e-tailers.