NEDERLANDS Conceptronic CMED2PRO Gebruikershandleiding Gefeliciteerd met de aanschaf van uw Conceptronic CMED2PRO. In deze gebruikershandleiding wordt u stap voor stap uitgelegd hoe u de Conceptronic 2,5” Media Player met Cardreader kunt gebruiken. In geval van problemen adviseren wij u onze support-site te bezoeken (ga naar: www.conceptronic.net en klik op ‘Support’). Hier vindt u een database met veelgestelde vragen waar u hoogstwaarschijnlijk de oplossing voor uw probleem kunt vinden.
NEDERLANDS In Media Speler stand: x Ondersteuning voor Interne HDD en geheugenkaarten. x Ondersteuning voor meerdere talen: Engels, Nederlands, Spaans, Frans, Italiaans, Duits en Portugees. (Hongaars en Turks met een Firmware upgrade) x Ondersteuning voor meerdere partities. x Voorbeeld van de aanwezige Media bestanden. x Ondersteuning voor ondertiteling (.SMI/.SRT/.SSA) voor MPEG4 (AVI), D1 resolutie.
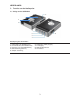
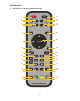
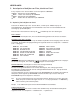
NEDERLANDS 2. Functies van de Mediaspeler 2.1 Uitleg van de CMED2PRO 9 1 2 3 4 8 5 6 7 Beschrijving van de nummers: 1. 2. 3. 4. 5. Status LED’s (Zie Hoofdstuk 2.2) Control Buttons (Zie Hoofdstuk 2.3) Ontvanger voor afstandsbediening USB aansluiting (Naar PC) Adapter aansluiting 6. 7. 8. 9.
NEDERLANDS 2.2 Status LED’s De CMED2PRO heeft diverse status LED’s om de huidige status van het apparaat te tonen: 1 2 3 4 5 Beschrijving van de nummers: 1. Mediaspeler Mode LED 2. USB Mode LED 3. HDD LED 4. Composiet uitgang LED 5. YPbPr uitgang LED 2.3 Bedieningsknoppen De CMED2PRO heeft diverse bedieningsknoppen om het apparaat te bedienen zonder afstandsbediening: 1 5 2 3 4 Beschrijving van de nummers: 1. Navigatieknoppen 2. OK / Enter knop 3. Power knop Let op: 4.
NEDERLANDS 3.
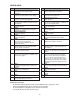
NEDERLANDS Nr. 1 2 3 4 5 6 7 8 9 10 11 Beschrijving Nr. 18 VIDEO Directe toegangknop naar video’s. 19 OUTPUT Selecteer het Video Uitgangssignaal. SLIDE Start de muziek-slideshow stand of stap-voorstap afspelen. SLOW Langzaam afspelen. TRANS Selecteer een overgangsstand of wijzig de equalizer instellingen. BEDIENINGSKNOPPEN Verplaats de selectie. AUDIO Selecteer / Wijzig geluidsspoor (Bij het afspelen van DVD’s). MENU Toon Apparaatlijst of Bestandslijst (als er maar 1 apparaat is aangesloten).
NEDERLANDS 4. De Mediaspeler aansluiten 4.1 Aansluiten op uw computer A. B. C. Zet uw computer aan. Sluit de spannings-adapter aan op de CMED2PRO en een vrij stopcontact. Sluit de USB kabel aan op de CMED2PRO en een vrije USB poort op uw computer. De computer zal de CMED2PRO automatisch herkennen en installeren, een stationsletter toewijzen en gebruiken als Massa-Opslag Apparaat. (De harde schijf is geformatteerd met het FAT32 bestandssysteem).
NEDERLANDS Notities x Normaal gesproken is het niet nodig om uw beeldinstelling te wijzigen (PAL/NTSC). Indien uw TV alleen NTSC of PAL ondersteunt kunt u met de P/N knop op de afstandsbediening de juiste beeldinstelling kiezen. x Druk op 1 van de / / / knoppen om de cursor te verplaatsen en gebruik de / ENTER knop om de selectie te bevestigen (Open de Bestandslijst, open de geselecteerde map of begin met afspelen van het geselecteerde bestand).
NEDERLANDS 5. Het afspelen of bekijken van Films, Muziek en Foto’s Er zijn 4 opties in the ‘Selectie Menu’ van de Conceptronic CMED2PRO x Photo - Bekijk foto’s op de CMED2PRO x Music - Luister naar muziek op de CMED2PRO x Video - Bekijk films op de CMED2PRO x File – Blader door alle bestanden op de CMED2PRO 5.1 Opties bij het bekijken van foto’s Selecteer de “Photo” knop in het ‘Selectie Menu’, of druk op de “Photo” knop op de afstandsbediening.
NEDERLANDS Foto’s herhalen Druk op de REPEAT knop om de foto’s in de map herhaald te laten zien. Een bepaalde map / foto bekijken Als u op de “Photo” knop in het ‘Selectie Menu’ of op de afstandsbediening drukt, zal de Mediaspeler alle aanwezige foto’s indexeren en tonen op het scherm. Als u een bepaalde map met foto’s wilt bekijken, dient u te drukken op de “File” knop in het ‘Selectie Menu’ of op uw afstandsbediening. In het ‘File’ menu kunt u de map openen waarin de foto’s staan die u wilt bekijken.
NEDERLANDS 5.3 Opties bij het bekijken van films De CMED2PRO ondersteunt diverse video formaten als MPEG2/1, MPEG 4 (inclusief XVID), VOB formaat. Ook het het afspelen van MP3, AC3, AAC en MPG1/2 geluidssporen binnen de videobestanden wordt ondersteund. Selecteer de Video” knop in het ‘Selectie Menu’, of druk op de “Video” knop op de afstandsbediening. De Mediaspeler zal een voorbeeldweergave tonen van alle videobestanden op de Mediaspeler.
NEDERLANDS Extra opties voor het afspelen van videobestanden (Alleen beschikbaar via het ‘File’ Menu) Ondersteuning voor het afspelen van MPEG4 video met ondertiteling: De Conceptronic CMED2PRO heeft ondersteuning voor .SMI, .SRT, en .SSA ondertitelingsbestanden. Als het ondertitelingsbestand dezelfde bestandsnaam heeft als de film (met uitzondering van de extensie), wordt de ondertiteling automatisch geladen als u het MPEG4 bestand afspeelt.
NEDERLANDS Het afspelen van de DVD Gebruik de navigatietoetsen op de afstandsbediening om de aangemaakte DVD map te selecteren (In het voorbeeld: “My Movie”). Druk op de PLAY/PAUSE toets van de afstandsbediening om het afspelen van de DVD te starten. Let op: Gebruik niet de / ENTER knop om te starten. Hierdoor wordt alleen de inhoud van de map getoond en niet de inhoud van de DVD afgespeeld. Gebruik de / / / navigatietoetsen en de DVD menu te kunnen bedienen. Druk op de beëindigen.
NEDERLANDS 6. Configuratie Menu Als het apparaat in STOP stand staat kunt u op de SETUP knop drukken om het Configuratie Menu te / ENTER knop openen. Gebruik de / / / knoppen om de selectie te wijzigen en druk op de om de selectie te bevestigen. Configuratie Menu Muziek Conf. : Film Conf. : Slideshow Conf.
NEDERLANDS Voorkeuren Configuratie Pagina TV Afbeelding Tv Type Video Output OSD Taal Configuratie Hoofdpagina : Kies uw TV grootte. : Kies uw TV Type: PAL / NTSC. : Kies het juiste video uitgangssignaal voor de aangesloten TV/ monitor. : Kies de OSD taal van uw Mediaspeler. : Zet de configuratie van de Media speler terug naar de fabrieksinstellingen. : Terug naar het Configuratiemenu. 7.
NEDERLANDS Als de SLIDE knop ingedrukt wordt, stopt de CMED2PRO met reageren. x Er staan veel foto’s of muziek in de geselecteerde map. Het kan even duren voordat de Music-SlideShow gestart wordt. Wacht op het afspelen van de Music-Slide-Show. De afstandsbediening werkt niet. x Richt de afstandsbediening op de CMED2PRO ontvanger binnen een hoek van maximaal ±30 graden. x Gebruik de afstandsbediening binnen een afstand van 5 meter. x De batterij van de afstandsbediening is zwak of leeg. Vervang de batterij.
ENGLISH Conceptronic CMED2PRO User Guide Congratulations on the purchase of your Conceptronic CMED2PRO. This User Guide gives you a step-by-step explanation of how to use the Conceptronic 2,5” Media Player with Cardreader. When problems occur, we advise you to go to our support-site (go to www.conceptronic.net and click ‘Support’. Here you will find the Frequently Asked Questions Database.
ENGLISH In Player mode: x Support for Internal HDD and memory cards. x Multiple languages support: English, Dutch, Spanish, French, Italian, German, Portuguese (Hungarian and Turkish with Firmware upgrade) x Supports multiple HDD partitions (up to 4 Primary Partitions). x Media files previewing. x Supports text subtitle (.SMI/.SRT/.SSA) for MPEG4 (AVI), D1 resolution. x Supports AVI (MPEG4), MPG (MPEG1, MPEG2), DAT (VCD), VOB (DVD), WAV, WMA, MP3, AC3, JPG (Various Codec’s supported).
ENGLISH 2. Functionalities of the Media Player 2.1 Identify the parts of the CMED2PRO 9 1 2 3 4 8 5 6 7 Description of the numbers: 1. 2. 3. 4. 5. Status LED’s (See Chapter 2.2) Control Buttons (See Chapter 2.3) Remote Control Receiver USB Jack (To PC) DC Input 6. 7. 8. 9.
ENGLISH 2.2 Status LED’s The CMED2PRO has various status LED’s to show the current state of the device. 1 2 3 4 5 Description of the numbers: 1. Player Mode LED 2. USB Mode LED 3. HDD LED 4. Composite output active LED 5. YPbPr output active LED 2.3 Control Buttons The CMED2PRO has various control buttons to operate the Media Player without a remote control: 1 5 2 3 4 Description of the numbers: 1. Navigation Buttons 2. OK / Enter Button 3. Power Button 4.
ENGLISH 3.
ENGLISH Nr. 1 2 3 4 5 6 7 8 9 10 11 12 13 14 15 16 17 Description Nr. POWER Enter or exit Standby mode. (ON/OFF) P/N Select video system. (PAL / NTSC) OUTPUT Select the Video Output Signal. SLIDE Enter Music-slide-show mode or step-play. SLOW Play back slowly. TRANS Select a mode of transition or a type of music equalizer. DIRECTION BUTTONS Move cursor. AUDIO Select / Change audio stream (DVD Playback). MENU Show DEVICE LIST or FILE LIBRARY (if there is only 1 device connected).
ENGLISH 4. How to connect the Media Player 4.1 Connecting to your Computer A. B. C. Turn on your computer. Connect the powersupply to the CMED2PRO and to the power outlet. Connect the USB Cable to the CMED2PRO and your computer. The computer will automatically detect and configure the device, assign new drive letter(s), and then use it as a mass storage device. (Your drive is pre-formatted in FAT32 file system). You can now add movies,music,photo’s, etc. to the CMED2PRO.
ENGLISH After initializing, the device will be ready to use. Notices x Usually, it is not necessary to change your video system (PAL/NTSC), but if the TV only supports NTSC or PAL, you should use the P/N button to select a color system to match your TV system. x Press one of the / / / buttons to move the cursor, and use the / ENTER button to confirm selection (enters media library, enters file folder, or starts playing files). x Press the / STOP button button to stop playing and go back to FILE LIBRARY.
ENGLISH 5. Playback of Movies, Music and Photos There are 4 options in the SELECTION MENU of the Conceptronic CMED2PRO x x x x Photo Music Video File – Play & watch Photos on the CMED2PRO Play & listen to Music on the CMED2PRO Play & watch movies on the CMED2PRO Browse and Play all files on the CMED2PRO 5.1 Options how to play & watch photos Select the “Photo” button in the ‘Selection Menu’, or press the “Photo” Button on the Remote Control.
ENGLISH Single Folder/File Playback When you press the “Photo” Button in the ‘Selection Menu’ or on the Remote Control, the Media Player will index all photos on the Media Player. If you want to view a single folder with photos on the media player, press the “File” button in the ‘Selection Menu’ or on the Remote Control. In the File Browser menu, you can open the folder with the photos you want to see. Select a photo and press the / ENTER Button to start the slideshow. 5.
ENGLISH 5.3 Options how to play & watch a movie Playing movies The CMED2PRO is supporting various video formats: MPEG2/1, MPEG 4 including (XVID, VOB format) including support for playing MP3, AC3, AAC and MPG1/2 audio tracks within video). Select the “Video” button in the ‘Selection Menu’, or press the “Video” Button on the Remote Control. The Media Player will show thumbnails of all the video files on the Media Player.
ENGLISH DVD Playback The CMED2PRO plays DVD’s from the hard disk as if they are a normal DVD. You can navigate through the DVD Menu, choose subtitles, change audio languages, etc. Folder Setup To play DVD’s from your Harddisk, you need to setup the DVD folders on the CMED2PRO correctly. Create a folder on the CMED2PRO Harddisk with the name of the DVD (i.e. “My Movie”) Copy the VIDEO_TS Folder from your DVD to the created DVD folder on the CMED2PRO Harddisk.
ENGLISH 5.4 Browse and Play all files Select the “File” button in the ‘Selection Menu’, or press the “File” Button on the Remote Control. The Media Player will open the File Browser Menu. In the File Browser Menu, you have the following options: x Use / button to select a file or folder; / (PREV/NEXT) button to page up/page down. If a photo or a video is selected, its preview and information will be shown on the right hand side of the TV screen.
ENGLISH Movie Setup page Repeat : Set Repeat mode. One / Off / All / Shuffle Main Page : Return to the Setup Menu Slideshow Setup page Folder Repeat Interval Time Transition Main Page : Repeat the contents of a folder. On / Off / Shuffle : Set the interval time of the slideshow. : Set a standard transition for the slideshow. : Return to the Setup Menu Preferences Setup page TV Display Tv Type Video Output OSD Language Configuration Main Page : Set your TV Display size.
ENGLISH There is no sound x The Audio cable is not connected properly. Make sure the cable is connected correctly to your TV or amplifier. x The CMED2PRO is connected with an amplifier, but the amplifier is turned off. Turn on the amplifier. x The audio stream of the MPEG2 or VOB file is invalid. Press the AUDIO button on the remote control to adjust to the proper audio stream. x The Mute function is on. Press the MUTE button on the remote control again to cancel mute.
ESPAÑOL CMED2PRO de Conceptronic Guía del usuario Felicidades por la compra de su CMED2PRO de Conceptronic. Esta Guía del usuario le ofrece una descripción paso a paso acerca de cómo utilizar el Reproductor multimedia 2,5” con lector de tarjetas de Conceptronic. Si se producen problemas, le aconsejamos que consulte nuestro sitio de servicio técnico (en www.conceptronic.net y haga clic en “Support”). Aquí encontrará la base de datos con las preguntas más frecuentes.
ESPAÑOL En modo Reproductor: x Compatible con HDD interno y tarjetas de memoria. x Diversos idiomas: inglés, neerlandés, español, francés, italiano, alemán y portugués (húngaro y turco con actualización de firmware) x Compatible con múltiples particiones HDD (hasta 4 particiones primarias). x Visualización previa de archivos multimedia. x Compatible con archivos de subtítulos (.SMI/.SRT/.SSA) para MPEG4 (AVI), resolución D1.
ESPAÑOL 2. Funciones del Reproductor multimedia 2.1 Identificación de las partes del CMED2PRO 9 1 2 3 4 8 5 6 7 Descripción de los mandos: 1. 2. 3. 4. 5. 6. 7. 8. 9. LED de estado (consulte el apartado 2.2) Botones de control (consulte el apartado 2.
ESPAÑOL 2.2 LED de estado El CMED2PRO incorpora varios LED de estado que muestran el estado actual del dispositivo. 1 2 3 4 5 Descripción de los mandos: 1. LED del modo Reproductor 2. LED del modo USB 3. LED del HDD 4. LED de salida Composite activo 5. LED de salida YPbPr activo 2.3 Botones de control El CMED2PRO incorpora varios botones de control que hacen funcionar el Reproductor Multimedia sin necesidad del mando a distancia: 1 5 2 3 4 Descripción de los mandos: 1. Botones de navegación 2.
ESPAÑOL 3.
ESPAÑOL Nº Nº Descripción POWER (ENCENDIDO) Activa o desactiva el modo Standby. (ON/OFF) P/N Selecciona el sistema de vídeo (PAL/NTSC). 18 OUTPUT (SALIDA) Selecciona la señal de salida de vídeo. SLIDE (DIAPOSITIVAS) Activa el modo de presentación de diapositivas con música o reproducción de vídeo paso a paso. SLOW (LENTO) Reproducción lenta. TRANS Selecciona un modo de transición o un tipo de ecualizador musical. BOTONES DE DIRECCIÓN Mueven el cursor.
ESPAÑOL 4. Cómo conectar el Reproductor multimedia 4.1 Conectar al ordenador A. B. C. Encienda su ordenador. Conecte el cable de alimentación al CMED2PRO y a la toma de corriente. Conecte el cable USB al CMED2PRO y al ordenador. El ordenador detectará y configurará automáticamente el dispositivo, le asignará una nueva letra o letras de unidad y lo utilizará como dispositivo de almacenamiento masivo (la unidad debe estar formateada previamente en el sistema de archivos FAT32).
ESPAÑOL Una vez encendido, el Reproductor estará listo para su uso. Avisos x Normalmente no es necesario cambiar el sistema de vídeo (PAL/NTSC), pero si su televisor sólo es compatible con los sistemas NTSC o PAL, deberá utilizar el botón P/N para seleccionar un sistema de color que coincida con el sistema de su televisor.
ESPAÑOL 5. Reproducción de películas, música y fotografías El MENÚ DE SELECCIÓN del CMED2PRO de Conceptronic ofrece 4 opciones: x x x x Foto Música Vídeo Archivo – Reproducir y ver fotografías en el CMED2PRO Reproducir y escuchar música en el CMED2PRO Reproducir y ver películas en el CMED2PRO Navegar y reproducir todos los archivos en el CMED2PRO 5.1 Opciones para reproducir y ver fotografías Seleccione el botón “Foto” del “Menú de selección”, o pulse el botón “Foto” del mando a distancia.
ESPAÑOL Cambiar el intervalo Si lo desea, puede configurar el intervalo de visualización entre dos fotografías pulsando el botón DELAY. El intervalo predeterminado se configura en la ruta siguiente: “Menú de configuración -> Configuración de la presentación de diapositivas -> Intervalo”. Repetir fotografías Pulse el botón REPEAT para reproducir las fotos repetidamente.
ESPAÑOL 5.3 Opciones para reproducir y ver películas Reproducción de películas El CMED2PRO es compatible con varios formatos de vídeo (MPEG2/1, MPEG 4, incluidos los formatos XVID y VOB), y también reproduce pistas de audio en formato MP3, AC3, AAC y MPG1/2 en entorno de vídeo. Seleccione el botón “Video” del “Menú de selección” o pulse el botón “Video” del mando a distancia. El reproductor multimedia mostrará imágenes en miniatura de todos los archivos de vídeo que contiene el dispositivo.
ESPAÑOL Nota: El CMED2PRO es compatible con la mayoría de codecs de vídeo (como XviD, AVI, MPEG2, etc.), pero es posible que tenga archivos que requieren un codec que el CMED2PRO no incluya. Si trata de reproducir un archivo con un codec no compatible, aparecerá el mensaje “CODEC NO COMPATIBLE”. Reproducción de DVD El CMED2PRO reproduce DVD del disco duro como si fueran DVD normales. Puede navegar por el Menú de DVD, elegir los subtítulos, cambiar el idioma de audio, etc.
ESPAÑOL 5.4 Navegación y reproducción de todos los archivos Seleccione el botón “File” del “Menú de selección” o pulse el botón “File” del mando a distancia, y el Reproductor multimedia abrirá el Menú de navegación de archivos. En el Menú de navegación de archivos encontrará las opciones siguientes: x Utilice los botones / para seleccionar un archivo o carpeta, y los botones / (PREV/NEXT) para avanzar o retroceder de página.
ESPAÑOL Página de configuración de Películas Repetir : habilita el Modo de Repetición. Uno / Off / Todos / Shuffle Página principal : vuelve al Menú de configuración Página de configuración de Presentación de Diapositivas Repetir carpeta Intervalo Transición Página principal : repite el contenido de una carpeta. On / Off / Shuffle : ajusta el intervalo de la presentación de diapositivas. : ajusta una transición estándar para la presentación de diapositivas.
ESPAÑOL 7. Consejos y resolución de problemas Aplique los consejos que indicamos a continuación para resolver los problemas que puedan surgir en caso de que su CMED2PRO no funcione correctamente: El LED de encendido no se ilumina x El CMED2PRO no está conectado a la toma de alimentación. Conecte el CMED2PRO a la toma de corriente. No hay actividad en la pantalla x x x x El CMED2PRO está en modo Stand-by. Pulse el botón del mando a distancia para activarlo.
ESPAÑOL El CMED2PRO no muestra todas las particiones / contenido del disco duro. x x x La partición del disco duro no es primaria. Vuelva a realizar la partición del disco duro y asegúrese de que todas las particiones son primarias. La partición no se ha formateado como FAT32. Vuelva a formatear la partición con el sistema de ficheros FAT32. No hay ficheros multimedia en la partición seleccionada.
DECLARATION OF CE CONFORMITY El fabricante Dirección: 2L International BV Databankweg 7 3821 AL Amersfoort, Países Bajos, tel. +31 (0)33 4549401 CIF/NIF NL801729877B01 Declara mediante este documento que el producto Tipo 2,5" MEDIA PLAYER Producto CMED2PRO Marca Conceptronic Cumple con las siguientes directivas: Directiva EMC 2004/108/CE EMC Directiva 2004/108/EEC EMC (transpuesta a la legislación española mediante RD 1580/2006: Compatibilidad electromagnética.
DEUTSCH Conceptronic CMED2PRO Bedienungsanleitung Wir gratulieren Ihnen zum Kauf Ihres Conceptronic CMED2PRO. In dieser Bedienungsanleitung wird Ihnen Schritt für Schritt gezeigt, wie der Conceptronic 2,5“ Media Player mit Kartenleser installiert werden muss. Wenn Probleme auftreten sollten, besuchen Sie unsere Support-Seite (unter www.conceptronic.net) und klicken Sie auf ‚Support’. Dort steht Ihnen unsere FAQ-Datenbank mit den häufig gestellten Fragen zur Verfügung.
DEUTSCH Im Player-Modus: x Unterstützt interne Festplatten und Speicherkarten. x Unterstützt mehrere Sprachen: Englisch, Niederländisch, Spanisch, Französisch, Italienisch, Deutsch, Portugiesisch (Ungarisch und Türkisch mit Firmware-Upgrade) x Unterstützt mehrere Festplatten-Partitionen (bis zu 4 primäre Partitionen). x Voransicht von Mediadateien. x Unterstützt Text-Untertitel (.SMI/.SRT/.SSA) für MPEG4 (AVI), D1-Auflösung.
DEUTSCH 2. Funktionen des Media Players 2.1 Bedienungselemente des CMED2PRO 9 1 2 3 4 8 5 6 7 Legende: 1. 2. 3. 4. 5. Status LED-Anzeigen (siehe Kapitel 2.2) 6. Steuerungstasten (siehe Kapitel 2.3) 7. Fernbedienungsempfänger 8. USB-Buchse (für Anschluss an PC) 9.
DEUTSCH 2.2 Status-LED-Anzeigen Der CMED2PRO hat verschiedene Status-LED-Anzeigen. 1 2 3 4 5 Legende: 1. Player-Modus-LED-Anzeige 2. USB-Modus-LED-Anzeige 3. Festplatten-LED-Anzeige 4. LED-Anzeige Composite-Ausgang aktiv 5. LED-Anzeige YPbPr-Ausgang aktiv 2.3 Steuerungstasten Der CMED2PRO hat verschiedene Steuerungstasten für den Betrieb des Media Players ohne Fernbedienung: 1 5 2 3 4 Legende: 1. Navigationstasten 2. OK-/ Enter-Taste 4.
DEUTSCH 3.
DEUTSCH Nr. 1 Beschreibung Nr. Beschreibung POWER Standby-Modus aktivieren/deaktivieren. (EIN/AUS) P/N Auswahl des Videosystems. (PAL / NTSC) 18 VIDEO Taste für Direktzugriff auf Videos. 19 OUTPUT Auswahl des Video-Ausgabesignals. SLIDE Aufrufen des Modus Musik-Diashow oder StepPlay [schrittweises Abspielen]. SLOW Langsame Wiedergabe. TRANS Auswahl eines Übergangsmodus oder eines Musik-Equalizers. NAVIGATIONSTASTEN Cursor bewegen. AUDIO Auswahl / ändern des Audiostroms (DVDWiedergabe).
DEUTSCH 4. Anschluss des Media Players 4.1 Anschluss an den Computer A. B. C. Schalten Sie Ihren Computer ein. Schließen Sie den CMED2PRO an die Stromversorgung an. Schließen Sie das USB-Kabel an den CMED2PRO und Ihren Computer an. Der Computer entdeckt und konfiguriert das Gerät automatisch. Er ordnet ihm als Massenspeichergerät einen neuen Laufwerkbuchstaben zu. (Das Laufwerk ist mit Dateisystem FAT32 vorformatiert.) Sie können jetzt Filme, Musik, Fotos usw. auf den CMED2PRO laden.
DEUTSCH Nach der Initialisierung ist das Gerät betriebsbereit. Hinweise x Normalerweise ist es nicht erforderlich, das Videosystem zu ändern (PAL/NTSC). Wenn jedoch Ihr Fernseher nur NTSC oder PAL unterstützt, sollten Sie über die Taste P/N ein Ihrem TV-System entsprechendes Farbsystem wählen. x Bewegen Sie den Cursor mithilfe der Tasten / / / und verwenden Sie die Taste /ENTER, um die Auswahl zu bestätigen (Media-Bibliothek/Dateiordner werden aufgerufen oder die Wiedergabe von Dateien beginnt).
DEUTSCH 5. Wiedergabe von Filmen, Musik und Fotos Im AUSWAHLMENÜ des Conceptronic CMED2PRO stehen 4 Optionen zur Verfügung: x Foto Wiedergabe von Fotos auf dem CMED2PRO x Musik Wiedergabe von Musik auf dem CMED2PRO x Video Wiedergabe von Filmen auf dem CMED2PRO x Datei Durchsuchen und Wiedergabe aller Dateien des CMED2PRO 5.1 Optionen für die Fotowiedergabe Wählen Sie im „Auswahlmenü” die Option „Foto” oder drücken Sie die „Photo”-Taste auf der Fernbedienung.
DEUTSCH Fotos wiederholen Über die Taste REPEAT können Sie Fotos wiederholt anzeigen. Wiedergabe einzelner Ordner/Dateien Wenn Sie im “Auswahlmenü” die Option „Foto” wählen oder auf der Fernbedienung die Taste „Photo” drücken, indiziert der Media Player all Fotos auf dem Media Player. Wenn Sie einen einzelnen Ordner mit Fotos auf dem Media Player anschauen möchten, wählen Sie im „Auswahlmenü“ die Option „Datei“ oder drücken Sie die Taste „File“ auf der Fernbedienung.
DEUTSCH 5.3 Optionen für die Filmwiedergabe Wiedergabe von Filmen Der CMED2PRO unterstützt verschiedene Videoformate: MPEG2/1, MPEG 4 einschließlich XVID-, VOB-Format und Wiedergabe von MP3-, AC3-, AAC- und MPG1/2-Audiotiteln in der Videofunktion. Wählen Sie im „Auswahlmenü” die Option „Video” oder drücken Sie die „Video”-Taste auf der Fernbedienung. Der Media Player zeigt eine Minibildvorschau aller Videodateien auf dem Media Player an. Wählen Sie eine Videodatei und drücken Sie die Taste starten.
DEUTSCH Hinweis: Der CMED2PRO unterstützt die meisten Video-Codecs (wie XviD, AVI, MPEG2 usw.). Es ist jedoch möglich, dass Sie Dateien haben, die einen Codec erfordern, der auf dem CMED2PRO nicht vorhanden ist. Wenn Sie versuchen, eine Datei mit einem nicht unterstützten Codec wiederzugeben, erscheint die Meldung „CODEC NOT SUPPORTED [CODEC NICHT UNTERSTÜTZT]”. DVD-Wiedergabe Der CMED2PRO gibt DVDs von einer Festplatte wie normale DVDs wieder.
DEUTSCH 5.4 Alle Dateien durchsuchen und wiedergeben Wählen Sie im „Auswahlmenü” die Option „Datei” oder drücken Sie die „File”-Taste auf der Fernbedienung. Daraufhin öffnet der Media Player das ‚Dateibrowser-Menü’. Im ‚Dateibrowser-Menü’ stehen die folgenden Optionen zur Auswahl: x Wählen Sie über die Tasten / eine Datei oder einen Ordner. Über die Tasten / (VOR/ZURÜCK) können Sie vor-/zurückblättern.
DEUTSCH Seite Film-Einstellungen Wiederholen : Zum Einstellen des Wiederholmodus. One [Einer] / Off [Aus] / All [Alle] / Shuffle [Zufallswiedergabe] Hauptseite : Kehrt zum Einstellungs-Menü zurück. Seite Musik-Einstellungen Wiederholen Auto Start Hauptseite : Zum Einstellen des Wiederholmodus. One [Einer] / Off [Aus] / All [Alle] / Shuffle [Zufallswiedergabe] : Startet automatisch die Wiedergabe, wenn eine Musikdatei im Menü ausgewählt ist. : Kehrt zum Einstellungs-Menü zurück.
DEUTSCH 7. Tipps zur Fehlerbeseitigung Im Folgenden finden Sie Tipps zur Fehlerbeseitigung, wenn Ihr CMED2PRO nicht ordnungsgemäß funktioniert: Die Power-LED-Anzeige leuchtet nicht x Der CMED2PRO ist nicht an die Stromversorgung angeschlossen. Schließen Sie den CMED2PRO an die Stromversorgung an. Es erscheint keine Anzeige auf dem Display. x Der CMED2PRO befindet sich im Standby-Modus. Drücken Sie Taste xx auf der Fernbedienung, um den Standby-Modus zu deaktivieren.
DEUTSCH Der CMED2PRO zeigt nicht alle(n) Festplatten-Partitionen / Inhalt an. x Die Partition auf der Festplatte ist keine Primärpartition. Partitionieren Sie die Festplatte erneut und stellen Sie sicher, dass alle Partitionen primär sind. x Die Partition ist nicht FAT32-formatiert. Formatieren Sie die Partition erneut mit dem FAT32Dateisystem. x Die ausgewählte Partition enthält keine Mediadateien.
FRANÇAIS Conceptronic CMED2PRO Guide d’Utilisation Félicitations pour l’achat de votre CMED2PRO de Conceptronic. Ce Guide d’Utilisation vous donnera une explication détaillée du mode d’emploi du Lecteur Multimédia avec Écran 2,5” et Lecteur de Carte de Conceptronic. En cas de problèmes, nous vous conseillons vivement de vous reporter à notre site Internet d’assistance en ligne (connectez-vous sur www.conceptronic.net et cliquez sur ‘Support’ (Assistance).
FRANÇAIS En mode Lecteur: x Support pour HDD interne et cartes mémoire. x Assistance en plusieurs langues: Anglais, Neerlandais, Espagnol, Français, Italien, Allemand, Portugais (Hongrois et Turc avec mise à jour du Microprogramme/Micrologiciel/Firmware) x Fonctionne avec des partitions HDD multiples (jusqu’à 4 Partitions Primaires). x Aperçu des fichiers vidéo. x Supporte le sous-titrage (.SMI/.SRT/.SSA) au format MPEG4 (AVI), résolution 2/3 D1.
FRANÇAIS 2. Fonctionnalités du Lecteur Multimédia 2.1 Identifier les différents éléments du CMED2PRO 9 1 2 3 4 8 5 6 7 Description des commandes: 1. 2. 3. 4. 5. Témoins Lumineux (Voir Chapitre 2.2) Boutons de Contrôle (Voir Chapitre 2.3) Récepteur de Commande à Distance Prise USB (Pour connexion avec le PC) Entrée DC 6. 7. 8. 9.
FRANÇAIS 2.2 Témoins Lumineux Le CMED2PRO possède plusieurs voyants lumineux destinés à indiquer le mode actuel de l’appareil. 1 2 3 4 5 Description des commandes: 1. Voyant du Mode Lecture 2. Voyant du Mode USB 3. Voyant HDD 4. Voyant de sortie Composite 5. Voyant de sortie YPbPr 2.3 Boutons de Contrôle Le CMED2PRO possède plusieurs boutons servant à activer le Lecteur Multimédia sans commande à distance: 1 5 2 3 4 Description des commandes: 1. Boutons de Navigation 4. 2.
FRANÇAIS 3.
FRANÇAIS Nr. Nr. Description POWER (ALIMENTATION/MARCHE) Entrer ou quitter le mode de Mise en Veille. (MARCHE/ARRÊT) P/N Sélectionner le système vidéo. (PAL / NTSC) 18 OUTPUT (SORTIE) Sélectionner le Signal de Sortie Vidéo. SLIDE (FAIRE DÉFILER) Accéder au Mode de Défilement des Clips Musicaux ou step-play. SLOW (RALENTI) Lecture au ralenti. TRANS Sélectionner un mode de transition ou un type d’égaliseur musical. BOUTONS DIRECTIONNELS Déplacer le curseur.
FRANÇAIS Remarques importantes: - La portée efficace maximale de la commande à distance est d’environ 5 mètres. - Pointer la commande à distance vers le récepteur situé sur la façade de l’appareil. - L’angle de réception se situe à environ ±30 degrés dans un rayon de 5 mètres. - Changer les piles lorsqu’elles commencent à être faibles ou à plat. 4. Comment connecter le Lecteur Multimédia? 4.1 Connexion à votre Ordinateur A. B. C. Démarrez votre ordinateur.
FRANÇAIS Remarque: Assurez-vous qu’aucune Carte Mémoire ne soit insérée dans les logements (slots) du Lecteur Multimédia prévus à cet effet, lors du démarrage. Cela pourrait donner lieu à un démarrage avec erreurs, pouvant rendre le Lecteur Multimédia inutilisable. Le cas échéant, éteignez le Lecteur Multimédia, retirez la (les) Carte(s) Mémoire et rallumez le Lecteur Multimédia. Après réinitialisation, l’appareil sera prêt à l’emploi.
FRANÇAIS 5. Lecture de Films, Écoute de Musique et Visualisation de Photos Il existe 4 options dans le SELECTION MENU (MENU DE SÉLECTION) du CMED2PRO de Conceptronic: x x x x Photo Music (Musique) Vidéo File (Fichier) - Lire et Visualiser des Photos sur le CMED2PRO - Lire et Écouter de la Musique sur le CMED2PRO - Lire et Visionner des films sur le CMED2PRO – Parcourir et Lire tous les fichiers sur le CMED2PRO 5.
FRANÇAIS Remarque: Dans ce mode, les fonctions ROTATE/ZOOM (ORIENTER/ZOOMER) ne sont pas accessibles. Modifier le Temps Intervalle Vous pouvez configurer le temps intervalle d’affichage entre deux photos en appuyant sur la touche DELAY (TEMPORISER). Le temps intervalle est défini par défaut via “Setup Menu -> Slideshow Setup -> Interval Time”. Reproduire des Photos Appuyez sur le bouton REPEAT (RÉPÉTER) pour visualiser des photos à plusieurs reprises.
FRANÇAIS Dans le menu File Browser (Navigateur de Fichier), vous pouvez ouvrir le dossier contenant les fichiers musicaux à reproduire. Sélectionnez un fichier musical et appuyez sur le bouton / ENTRÉE pour lancer la reproduction. 5.3 Options du mode de lecture et de visionnage des films Visionner des films Le CMED2PRO supporte plusieurs formats vidéo: MPEG2/1, MPEG 4 (les formats XVID, VOB), y compris ceux utilisés pour la lecture des pistes audios dans les vidéos, du type MP3, AC3, AAC et MPG1/2).
FRANÇAIS Options supplémentaires pour le visionnage de vidéos (Seulement accessible à travers le Menu ‘File’ (Fichier)) Possibilité de lire des vidéos MPEG4 avec sous-titrage Le CMED2PRO de Conceptronic peut supporter les fichiers de sous-titrage .SMI, .SRT, .SUB ou .SSA. Si le fichier de sous-titrage a un nom identique à celui du fichier vidéo sélectionné (seule l’extension est différente), le fichier de sous-titrage sera automatiquement chargé lors de la lecture du fichier MPEG4.
FRANÇAIS Lire le DVD Sélectionnez le bouton “File” (Fichier) du ‘Selection Menu’ (Menu de Sélection) ou appuyez sur le Bouton “File” de la Commande à Distance. Le Lecteur Multimédia ouvrira le Menu du Navigateur de Fichiers. Utilisez les touches de navigation de la commande à distance pour sélectionner le dossier de votre DVD dans le menu (Dans l’exemple : My Movie (Mon Film)). Appuyez sur le bouton PLAY/PAUSE (LECTURE/PAUSE) de la commande à distance pour débuter la lecture du DVD.
FRANÇAIS 6. Menu de Configuration En phase Arrêt, appuyez sur le bouton SETUP (RÉGLER) pour accéder au Setup Menu (Menu de Configuration). Appuyez sur le bouton / / / pour déplacer le curseur et appuyez sur le bouton / ENTER (ENTRÉE) pour confirmer votre choix.
FRANÇAIS Page de Configuration du Diaporama Folder Repeat (Visualisation Répétée d’un Dossier) : Visualisation Répétée du contenu d’un dossier. Visualisation Répétée Activée / Désactivée Interval Time : Définir le temps intervalle du (Temps Intervalle) diaporama. Transition : Définir une transition standard pour le diaporama.
FRANÇAIS x Le CMED2PRO fonctionne en mode FF/FR. Appuyez sur la touche PLAY/PAUSE de la télécommande pour revenir en mode normal de lecture. Distorsion d’image à l’écran. x Le CMED2PRO fonctionne en mode FF/FR. Appuyez sur la touche PLAY/PAUSE de la télécommande pour revenir en mode normal de lecture. x Un film en format PAL est reproduit en mode NTSC ou vice-versa. Appuyez sur le bouton P/N de la télécommande pour modifier les paramètres d'affichage. En appuyant sur la touche SLIDE, le système se fige.
ITALIANO Conceptronic CMED2PRO Manuale d’uso Vi ringraziamo per aver acquistato il CMED2PRO di Conceptronic. Questo Manuale d’uso spiega passo a passo come usare il Media Player 2,5” con lettore di schede di Conceptronic. In caso di problemi, vi consigliamo di visitare il nostro sito di supporto (collegandovi su www.conceptronic.net e facendo clic su “Support”), dove si trova il database delle FAQ (Risposte alle domande più frequenti).
ITALIANO In modo lettore: x Supporta HDD interno e schede di memoria. x Supporta più lingue: Inglese, Neerlandese, Spagnolo, Francese, Italiano, Tedesco, Portoghese (Ungherese e Turco con l’aggiornamento del Firmware) x Supporta molteplici partizioni dell’HDD (fino a quattro partizioni primarie). x Anteprima file media. x Supporta sottotitoli testi (.SMI/.SRT/.SSA) per MPEG4 (AVI), risoluzione D1.
ITALIANO 2. Funzioni del Media Player 2.1 Spiegazione delle parti del CMED2PRO 9 1 2 3 4 8 5 6 7 Descrizione dei numeri: 1. 2. 3. 4. 5. LED di stato (vedi Capitolo 2.2) 6. Uscita componente (YPbPr) Pulsanti di controllo (vedi Capitolo 2.3) 7. Uscita A/V Ricevitore telecomando 8. Slot schede MMC/MS/SD Jack USB (a PC) 9.
ITALIANO 2.2 LED di stato Il CMED2PRO possiede diversi LED di stato per mostrare la situazione del dispositivo. 1 2 3 4 5 Descrizione dei numeri: 1. LED modo lettore 2. LED modo USB 3. LED HDD 4. LED uscita composita attiva 5. LED uscita YPbPr attiva 2.3 Pulsanti di controllo Il CMED2PRO possiede diversi pulsanti di controllo per far funzionare il Media Player senza telecomando: 1 5 2 3 4 Descrizione dei numeri: 1. Pulsanti di navigazione 2. Pulsante OK / Intro 3. Pulsante Acceso/Spento 4.
ITALIANO 3.
ITALIANO N. 1 2 3 4 5 6 7 8 9 10 11 Descrizione N. Descrizione POWER (Accensione) Entra o esce dalla modalità standby (ON/OFF) P/N Serve per selezionare il sistema video (PAL / NTSC) OUTPUT (Uscita) Seleziona il segnale di uscita video. SLIDE (Presentazione) Entra in modalità di presentazione con musica o fermo immagine. SLOW (Lento) La riproduzione viene realizzata lentamente. TRANS Seleziona una modalità di transizione o un tipo di equalizzatore audio.
ITALIANO 4. Come collegare il Media Player 4.1 Collegamento al Computer A. B. C. Accendere il computer. Collegare l’alimentatore di corrente al CMED2PRO e alla presa di corrente. Collegare il cavo USB al CMED2PRO e al computer. Il computer rileverà e configurerà automaticamente il dispositivo. Assegnare una nuova lettera di unità, dopo di che usarla come dispositivo di archiviazione di massa (l’unità è preformattata in base al file system FAT32). Ora è possibile aggiungere film, musica, foto, ecc.
ITALIANO Dopo aver inizializzato il dispositivo, questo sarà pronto per essere usato. Avviso x Di solito non è necessario cambiare il sistema video (PAL/NTSC), ma nel caso in cui la TV supporti solo uno dei due sistemi, si dovrà usare il tasto P/N per selezionare un sistema cromatico adatto alla TV.
ITALIANO 5. Riproduzione di film, brani musicali e foto Esistono quattro opzioni nel MENU DI SELEZIONE del CMED2PRO di Conceptronic x Photo - Serve per aprire e visualizzare le foto del CMED2PRO x Music - Serve per aprire e ascoltare i brani musicali del CMED2PRO x Video - Serve per aprire e visualizzare i film del CMED2PRO x File – Serve per consultare e aprire tutti i file del CMED2PRO 5.
ITALIANO Ripetizione foto Premere il pulsante REPEAT per ripetere ininterrottamente la riproduzione delle foto. Riproduzione di una sola cartella o file Quando viene premuto il pulsante “Photo” nel ‘MENU DI SELEZIONE’ o sul telecomando, il Media Player indicizzerà tutte le foto contenute nel Media Player. Se si desidera visualizzare solo una cartella con foto sul Media Player, premere il pulsante “File” nel ‘MENU DI SELEZIONE’ o sul telecomando.
ITALIANO 5.3 Opzioni disponibili per aprire e visualizzare film Riproduzione film Il CMED2PRO di Conceptronic supporta diversi formati video: MPEG2/1, MPEG4 (formato XVID, VOB), compreso il supporto per la riproduzione di tracce audio MP3, AC3, AAC e MPG1/2 all’interno del video). Selezionare il pulsante “Video” nel ‘MENU DI SELEZIONE’, o premere il tasto “Video” del telecomando. Il Media Player mostrerà le miniature di tutti i file video contenuti nel Media Player.
ITALIANO Nota: sebbene il CMED2PRO supporti la maggior parte dei Codec Video (come XviD, AVI, MPEG2, ecc.) potrebbe darsi che per il file che si desidera aprire sia necessario un Codec non incluso nel CMED2PRO. Se si cerca di riprodurre un file con un Codec non supportato, apparirà il messaggio “CODEC NOT SUPPORTED” (Codec non supportato). Riproduzione DVD Il CMED2PRO riproduce i DVD contenuti nel disco rigido come se fossero DVD normali.
ITALIANO 5.4 Sfogliare e riprodurre tutti i file Selezionare il pulsante “File” nel ‘MENU DI SELEZIONE’, o premere il tasto “File” del telecomando. Il Media Player aprirà il Menu di Selezione File. Nel Menu di selezione file esistono le seguenti opzioni: x Usare il pulsante / per selezionare un file o una cartella; il pulsante / (INDIETRO/AVANTI) per andare pagina su e pagina giù. Se vengono selezionati una foto o un video, ne verrà mostrata l’anteprima con le informazioni sul lato destro dello schermo TV.
ITALIANO Pagina di configurazione Musica Repeat : Imposta il modo di ripetizione. One (Uno) / Off (Spento)/ All (Tutte) / Shuffle (Casuale) Auto Start : Riproduzione automatica quando viene selezionato un file audio nel menu Main Page : Torna al Menu di configurazione Pagina di configurazione Presentazione Folder Repeat Interval Time Transition Main Page : Ripete il contenuto della cartella. One (Uno) / Off (Spento)/ Shuffle (Casuale) : Imposta l’intervallo di tempo della presentazione.
ITALIANO 7. Consigli e risoluzione di problemi SeguitE i consigli riportati qui in basso per risolvere eventuali problemi di funzionamento del CMED2PRO. Il LED di alimentazione non si accende x L’alimentazione di corrente non è collegata al CMED2PRO. Ricollegare l’alimentatore di corrente al CMED2PRO. Non vi è nessun tipo di attività nel display. x Il CMED2PRO è in standby. Premere il pulsante del telecomando per attivarlo. x È stata selezionata la sorgente d’ingresso sbagliata sulla TV.
ITALIANO Il CMED2PRO non mostra tutte le partizioni o il contenuto dell’unità disco rigido. x La partizione dell’HDD non è primaria. Realizzare di nuovo la partizione dell’HDD e assicurarsi che tutte le partizioni siano configurate come primarie. x La partizione non è stata formattata in base la sistema FAT32. Realizzare di nuovo la partizione con questo sistema. x Non esiste nessun media file nella partizione selezionata.
PORTUGUÊS Conceptronic CMED2PRO Instruções de Uso Parabéns pela compra do CMED2PRO da Conceptronic. Estas instruções de uso trazem uma explicação passo-a-passo de como utilizar o Reprodutor Multimédia de 2,5” da Conceptronic com leitor de cartão. Se tiver algum problema, recomendamos que procure o nosso sítio web de suporte (vá a www.conceptronic.net e clique em “Suporte”); aí encontrará uma secção de perguntas e respostas frequentes.
PORTUGUÊS No Modo Reprodução: x Suporta disco rígido interno e cartão de memória. x Suporte multilingue: Inglês, Holandês, Espanhol, Francês, Italiano, Alemão e Português (com actualização de firmware, também suporta Húngaro e Turco). x Suporta múltiplas partições de disco rígido (até 4 partições primárias). x Pré-visualização de ficheiros multimédia. x Suporta legendas (.SMI/.SRT/.SSA) para MPEG4 (AVI), resolução D1.
PORTUGUÊS 2. Funcionalidades do Reprodutor Multimédia 2.1 Partes do CMED2PRO 9 1 2 3 4 8 5 6 7 Descrição dos números 1. 2. 3. 4. 5. LEDs de indicação do estado (ver Capítulo 2.2) 6. Saída Componente (YPbPr) Botões de Controlo (ver Capítulo 2.3) 7. Saída de Áudio/Vídeo Receptor do Controlo Remoto 8. Entrada para cartão MMC/MS/SD Conector USB (para o computador) 9.
PORTUGUÊS 2.2 LEDs de indicação do estado O CMED2PRO possui diversos LEDs para mostrar o estado do aparelho. 1 2 3 4 5 Descrição dos números: 1. Indicador de Modo Reprodução 2. Indicador de Modo USB 3. Indicador de disco rígido 4. Indicador de saída Composite activa 5. Indicador de saída YPbPr activa 2.3 Botões de Controlo O CMED2PRO possui diversos botões de controlo para operar o Reprodutor Multimédia sem o uso do controlo remoto: 1 5 2 3 4 Descrição dos Números: 1. Botões de Navegação 2.
PORTUGUÊS 3.
PORTUGUÊS Nº 1 2 3 4 5 6 7 8 9 10 11 12 13 14 15 16 17 Descrição Nº Descrição LIGAR/DESLIGAR Entra ou sai do modo de espera (LIGAR/DESLIGAR) P/N Selecciona o sistema de vídeo. (PAL / NTSC) 18 VIDEO Botão de acesso directo a vídeos. 19 OUTPUT Selecciona o sinal de saída de vídeo. SLIDE Selecciona o modo de reprodução de diapositivos com música ou o modo de reprodução por quadros. SLOW Reprodução lenta. TRANS Selecciona o modo de transição ou um tipo de equalizador de música.
PORTUGUÊS 4. Como Ligar o Reprodutor Multimédia 4.1 Ligar ao computador A. B. C. Ligue o computador. Ligue a fonte de alimentação ao CMED2PRO e a uma tomada eléctrica. Ligue o cabo USB ao CMED2PRO e ao computador. Automaticamente, o computador irá detectar e configurar o dispositivo, associando a ele uma ou mais letras de drive, e então utilizará o dispositivo como dispositivo de armazenamento em massa. O seu drive está pré-formatado no sistema de ficheiros FAT32.
PORTUGUÊS Após a inicialização o dispositivo estará pronto para ser utilizado. Notas x Normalmente, não é necessário mudar o sistema de vídeo (PAL/NTSC), mas se o televisor suportar apenas NTSC ou PAL, utilize o botão P/N para seleccionar o sistema de cores compatível com o sistema do televisor.
PORTUGUÊS 5. Reprodução de filmes, música e fotografias Há 4 opções no MENU DE SELECÇÃO do Conceptronic CMED2PRO x Fotografia - Reproduzir e visualizar fotografias no CMED2PRO x Música - Reproduzir e ouvir música no CMED2PRO x Vídeo - Reproduzir e assistir filmes no CMED2PRO x File – Navegar e reproduzir qualquer ficheiro no CMED2PRO 5.1 Opções de reprodução e visualização de fotografias Seleccione o botão “Fotografia” do “Menu de Selecção”, ou prima o botão “Photo” do controlo remoto.
PORTUGUÊS Repetir fotografias Prima o botão REPEAT para mostrar as fotografias de forma repetida. Visualizar uma única pasta ou um único ficheiro Quando se prime “Photo” no “Menu de Selecção” ou o botão do controlo remoto, o Reprodutor Multimédia indexa todas as fotografias. Se quiser ver uma única pasta com fotografias no Reprodutor Multimédia, prima “Ficheiro” no “Menu de Selecção” ou o botão “File” do controlo remoto.
PORTUGUÊS 5.3 Opções para reproduzir e assistir filmes Reproduzir filmes O CMED2PRO suporta vários formatos de vídeo: MPEG2/1, MPEG 4 (incluindo formatos XVID, VOB) e também suporte para reproduzir trilhas sonoras MP3, AC3, AAC e MPG1/2 que acompanham o vídeo. Seleccione “Vídeo” no “Menu de Selecção” ou prima o botão “Video” do controlo remoto. O Reprodutor Multimédia mostrará miniaturas de todos os ficheiros de vídeo nele contidos.
PORTUGUÊS Nota: O CMED2PRO suporta a maioria dos codecs de vídeo (como XviD, AVI, MPEG2, etc.) mas é possível que alguns ficheiros requeiram um codec que não está incluído no CMED2PRO. Se tentar reproduzir um ficheiro com um codec não suportado, aparecerá a mensagem “CODEC NÃO SUPORTADO”. Reprodução de DVD O CMED2PRO reproduz um DVD armazenado no seu disco rígido como se fosse um DVD normal. Pode-se navegar através do menu de DVD, escolher legendas, mudar o idioma de áudio, etc.
PORTUGUÊS 5.4 Visualizar e reproduzir todos os arquivos Seleccione “Ficheiro” no “Menu de Selecção”, ou prima o botão “File” do controlo remoto. O Reprodutor Multimédia abrirá o menu de visualização de ficheiros. O menu de visualização de ficheiros apresenta as seguintes opções: x Use os botões / para seleccionar um ficheiro ou uma pasta; e os botões / (ANTERIOR/SEGUINTE) para subir ou descer páginas.
PORTUGUÊS Página de configuração de filmes Repetir : Configurar modo de repetição. Único / Desligado / Todos / Aleatório Página principal : Retorna ao Menu de Configurações Página de configuração de música Repetir Início automático Página principal : Configurar modo de repetição. Único / Desligado / Todos / Aleatório : Inicia a reprodução automaticamente quando um ficheiro é seleccionado no menu.
PORTUGUÊS 7. Sugestões e Resolução de problemas Use as sugestões seguintes para resolver problemas quando o seu CMED2PRO não estiver a funcionar devidamente: A luz de Alimentação não acende x A fonte de alimentação não está ligada ao CMED2PRO. Volte a ligar a fonte de alimentação ao CMED2PRO. Não há qualquer actividade no visor. x x x x O CMED2PRO está no modo de standby. Carregue no botão do comando para activá-lo. Está seleccionada uma entrada errada na sua televisão. Altere a entrada.
PORTUGUÊS O CMED2PRO não mostra todas as partições/conteúdo do HDD. x x x A partição do HDD não é a principal. Volte a fazer a repartição do HDD e assegure-se de que todas as partições são definidas como principais. A partição não está formatada com o sistema de ficheiros FAT32. Reformate a partição com o sistema de ficheiros FAT32. Não existem ficheiros multimédia na partição seleccionada.
MAGYAR Conceptronic CMED2PRO Felhasználói útmutató Köszönjük, hogy a Conceptronic CMED2PRO-t választotta. Ez a felhasználói útmutató lépésr l-lépésre elmagyarázza, hogy miként kell a kártyaolvasóval ellátott Conceptronic 2,5-colos médialejátszót használnia. Ha probléma jelentkezne, azt tanácsoljuk, hogy keresse fel a terméktámogatást nyújtó webhelyünket (látogasson el a www.conceptronic.net honlapra, majd ott kattintson a „Support”-ra). Itt található ugyanis a gyakran ismétl d kérdések (GYIK) adatbázisa.
MAGYAR Lejátszós üzemmódban: x Támogatja a bels merevlemez-meghajtót és a memóriakártyákat. x Többnyelv támogatás: angol, holland, spanyol, francia, olasz, német, portugál (magyar és török, firmware-frissítéssel) x Támogatja a merevlemez-meghajtónál a többszörös partíciót (akár négy els dleges partíció is lehet). x Médiafájlok el nézete. x Támogatja a szövegfeliratozást (.SMI/.SRT/.SSA) az MPEG4- (AVI), D1-felbontáshoz.
MAGYAR 2. A médialejátszó funkciói 2.1 A CMED2PRO alkatrészeinek azonosítása 9 1 2 3 4 8 5 6 7 A számokkal jelzettek ismertetése: 1. 2. 3. 4. 5. Állapotjelz LED-ek (lásd a 2.2. fejezetet) Kezel szervek (lásd a 2.3. fejezetet) A távirányító vev készüléke USB-jackcsatlakozó (a PC felé) Egyenáramú bemenet 6. 7. 8. 9.
MAGYAR 2.2 Állapotjelz LED-ek A CMED2PRO-nak különböz állapotjelz LED-jei vannak az eszköz mindenkori állapotának kijelzéséhez. 1 2 3 4 5 A számokkal jelzettek ismertetése: 1. A lejátszó üzemmódot jelz LED 2. Az USB üzemmódot jelz LED 3. A merevlemez-meghajtó LED-je 4. Az összetett kimenet aktivitását jelz LED 5. Az YPbPr kimenet aktivitását jelz LED 2.
MAGYAR 3.
MAGYAR Sz. Leírás Sz. Leírás 1. POWER Be-, illetve kilépés készenléti üzemmódból. (ON/OFF — BE/KI) 18. VIDEO A videofelvételek közvetlen elérését biztosító gomb. 2. P/N Videorendszer kijelölése (PAL/NTSC) 19. DISPLAY Fájladatok megjelenítése a lejátszás alatt. 3. OUTPUT A kimen videojel kijelölése. 20. ROTATE Fényképek forgatása. 4. SLIDE Belépés zenés diavetítés üzemmódba, illetve lépésenként történ lejátszási üzemmódba. 21.
MAGYAR Fontos megjegyzések: - A távirányító maximális hatótávolsága mintegy 5 m. Irányítsa a távirányítót az eszköz el lapján lév vev készülék felé. A vételi szög körülbelül ±30 fok, 5 m hatótávolságon belül. Cserélje ki az elemeket, ha lemerül ben vannak vagy már lemerültek. 4. A médialejátszó csatlakoztatása 4.1 Csatlakoztatás számítógéphez A. B. C. Kapcsolja be a számítógépet. Csatlakoztassa a tápegységet a CMED2PRO-hoz, valamint falicsatlakozóhoz.
MAGYAR Megjegyzés: Ügyeljen arra, hogy ne legyen egyáltalán memóriakártya a médialejátszó kártyab vít helyein a rendszerindítás során. Ez ugyanis hibás inicializálást okozhat, amit l a médialejátszó használhatatlanná válik. Ha erre mégis sor kerülne, kapcsolja ki a médialejátszót, vegye ki a memóriakártyá(ka)t, majd kapcsolja be a médialejátszót. Inicializálás után az eszköz használatkész.
MAGYAR 5. Filmek, zene és fényképek lejátszása Négy választási lehet ség kínálkozik a Conceptronic CMED2PRO kijelölési menüjén SELECTION MENU) x x x x Photo Music Video File – Fényképek lejátszása és megtekintése a CMED2PRO-n Zene lejátszása és hallgatása a CMED2PRO-n Filmek lejátszása és megtekintése a CMED2PRO-n Böngészés az összes fájlban, illetve az összes fájl lejátszása a CMED2PRO-n 5.
MAGYAR Megjegyzés: Ebben az üzemmódban a ROTATE/ZOOM nem hozzáférhet . Id intervallum megváltoztatása A két fénykép közötti megjelenítési id intervallum beállítható a DELAY (KÉSLELTETÉS) gomb megnyomásával. Az alapértelmezés szerinti id intervallumot a „Setup Menu -> Slideshow Setup -> Interval Time” segítségével lehet beállítania. Fényképek ismételt megjelenítése A fényképek ismételt megjelenítéséhez nyomja meg a REPEAT gombot.
MAGYAR 5.3 Választási lehet ségek film lejátszásához és megtekintéséhez Filmek lejátszása A CMED2PRO különböz videoformátumokat támogat: MPEG2/1, MPEG 4, beleértve (az XVID- , VOBformátumot), beleértve az MP3-, AC3-, AAC-, illetve MPG1/2 audiosávok támogatását is a videón belül. Jelölje ki a „Video” gombot a „Selection Menu”-n, majd nyomja meg a „Video” gombot a távirányítón. A médialejátszó megjeleníti a médialejátszón lév összes videofájl miniat rjét.
MAGYAR Megjegyzés: A legtöbb videokodeket a CMED2PRO támogatja (például XviD, AVI, MPEG2 stb.), de az is lehet, hogy olyan fájljai vannak, amelyek a CMED2PRO-n nem található kodeket igényelnek. Ha egy nem támogatott kodek fájlt próbál lejátszani, a következ üzenet jelenik meg: „CODEC NOT SUPPORTED” (a kodek nem támogatott). DVD lejátszása A CMED2PRO a DVD-ket a merevlemezr l úgy játssza le, mintha azok normál DVD-k volnának.
MAGYAR 5.4 Böngészés az összes fájlban, illetve ezek lejátszása Jelölje ki a „File” gombot a „Selection Menu”-n, vagy nyomja meg a „File” gombot a távirányítón. A médialejátszó megnyitja a File Browser (fájlböngész ) menüt. A fájlböngész menün a következ lehet ségek adottak: x A / gombot használja fájl vagy mappa kijelöléséhez; a / (PREV/NEXT) gombot használja a felfelé/lefelé való lapozáshoz.
MAGYAR Movie Setup (filmbeállítások) oldal Repeat : Ismétlési mód beállítása Egy/ki/összes/véletlenszer Main Page : Visszatérés a beállítások menüjéhöz Music Setup (zenei beállítások) oldal Repeat Auto Start Main Page : Ismétlési mód beállítása. Egy/ki/összes/véletlenszer . : Lejátszás automatikus indítással, ha ki van emelve egy zenei fájl a menün. : Visszatérés a beállítások menüjéhez.
MAGYAR 7. Ötletek és hibaelhárítás Az alábbiakat akkor használja hibaelhárításra, ha a CMED2PRO nem m ködik megfelel en: Az áramellátást jelz LED nem világít x A tápegység nincs a CMED2PRO-hoz csatlakoztatva. Csatlakoztassa újból a tápegységet a CMED2PRO-hoz. Nincs semmilyen tevékenység a képerny n x x x x A CMED2PRO készenléti állapotban van. Aktiválásához nyomja le a távirányítón a gombot. Képerny jén rossz bemeneti forrást jelölt ki. Változtassa meg a bemeneti forrást.
MAGYAR A CMED2PRO nem jelenít meg minden partíciót/tartalmat a merevlemezes meghajtóról. x x x A merevlemezes meghajtón lév partíció nem els dleges. Partícionálja át ismét a merevlemezes meghajtót, majd gondoskodjon arról, hogy minden partíció els dleges beállítású legyen. A partíció nincs FAT32 szerint formázva. Formázza át a partíciót az FAT32 fáljrendszer szerint. A kijelölt partíción nincsenek médiafájlok.
TüRKÇE Conceptronic CMED2PRO Kullan c K lavuzu Conceptronic CMED2PRO ürününü Sat n Ald n z çin Tebrikler. Bu Kullan c K lavuzu Conceptronic 2,5” Kart Okuyuculu Ortam Oynat c s n n ad m ad m nas l kullan laca konusunda bilgiler içermektedir. Problem ortaya ç kt nda, destek sitemize gitmenizi (www.conceptronic.net adresine gidiniz ve ‘Support’ sayfas na t klay n z) tavsiye ederiz. Burada S kça Sorulan Sorular Veritaban n bulacaks n z.
TüRKÇE Oynat c modunda: x Dahili Sabit Disk (HDD) ve bellek kartlar n destekler. x Çoklu dil deste i vard r: ngilizce, Hollandaca, spanyolca, Frans zca, talyanca, Almanca, Portekizce (Ürün bilgisinin yükseltilmesi ile Macarca ve Türkçe) x Çoklu Sabit Disk bölümlerini destekler (en fazla 4 adet Birincil Disk Bölümü). x Ortam dosyalar ön-izlemesi yap l r. x MPEG4 (AVI) için metin alt yaz s (.SMI/.SRT/.SSA), D1 çözünürlük deste i vard r.
TüRKÇE 2. Ortam Oynat c s n n Fonksiyonlar 2.1 CMED2PRO parçalar n n tan t m 9 1 2 3 4 8 5 6 7 Rakamlar n aç klamas : 1. 2. 3. 4. 5. Durum LED’leri (Bkz. Bölüm 2.2) Kumanda Dü meleri (Bkz. Bölüm 2.3) Uzaktan Kumanda Al c s USB Jak (Bilgisayara) DC Giri 6. 7. 8. 9.
TüRKÇE 2.2 Durum LED’leri CMED2PRO’da cihaz n o anki durumunu gösteren çe itli durum LED'leri mevcuttur. 1 2 3 4 5 Rakamlar n aç klamas : 1. Oynat c Modu LED’i 2. USB Modu LED’i 3. HDD (Sabit Disk) LED’i 4. Kompozit ç k aktif LED’i 5. YPbPr ç k aktif LED’i 2.3 Kumanda Dü meleri CMED2PRO’da Ortam Oynat c s n uzaktan kumanda olmaks z n çal t rmak için çe itli kumanda dü meleri bulunmaktad r: 1 5 2 3 4 Rakamlar n aç klamas : 1. Gezinti Dü meleri 2. OK / Enter Dü mesi 3.
TüRKÇE 3.
TüRKÇE Nr. Tan m Nr. POWER (GÜÇ-AÇMA/KAPAMA) Haz rda bekleme moduna girer ya da ç kar. (AÇIK/KAPALI) P/N Video sistemini seçer. (PAL / NTSC) OUTPUT (ÇIKI ) Video Ç k Sinyalini seçer. SLIDE (SLAYT) Müzik slayt gösterisi moduna girer ya da ad m ad m oynat r. SLOW (YAVA ) Yava oynat m yapar. TRANS Bir geçi modu ya da müzik ekolayz r türü seçer. YÖN DÜ MELER mleci hareket ettirir. AUDIO (SES) Ak c ses Seçme / De i tirme (DVD Oynat m ). 18 VIDEO Videolara Do rudan Eri im dü mesi.
TüRKÇE 4. Ortam Oynat c Ba lant s Nas l Yap l r 4.1 Bilgisayar Ba lant s A. B. C. Bilgisayar n z aç n. Güç kayna n CMED2PRO ve elektrik prizine tak n. USB Kabloyu CMED2PRO ve bilgisayara tak n. Bilgisayar otomatik olarak cihaz alg lar ve yap land r r, yeni sürücü harfi atar ve ard ndan y n depolama cihaz olarak kullan r. (Sürücünüz FAT32 dosya sistemi ile önceden biçimlendirilmi tir). Art k CMED2PRO’ya film, müzik, resim vb. ekleyebilirsiniz. CMED2PRO bilgisayar ba lant s n n kesilmesi A A. B.
TüRKÇE Aç l i leminden sonra cihaz kullan ma haz r olacakt r. Uyar lar x Genellikle video sisteminizi (PAL/NTSC) de i tirmek gerekmez fakat TV sadece NTSC ya da PAL' destekliyorsa TV sisteminizle e le tirmek için bir renk sistemi seçmek üzere P/N dü mesini kullanman z gerekir. x mleci hareket ettirmek için / / / dü melerinden birisine bas n ve seçimi onaylamak için / ENTER dü mesini kullan n (ortam kütüphanesine girer, dosya klasörüne girer ya da dosya çalmaya ba lar).
TüRKÇE 5. Film, Müzik ve Resim Oynat m Conceptronic CMED2PRO SEÇ M MENÜSÜ’nde 4 seçenek bulunur. x x x x Photo (Foto raf) Music (Müzik) Video File (Dosya) - CMED2PRO’da Foto raf görüntüleme - CMED2PRO’da Müzik dinleme - CMED2PRO’da film izleme - CMED2PRO’daki tüm dosyalara göz atma ve oynatma 5.1 Foto raf oynatma ve görüntüleme seçenekleri ‘Selection Menu (Seçim Menüsü)’ndeki “Photo (Foto raf)” dü mesini seçin ya da Uzaktan Kumandada bulunan “Photo (Foto raf)” dü mesine bas n.
TüRKÇE Aral k Süresini De i tirme DELAY dü mesine basarak iki foto raf aras ndaki görüntüleme süresini ayarlayabilirsiniz. Varsay lan aral k süresi “Setup Menu -> Slideshow Setup -> Interval Time” içinden ayarlan r. Foto raf Tekrarlama Arka arkaya foto raf oynatmak için REPEAT (TEKRAR) dü mesine bas n. Tek Klasör/Dosya Oynatma ‘Selection menu (Seçim Menüsü)’ içinde ya da Uzaktan Kumanda üzerinde “Photo” Dü mesine bast n zda Ortam Oynat c s üzerinde bulunan tüm foto raflar dizinlenecektir.
TüRKÇE 5.3 Film oynatma ve izleme seçenekleri Film oynatma CMED2PRO çe itli video biçimlerini destekler: MPEG2/1, MPEG 4 (XVID, VOB biçimi dahil) video içinde MP3, AC3, AAC ve MPG1/2 ses parçalar n çalma deste i dahil. ‘Selection Menu (Seçim Menüsü)’ndeki “Video” dü mesini seçin ya da Uzaktan Kumandada bulunan “Video” Dü mesine bas n. Ortam Oynat c s , üzerinde bulunan tüm video dosyalar minyatür resim eklinde gösterilecektir.
TüRKÇE Not: CMED2PRO’da ço u Video Codec’i desteklenmektedir (XviD, AVI, MPEG2, vb.) fakat CMED2PRO’da mevcut olmayan bir Codec gerektiren dosyalara sahip olabilirsiniz. Desteklenmeyen Codec ile bir dosya çalmaya çal rsan z “CODEC NOT SUPPORTED (CODEC DESTEKLENM YOR)” mesaj n göreceksiniz. DVD Oynat m CMED2PRO normal bir DVD gibi sabit diskten DVD oynat r. DVD menüsü içinde gezinebilir, alt yaz seçebilir, ses dillerini vb. de i tirebilirsiniz.
TüRKÇE 5.4 Tüm dosyalara Göz Atma ve dosyalar n Oynat m ‘Selection Menu (Seçim Menüsü)’ndeki “File (Dosya)” dü mesini seçin ya da Uzaktan Kumandada bulunan “File (Dosya)” dü mesine bas n. Ortam Oynat c s taraf ndan Dosya Göz Atma Menüsü aç lacakt r. Dosya Göz Atma Menüsünde a a daki seçeneklere sahipsiniz: x Bir dosya ya da klasör seçmek için / dü mesini; sayfa yukar /a a için / (PREV/NEXTÖNCEK /SONRAK ) dü mesini kullan n.
TüRKÇE Music Setup (Müzik Ayarlar ) sayfas Repeat Auto Start Main Page : Tekrar modunu ayarlar. Bir / Kapal / Tümü / Kar k : Menüde bir müzik dosyas vurguland nda çalmay otomatik olarak ba lat r. : Ayarlar Menüsüne döner Slideshow Setup (Slayt Gösterisi Ayarlar ) sayfas Folder Repeat Interval Time Transition Main Page : Bir klasörün içeri ini tekrar eder. Aç k / Kapal / Kar k : Slayt gösterisinin aral k süresini ayarlar. : Slayt gösterisi için standart bir geçi ayar yapar.
TüRKÇE Ses yok x Ses kablosu düzgün bir ekilde ba l de il. Kablonun TV ya da amplifikatöre do ru bir ekilde ba l oldu undan emin olun. x CMED2PRO amplifikatöre ba l fakat amplifikatör kapal . Amplifikatörü aç n. x MPEG2 ya da VOB dosyas ses ak geçersiz. Uygun ses ak ayar için uzaktan kumanda üzerindeki AUDIO dü mesine bas n. x Mute (Sessiz) fonksiyonu aç k. Sessiz fonksiyonunu iptal etmek için uzaktan kumanda üzerindeki MUTE dü mesine bas n. x CMED2PRO, FF/FR modunda çal yor.
SPECIFICATIONS Specifications Power Power Consumption Image Resolution Color System Frequency Response Signal/Noise Ratio Audio Cross talk Audio Output Video Output USB Data Transfer Rate File Format Supported HDD Interface Supported File System Supported Memory Cards : : : : : : : : : : : : : : 100~240VAC, 50/60HZ 20W (max) 720x480 (NTSC), 720x576 (PAL), 640x480 (VGA) PAL/NTSC ±3dB(20HZ~20KHZ) 80dB 70dB 2,0±0,2V(rms) 1,0±0,2Vp-p, 75 USB 2.0, Max.
Declaration of CE Conformity Declaration of CE Conformity The manufacturer 2L International BV Address Databankweg 7 3821 AL Amersfoort, the Netherlands Hereby declares that the product Type 3,5" MEDIA PLAYER + DISPLAY Product CMED2PRO Brandname Conceptronic Complies with following directives: 2004/108/EEC EMC directive: Electromagnetic Compatibility 73/23/EEC Low Voltage Directive: Electrical equipment designed for use within certain voltage limits The following standards were consulted to asse