NEDERLANDS Conceptronic CADSLR4+ / CADSLR4B+ Snelstart handleiding Hartelijk gefeliciteerd met de aanschaf van uw Conceptronic ADSL2+ Router & Modem. In de bijgaande Snelstart handleiding wordt stap voor stap uitgelegd hoe u de Conceptronic ADSL2+ Router & Modem configureert en gebruikt. Ingeval van problemen adviseren wij u onze support-site te bezoeken (ga naar: www.conceptronic.net en klik op ‘Support’).
NEDERLANDS 2.
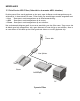
NEDERLANDS 3. De CADSLR4(B)+ met uw ADSL Lijn verbinden De meeste ADSL Providers vereisen het gebruik van een filter tussen de telefoonlijn en de CADSLR4(B)+ om te voorkomen dat de ADSL lijn stoort met de standaard telefoondiensten. De 2 soorten basisfilters worden hier beschreven. Let op: De CADSLR4(B)+ wordt geleverd zonder ADSL Filter! Neem contact op met uw telefoon of internet leverancier voor het de ADSL Filter. 3.
NEDERLANDS 3.2 Drie-Poorts ADSL Filter (Gebruikt in de meeste ADSL situaties) De drie-poorts filter wordt geplaatst op het punt waar de Router wordt aangesloten op de telefoonlijn. In deze situatie is maar 1 filter nodig. De aansluitingen worden aangeduid met: Line - Deze poort wordt aangesloten op de telefoonaansluiting. ADSL – Deze poort wordt aangesloten op de router. Phone – Deze poort wordt aangesloten op een telefoon. Het onderstaande diagram geeft de correcte aansluiting van het filter weer.
NEDERLANDS 4. Uw computer(s) configureren voor gebruik met de Router & Modem De CADSLR4(B)+ is voorzien van een ingebouwde DHCP Server. Deze DCHP Server zal automatisch een IP adres toekennen aan een aangesloten computer als deze ingesteld staat op “automatisch een IP adres verkrijgen”. Om uw computer in te stellen voor een automatisch IP adres kunt u de volgende instructies volgen: 1. Klik op “Start” Æ “Uitvoeren”. 2. Voer het commando “NCPA.CPL” in en klik op “OK”.
NEDERLANDS De eigenschappen van de LAN Verbinding worden getoond op uw scherm. 4. Selecteer “Internet Protocol (TCP/IP” en klik op “Eigenschappen”. 4 4 De eigenschappen van het Internet Protocol (TCP/IP) worden getoond op uw scherm. 5. Zet de eigenschappen op “Automatisch een IP adres verkrijgen” en klik op “OK” om de instellingen op te slaan. 6. Klik op “OK” in het eigenschappen scherm van de LAN Verbinding om de instellingen op te slaan.
NEDERLANDS Met behulp van de Command prompt van Windows kunt u controleren of het juiste IP adres is toegewezen aan de LAN Verbinding: 7. 8. Klik op “Start” Æ “Uitvoeren”. Voer het commando “CMD” in en klik op “OK”. De Command Prompt zal getoond worden op uw scherm. 9. Voer het commando “IPCONFIG” in en druk op ENTER. 9 De volgende informatie zal getoond worden: IP Adres : 192.168.1.xxx (waar xxx kan variëren tussen 2 ~ 254). Subnet Masker : 255.255.255.0 Standaard Gateway : 192.168.1.
NEDERLANDS C C Als de voorgaande stappen uw IP adres probleem niet oplossen kunt u de CADSLR4(B)+ terugzetten naar de fabrieksinstellingen met de Reset knop op de achterzijde van het apparaat. Houd de Reset Knop +/- 10 seconden ingedrukt om de fabrieksinstellingen te laden. Als de LAN LED’s uit en aan gaan is het apparaat bezig met het laden van de fabrieksinstellingen. Wacht +/- 10 seconden en herhaal stap C om uw IP adres te vernieuwen. 5.
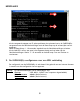
NEDERLANDS 1. Start uw internet browser (bijvoorbeeld: Internet Explorer, FireFox of Safari). 2 2. Voer het IP adres van de CADSLR4(B)+ in op de adresbalk van uw browser. (standaard: http://192.168.1.1/). De inlog pagina van de CADSLR4(B)+ zal getoond worden op uw scherm: 3 3 3. Voer de Gebruikersnaam en Wachtwoord in en klik op “Login” om de configuratie pagina’s te openen.
NEDERLANDS 1 2 3 6 7 1. 2. Let op: Selecteer uw land in de “Country” lijst op uw scherm. Selecteer uw provider in de “ISP” lijst op uw scherm. Als uw land en/of provider niet getoond worden in de bovenstaande lijsten dient u uw verbinding handmatig in te stellen. Klik op de “Config” knop (7) in het “Quick Start” scherm en ga verder in hoofdstuk 4.2 voor de handmatige configuratie van uw ADSL verbinding.
NEDERLANDS Afhankelijk van de gekozen encapsulatie dient u diverse instellingen te maken in het 2e scherm van de Quick Start Setup. 5.1.1 Gekozen encapsulatie = PPPoE (LLC) of PPPoA (LLC of VC-MUX) Als PPPoE of PPPoA is geselecteerd als encapsulatie zal het volgende scherm getoond worden: Voer de Gebruikersnaam en Wachtwoord in die u van uw provider heeft ontvangen en klik op “Apply” om de instellingen op te slaan en de CADSLR4(B)+ te herstarten.
NEDERLANDS 5.1.2 Gekozen encapsulatie = 1483 Bridge LLC – Static IP Als 1483 Bridge LLC met een Statisch IP is gekozen als encapsulatie zal het volgende scherm getoond worden: Voer de Statische IP informatie in die u van uw provider heeft ontvangen (IP Adres, Subnet Masker, Standaard Gateway en DNS) en klik op “Apply” om de instellingen op te slaan en de CADSLR4(B)+ te herstarten.
NEDERLANDS 5.1.3 Gekozen encapsulatie = 1483 Bridge LLC – Dynamic IP (DHCP) Als 1483 Bridge LLC met Dynamisch IP is geselecteerd als encapsulatie zal het volgende scherm getoond worden: Behoud de standaard instellingen en klik op “Apply” om de instellingen op te slaan en de CADSLR4(B)+ te herstarten.
NEDERLANDS 5.1.4 Gekozen encapsulatie = 1483 Bridge LLC – Bridge Als 1483 Bridge LLC met een Bridge verbinding is gekozen als encapsulatie zal het volgende scherm getoond worden: Zet de LAN groep op “Group 1” (Standaard waarde) en klik op “Apply” om de instellingen op te slaan en de CADSLR4(B)+ te herstarten. Als de herstart is voltooid zal de CADSLR4(B)+ de ADSL verbinding opzetten. Als de verbinding is gemaakt zal de ADSL LED op de voorkant van de CADSLR4(B)+ aangaan.
NEDERLANDS 5.2 Handmatig de ADSL verbinding instellen Als uw land en/of provider niet getoond wordt in de “Quick Start” Setup van de CADSLR4(B)+ dient u de verbinding handmatig in te stellen. Klik op de “Config” knop (7) op het “Quick Start” scherm om de handmatige configuratiepagina van de CADSLR4(B)+ te openen.
NEDERLANDS 7. Let op: 8. 9. Selecteer de juiste VCI waarde voor de ADSL verbinding. De uitgelegde instellingen zijn de basisinstellingen die benodigd zijn voor een ADSL verbinding. Neem contact op met uw provider voor de juiste instellingen van uw ADSL verbinding. Voor gedetailleerde informatie over de instellingen van de CADSLR4(B)+ kunt u de Gebruikershandleiding op de meegeleverde CDROM raadplegen (Alleen Engels!). Selecteer de optie “View User Manual” in het Autorun Menu van de CD-ROM.
NEDERLANDS 6. Port Forwarding – Poorten doorsturen De Conceptronic CADSLR4(B)+ is voorzien van een inbouwde Firewall om aanvallen vanaf internet op uw netwerk te voorkomen. Deze Firewall blokkeert automatisch al het inkomende verkeer op ongebruikte poorten. Als een geblokkeerde poort benodigd is voor een service of programma (bijvoorbeeld: een FTP of Web Server) kunt u deze open zetten door middel van de optie Port Forwarding in de Configuratie van de CADSLR4(B)+.
NEDERLANDS De Setup pagina voor “Port Forwarding” zal getoond worden op het scherm: 6 9 10 7 6. 7. Let op: 8. 9. 10. 11. 8 Selecteer het IP adres voor de computer waarvoor de Port Forwarding regel nodig is. Als het IP adres niet in de lijst voorkomt (bijvoorbeeld: als de computer een statisch IP adres heeft) kunt u deze toevoegen door op de knop “New IP” te klikken. Selecteer de Categorie voor de Port Forwarding regel. Er zijn diverse poorten voorgeprogrammeerd in de configuratie van de CADSLR4(B)+.
ENGLISH Conceptronic CADSLR4+ / CADSLR4B+ Quick Installation Guide Congratulations on the purchase of your Conceptronic ADSL2+ Router & Modem. The enclosed Hardware Installation Guide gives you a step-by-step explanation of how to install the Conceptronic ADSL2+ Router & Modem. When problems occur, we advise you to go to our support-site (go to www.conceptronic.net and click ‘Support’. Here you will find the Frequently Asked Questions Database.
ENGLISH 2.
ENGLISH 3. Connecting the CADSLR4(B)+ to your ADSL Line Most ADSL Providers require a filter between your Phone Line and the CADSLR4(B)+ that prevents the ADSL line from interfering with regular telephone services. The two basic styles of filters are described below. Note: The CADSLR4(B)+ is not delivered with a filter for the ADSL connection. Please contact your Telephone or Internet Provider for the correct ADSL Filter. 3.
ENGLISH 3.2 Three-Port ADSL Filter (Used in most ADSL Situations) Another type of filter is installed at the same point where the Router connects to the telephone line. Only a single filter is required. The connection ports are typically labelled as shown below: Line - This port connects to the wall jack. ADSL – This port connects to the Router. Phone – This port connects to a telephone or other telephone device. The diagram below illustrates the proper use of this type of filter.
ENGLISH 4. Configure your computer(s) for use with the Router & Modem The CADSLR4(B)+ is equipped with a build-in DHCP Server. The DHCP Server will automatically assign an IP to a connected computer if the connected computer is set to “obtain an IP address automatically”. To configure your computer for Automatic IP follow the instructions below: 1. Click “Start” Æ “Run”. 2. Enter the command “NCPA.CPL” and press “OK”. 2 2 The Network Connections window will appear. 3.
ENGLISH The Properties window of your Local Area Connection will appear. 4. Select the “Internet Protocol (TCP/IP” and click “Properties”. 4 4 The Properties window of the Internet Protocol (TCP/IP) will appear. 5. Set the properties to “Obtain an IP address automatically” and press “OK” to save the settings. 6. Press “OK” in the properties window of the Local Area Connection to save the settings.
ENGLISH With the Command prompt of Windows you can verify if you have received a correct IP address on your Local Area Connection: 7. 8. Click “Start” Æ “Run”. Enter the command “CMD” and press “OK”. The Command Prompt will appear. 9. Enter the command “IPCONFIG” and press ENTER. 9 You should see the IP Address Subnet Mask Default Gateway following information : 192.168.1.xxx (Where xxx can vary between 2 ~ 254). : 255.255.255.0 : 192.168.1.
ENGLISH C C If above steps don’t solve the IP address problem, you can reset the device to the factory default settings with the Reset Button on the back panel. Press and hold the Reset Button for +/- 10 seconds to load the Factory Default Settings. When the LAN LED’s turn off and on again the CADSLR4(B)+ reloads the Factory Default Settings. Wait for +/- 10 seconds and repeat step C to renew your IP address. 5.
ENGLISH 10. Start your web browser (like: Internet Explorer, FireFox or Safari). 2 11. Enter the IP address of the CADSLR4(B)+ in the address bar of your web browser (By default: http://192.168.1.1/). The Login page of the CADSLR4(B)+ will be shown on your screen: 3 3 12. Enter the Username and Password and click “Login” to enter the configuration pages. When the Username and Password are entered correct in the login page the CADSLR4(B)+ will display the configuration pages of the device. 5.
ENGLISH 1 2 3 6 7 1. 2. Note: Select your country in the “Country” drop-down list. Select your ISP in the “ISP” drop-down list. If your country and/or ISP is not displayed in 1 of the 2 above drop-down lists, you need to manually configure your connection. Click the “Config” button (7) in the “Quick Start” and continue to chapter 4.2 for the manual configuration of your Internet Connection.
ENGLISH 5.1.1 Selected Encapsulation = PPPoE (LLC) or PPPoA (LLC or VC-MUX) When PPPoE or PPPoA is selected as encapsulation, you will see the following configuration screen: Enter the Username and Password given by your Internet Provider and press “Apply” to save the settings and reboot the CADSLR4(B)+.
ENGLISH 5.1.2 Selected Encapsulation = 1483 Bridge LLC – Static IP When 1483 Bridge LLC with Static IP is selected as encapsulation, you will see the following configuration screen: Enter the Static IP information received from your Internet Provider (IP Address, Subnet Mask, Gateway and DNS) and press “Apply” to save the settings and reboot the CADSLR4(B)+.
ENGLISH 5.1.3 Selected Encapsulation = 1483 Bridge LLC – Dynamic IP (DHCP) When 1483 Bridge LLC with Dynamic IP is selected as encapsulation, you will see the following configuration screen: Keep the current settings and press “Apply” to save the settings and reboot the CADSLR4(B)+.
ENGLISH 5.1.4 Selected Encapsulation = 1483 Bridge LLC – Bridge When 1483 Bridge LLC with Bridge Connection is selected as encapsulation, you will see the following configuration screen: Set the LAN group to Group 1 (Default) and press “Apply” to save the settings and reboot the CADSLR4(B)+. When the reboot is completed, the CADSLR4(B)+ will create the ADSL connection for you. When the connection is made, the ADSL light on the CADSLR4(B)+ will turn on.
ENGLISH 5.2 Manually Set-Up your Internet Connection Configuration If your Country and/or ISP is not displayed in the “Quick Start” Connection Setup of the CADSLR4(B)+ you need to define the connection manually. Click on the “Config” button (7) in the “Quick Start” screen to enter the manual configuration of the CADSLR4(B)+.
ENGLISH Note: 8. 9. Explained settings are the basic settings needed for your ADSL connection. Please contact your Internet Provider for the correct settings for your connection. For detailed information about the settings please see the User Manual (English only!) on the CD-ROM. Select “Open User Manual” from the Autorun Menu. Click “Apply” to save the settings made in the configuration of the CADSLR4(B)+ Click “Save & Reboot” to enter the Save & Reboot screen. 10 10.
ENGLISH 6. Port Forwarding The Conceptronic CADSLR4(B)+ is equipped with a build-in Firewall to prevent attacks from the Internet on your network. This Firewall blocks automatically all incoming traffic on unused ports. When a blocked port is needed for a service or application (for example: a FTP Server or WEB Server) you can create a Port Forwarding Rule in the Configuration Pages.
ENGLISH You will see the “Port Forwarding” Setup page: 6 9 10 7 6. 7. 8 Select the LAN IP for the computer that needs the Port Forwarding Rule. If the IP is not in the list (for example: if the device uses a Static IP) you can use the “New IP” Button to add the device IP. Select the Category for your Port Forwarding Rule. Note: There are several ports pre-defined in the configuration.
ESPAÑOL CADSLR4+ / CADSLR4B+ de Conceptronic Guía de Instalación Rápida Felicidades por la compra de su Router y módem ADSL2+ de Conceptronic. Esta guía de instalación le orientará paso a paso acerca de cómo instalar el Router y módem ADSL2+ de Conceptronic. Si encuentra problemas, le aconsejamos que se dirija a nuestra página web www.conceptronic.net y haga clic en «Support». Aquí encontrará la base de datos de las preguntas más frecuentes o FAQ.
ESPAÑOL 2.
ESPAÑOL 3. Conexión del CADSLR4(B)+ a su línea ADSL La mayoría de proveedores de conexiones ADSL requiere un filtro entre la línea telefónica y el CADSLR4(B)+ que evita que la línea ADSL interfiera con los servicios telefónicos habituales. A continuación se describen los dos estilos básicos de filtros: Nota: El CADSLR4(B)+ no incluye un filtro para la conexión ADSL. Para obtener el filtro ADSL adecuado póngase en contacto con su proveedor de teléfono o de Internet. 3.
ESPAÑOL 3.2. Filtro ADSL de 3 puertos (utilizado en la mayoría de conexiones ADSL) Este tipo de filtro se instala en el mismo punto donde el Router conecta con la línea telefónica y tan sólo es necesario un único filtro. A continuación se describe la nomenclatura habitual de los puertos de conexión: Línea - Este puerto se conecta a la toma de la pared. ADSL – Este puerto se conecta al Router. Teléfono – Este puerto se conecta a un teléfono o a otro dispositivo telefónico.
ESPAÑOL 4. Configuración de su ordenador u ordenadores para su uso con el Router y módem El CADSLR4(B)+ está equipado con un servidor DHCP integrado que asignará automáticamente una dirección IP al ordenador conectado en caso de que éste tenga activada la opción “Obtener una dirección IP automáticamente”. Siga las instrucciones siguientes para configurar su ordenador y obtener una dirección IP automáticamente: 1. Haga clic en “Inicio” Æ “Ejecutar”. 2. Acceda al comando “NCPA.CPL”y pulse “Aceptar”.
ESPAÑOL A continuación aparecerá la ventana de Propiedades de la Conexión de Área Local. 4. Seleccione el “Protocolo de Internet (TCP/IP)” y haga clic en “Propiedades”. 4 4 A continuación aparecerá la ventana de Propiedades del Protocolo de Internet (TCP/IP). 5. Active la opción “Obtener una dirección IP automáticamente” y pulse “Aceptar” para guardar la configuración. 6. Pulse “Aceptar” en la ventana de Propiedades de la Conexión de Área Local para guardar la configuración.
ESPAÑOL Mediante la línea de comandos de Windows podrá verificar si ha recibido una dirección IP correcta en su Conexión de Área Local: 7. 8. Haga clic en “Inicio” Æ “Ejecutar”. Introduzca el comando “CMD” y pulse “Aceptar”. A continuación aparecerá la línea de comandos. 9. Introduzca el comando “IPCONFIG” y pulse ENTER. 9 A continuación deberá ver la información siguiente: Dirección IP : 192.168.1.xxx (en la que xxx puede oscilar entre 2 y 254). Máscara de subred : 255.255.255.
ESPAÑOL C C Si los pasos anteriores no resuelven el problema de la dirección IP, puede volver a activar la configuración predeterminada del dispositivo pulsando el Botón de Reinicio que se encuentra en el lateral del aparato. Mantenga pulsado el Botón de Reinicio durante 10 segundos aproximadamente para activar la configuración predeterminada. Cuando el LED LAN se apague y vuelva a encenderse, el CADSLR4(B)+ tendrá activada la configuración predeterminada.
ESPAÑOL 1. Inicie su navegador web (por ejemplo, Internet Explorer, FireFox o Safari). 2 2. Introduzca la dirección IP del CADSLR4(B)+ en la barra de direcciones del navegador web (dirección predeterminada: http://192.168.1.1/). A continuación en la pantalla aparecerá la página de inicio de sesión del CADSLR4(B)+: 3 3 3. Introduzca el Nombre de Usuario y la Contraseña, y haga clic en “Aceptar” para acceder a las páginas de configuración.
ESPAÑOL 1 2 3 6 1. 2. Nota: 7 Seleccione su país en la lista desplegable “País”. Seleccione su proveedor de Internet en la lista desplegable “ISP”. En caso de que su país y/o su proveedor de Internet no figuren en las listas desplegables indicadas, deberá configurar la conexión manualmente. Haga clic en el botón “Config” (7) del apartado “Inicio rápido” y pase al apartado 4.2 para proceder a la configuración manual de la conexión a Internet.
ESPAÑOL 5.1.1 Encapsulación seleccionada: PPPoE (LLC) o PPPoA (LLC o VC-MUX) Si selecciona PPPoE o PPPoA como encapsulación, a continuación verá la pantalla de configuración siguiente: Introduzca el Nombre de Usuario y la Contraseña facilitados por su proveedor de Internet y haga clic en “Aplicar” para guardar la configuración y reiniciar el CADSLR4(B)+.
ESPAÑOL 5.1.2 Encapsulación seleccionada: 1483 Puente LLC (IP estática) Si selecciona 1483 Puente LLC con IP estática como encapsulación, a continuación verá la pantalla de configuración siguiente: Introduzca la información de la IP estática facilitada por su proveedor de Internet (dirección IP, Máscara de subred, Puerta de enlace y DNS) y haga clic en “Aplicar” para guardar la configuración y reiniciar el CADSLR4(B)+.
ESPAÑOL 5.1.3 Encapsulación seleccionada: 1483 Puente LLC, IP dinámica (DHCP) Si selecciona 1483 Puente LLC con IP dinámica como encapsulación, a continuación verá la pantalla de configuración siguiente: Mantenga la configuración actual y haga clic en “Aplicar” para guardar la configuración y reiniciar el CADSLR4(B)+.
ESPAÑOL 5.1.4 Encapsulación seleccionada: 1483 Puente LLC (Puente) Si selecciona 1483 Puente LLC con Conexión de puente como encapsulación, a continuación verá la pantalla de configuración siguiente: Seleccione el Grupo 1 (predeterminado) en el campo Grupo LAN y haga clic en “Aplicar” para guardar la configuración y reiniciar el CADSLR4(B)+. Una vez reiniciado, el CADSLR4(B)+ creará la conexión ADSL. Cuando se haya creado la conexión, el LED ADSL del CADSLR4(B)+ se encenderá.
ESPAÑOL 5.2 Configuración manual de la Conexión a Internet En caso de que su país y/o su proveedor de Internet no figuren en la Configuración de la conexión a través del apartado “Inicio Rápido” del CADSLR4(B)+, deberá configurar la conexión manualmente. Haga clic en el botón “Config” (7) del apartado “Inicio rápido” para acceder a la configuración manual del CADSLR4(B)+. Nota: También puede utilizar la Configuración Manual para modificar opciones de conexión avanzadas.
ESPAÑOL Nota: 8. 9. Las opciones de configuración descritas constituyen las opciones básicas necesarias para su conexión ADSL. Póngase en contacto con su proveedor de Internet para obtener las opciones correctas para su conexión. Si desea obtener información detallada sobre la configuración, acceda al Manual de Usuario (disponible sólo en inglés) del CD-ROM que incluye el producto y seleccione “Abrir el Manual de Usuario” del menú autoejecutable.
ESPAÑOL 3. Habilitación de puertos El CADSLR4(B)+ de Conceptronic está equipado con un Firewall integrado para proteger su red de ataques procedentes de Internet. Este Firewall bloquea automáticamente todo el tráfico de entrada en los puertos que no se están utilizando. Si necesita un puerto bloqueado para un servicio o una aplicación (por ejemplo, un servidor FTP o un servidor WEB), puede crear una Regla de Habilitación de Puertos en las Páginas de Configuración.
ESPAÑOL A continuación verá la página de configuración “Habilitación de puertos”: 6 9 10 7 6. 7. Nota: 8 Seleccione la IP LAN del ordenador que necesite la Regla de Habilitación de Puertos. En caso de que la IP no esté en la lista (por ejemplo, si el dispositivo utiliza una IP estática), puede pulsar el botón “Nueva IP” para añadir la IP al dispositivo. Seleccione la categoría de su Regla de Habilitación de Puertos. Hay diversos puertos predefinidos en la configuración.
DEUTSCH Conceptronic CADSLR4+ / CADSLR4B+ Schnellinstallationsanleitung Wir gratulieren Ihnen zum Kauf Ihres Conceptronic ADSL2+ Routers & Modems. In beiliegender Hardware-Installationsanleitung wird Ihnen Schritt für Schritt gezeigt, wie der/das ADSL2+ Router / Modem von Conceptronic installiert werden muss. Sollten irgendwelche Probleme auftreten, empfehlen wir ihnen, auf unsere Support-Seite im Internet zu gehen (www.conceptronic.net) und auf 'Support’ zu klicken.
DEUTSCH 2. Conceptronic ADSL2+ Router & Modem - Bedienungstasten • Vorderseite 1 2 3 Nr.
DEUTSCH 3. Anschluss des CADSLR4(B)+ an eine ADSL-Leitung Bei den meisten ADSL-Anbietern ist ein Filter zwischen der Telefonleitung und dem CADSLR4(B)+ erforderlich, der die ADSL-Leitung von der normalen Telefonleitung trennt. Es folgt eine Beschreibung der beiden üblichen Filterarten. Hinweis: Der Filter für die ADSL-Verbindung ist nicht im Lieferumfang des CADSLR4(B)+ enthalten. Den korrekten ADSL-Filter erhalten Sie über Ihren Telefon- oder Internetdienstanbieter. 3.
DEUTSCH 3.2 Drei-Port-Filter für ADSL (häufigster Filter für ADSL-Anschlüsse) Der andere Filtertyp wird an der Stelle angebracht, an der der Router mit der Telefonleitung verbunden ist. Es wird nur ein einziger Filter benötigt. Die Anschlüsse sind normalerweise wie folgt gekennzeichnet: Line [Leitung] - Anschluss an die Wandbuchse ADSL - Anschluss an den Router Phone [Telefon]: - Anschluss an das Telefon oder andere Telefongeräte Folgende Abbildung zeigt die richtige Verwendung dieses Filtertyps.
DEUTSCH 4. Computer-Konfiguration für die Verwendung mit dem Router & Modem Der CADSLR4(B)+ ist mit einem eingebauten DHCP-Server ausgerüstet. Der DHCP-Server weist automatisch einem angeschlossenen Computer eine IP-Adresse zu, wenn dieser auf „IP-Adresse automatisch beziehen“ eingestellt ist. Befolgen Sie unten stehende Anweisungen, um Ihren Computer auf „Automatisches IP“ einzustellen: 1. Klicken Sie auf „Start” Æ „Ausführen”. 2. Geben Sie den Befehl „NCPA.CPL” ein und klicken Sie auf „OK”.
DEUTSCH Es erscheint das Fenster ‚Eigenschaften von LAN-Verbindung’. 4. Wählen Sie das „Internetprotokoll TCP/IP“ und klicken Sie auf „Eigenschaften“. 4 4 Es erscheint das Fenster ‚Eigenschaften von Internetprotokoll (TCP/IP)’. 5. Aktivieren Sie das Feld „IPAdresse automatisch beziehen“ und klicken Sie auf „OK“, um die Einstellungen zu speichern. 6. Klicken Sie im Fenster ‚Eigenschaften-von LANVerbindung’ auf „OK“, um die Einstellungen zu speichern.
DEUTSCH Über die Eingabeaufforderung von Windows können Sie überprüfen, ob Sie für Ihre LANVerbindung eine korrekte IP-Adresse erhalten haben: 7. 8. Klicken Sie auf „Start” Æ „Ausführen”. Geben Sie den Befehl „CMD” ein und klicken Sie auf „OK”. Es erscheint die Eingabeaufforderung. 9. Geben Sie den Befehl „IPCONFIG” ein und drücken Sie die „ENTER”-Taste. 9 Es sollten die folgenden Informationen angezeigt werden: IP-Adresse : 192.168.1.xxx (wobei xxx eine Zahl zwischen 2 ~ 254 sein sollte).
DEUTSCH C C Wenn diese Maßnahmen das Problem mit der IP-Adresse nicht lösen, können Sie durch Betätigen der Reset-Taste auf der Rückseite das Gerät auf die Werkseinstellungen zurücksetzen. Drücken Sie die Reset-Taste und halten Sie diese während + / - 10 Sekunden gedrückt, um die Werkseinstellungen zu laden. Wenn die LAN-LED-Anzeige aus- und wieder einschaltet, lädt der CADSLR4(B)+ die Werkseinstellungen. Warten Sie +/- 10 Sekunden und wiederholen Sie Schritt C, um die IP-Adresse zu erneuern. 5.
DEUTSCH 1. Starten Sie Ihren Webbrowser (z.B. Internet Explorer, FireFox oder Safari). 2 2. Geben Sie die IP-Adresse des CADSLR4(B)+ in das Adressfeld Ihres Webbrowsers ein (standardmäßig: http://192.168.1.1/). Es erscheint die Anmeldeseite des CADSLR4(B)+ auf Ihrem Bildschirm: 3 3 3. Geben Sie den Benutzernamen und das Passwort ein und klicken Sie auf „Log In“, um die Konfigurationsseiten zu öffnen.
DEUTSCH 1 2 3 6 7 1. 2. Wählen Sie Ihr Land in der Dropdown-Liste „Country“. Wählen Sie Ihren Internetdienstanbieter in der Dropdown-Liste „ISP“. Hinweis: Wenn Ihr Land und/oder Internetdienstanbieter in den entsprechenden Dropdown-Listen nicht aufgeführt ist, müssen Sie Ihre Verbindung manuell konfigurieren. Klicken Sie auf die Schaltfläche „Config” (7) in „Quick Start” und gehen Sie zu Kapitel 4.2, um die manuelle Konfiguration Ihrer Internetverbindung durchzuführen.
DEUTSCH 5.1.1 Gewählte Kapselung = PPPoE (LLC) oder PPPoA (LLC oder VC-MUX) Wenn PPPoE oder PPPoA als Kapselung gewählt wird, erscheint die folgende Anzeige: Geben Sie den Benutzernamen und das Passwort ein, die Sie von Ihrem Internetdienstanbieter erhalten haben, um die Einstellungen zu speichern und den CADSLR4(B)+ neu zu starten.
DEUTSCH 5.1.2 Gewählte Kapselung = 1483 Bridge LLC – Statisches IP Wenn 1483 Bridge LLD mit statischem IP als Kapselung gewählt wird, erscheint die folgende Anzeige: Geben Sie die Angaben für das statische IP ein, die Sie von Ihrem Internetdienstanbieter erhalten haben (IP-Adresse, Subnetzmaske, Gateway und DNS) und klicken Sie „Apply [Übernehmen]“, um die Einstellungen zu speichern und den CADSLR4(B)+ neu zu starten.
DEUTSCH 5.1.3 Gewählte Kapselung = 1483 Bridge LLC – Dynamisches IP (DHCP) Wenn 1483 Bridge LLD mit dynamischem IP als Kapselung gewählt wird, erscheint die folgende Anzeige: Behalten Sie die gegenwärtigen Einstellungen bei und klicken Sie auf „Apply [Übernehmen]“, um die Einstellungen zu speichern und den CADSLR4(B)+ neu zu starten.
DEUTSCH 5.1.4 Gewählte Kapselung = 1483 Bridge LLC – Bridge Wenn 1483 Bridge LLD mit Bridge-Verbindung als Kapselung gewählt wird, erscheint die folgende Anzeige: Wählen Sie „LAN group 1 (Standard)“ unter ‚Select LAN’ und klicken Sie auf „Apply [Übernehmen]“, um die Einstellungen zu speichern und den CADSLR4(B)+ neu zu starten. Wenn der Neustart abgeschlossen ist, erstellt der CADSLR4(B)+ Ihre ADSL-Verbindung. Sobald die Verbindung hergestellt ist, leuchtet die ADSL-Anzeige am CADSLR4(B)+.
DEUTSCH 5.2 Manuelle Konfiguration der Internetverbindung Wenn Ihr Land und/oder Internetdienstanbieter nicht bei den „Quick Start“Verbindungseinstellungen des CADSLR4(B)+ aufgeführt ist, müssen Sie die Verbindung manuell konfigurieren. Klicken Sie auf dem „Quick Start”-Bildschirm auf die Schaltfläche „Config” (7), um die manuelle Konfiguration für den CADSLR4(B)+ zu öffnen.
DEUTSCH Hinweis: Bei den beschriebenen Einstellungen handelt es sich um die Grundeinstellungen, die Sie für Ihre ADSL-Verbindung benötigen. Fragen Sie bitte Ihren Internetdienstanbieter nach den korrekten Einstellungen für Ihre Verbindung. Detaillierte Erklärungen zu den Einstellungen finden Sie im Benutzerhandbuch auf der CD-ROM (nur auf Englisch). Wählen Sie „Open User Manual [Benutzerhandbuch öffnen]” im Autorun-Menü. 8. 9.
DEUTSCH 6. Portweiterleitung Der Conceptronic CADSLR4(B)+ ist mit einer eingebauten Firewall ausgerüstet, um Angriffe aus dem Internet auf Ihr Netzwerk zu verhindern. Diese Firewall blockiert automatisch allen eingehenden Verkehr auf nicht benutzten Ports. Wenn ein blockierter Port für einen Dienst oder eine Anwendung benötigt wird (zum Beispiel für einen FTPServer oder WEB-Server), können Sie auf den Konfigurationsseiten eine Regel für die Portweiterleitung [Port Forwarding Rule] erstellen.
DEUTSCH Es erscheint die Einstellungsseite „Port Forwarding [Portweiterleitung]“: 6 9 10 7 6. 7. 8 Wählen Sie das LAN IP für den Computer, für den die Portweiterleitungsregel benötigt wird. Wenn das IP nicht auf der Liste aufgeführt ist (zum Beispiel, wenn das Gerät ein statisches IP verwendet) können Sie über die Schaltfläche „New IP [Neues IP]” das IP des Gerätes hinzufügen. Wählen Sie unter ‚Category’ die Kategorie Ihrer Portweiterleitungsregel.
FRANÇAIS CADSLR4+ / CADSLR4B+ de Conceptronic Guide d'installation rapide Nous vous félicitons d'avoir acheté votre Router et Modem ADSL2+ de Conceptronic Vous trouverez dans le Guide d'Installation du Hardware fourni avec le produit une explication détaillée de l'installation du Router et Modem ADSL2+ de Conceptronic. En cas de problèmes, nous vous recommandons de vous adresser à notre service technique (allez à www.conceptronic.net et cliquez sur « support »).
FRANÇAIS 2. Explication du Router et Modem ADSL2+ de Conceptronic • Façade Avant 1 Nº Description État 1 Led d'Alim. 2 LEDS de LAN (1,2,3,4) Allumée Éteinte Allumée Éteinte 3 LED ADSL 2 3 Explication de l’État L'appareil est allumé. L'appareil est éteint.
FRANÇAIS 3. Comment connecter le CADSLR4(B)+ sur votre ligne ADSL La plupart des Fournisseurs ADSL nécessitent un filtre entre votre Ligne Téléphonique et le CADSLR4(B)+ qui empêche la ligne de produire des interférences avec les services téléphoniques traditionnels. Les deux principaux styles de filtres sont décrits ci-après.
FRANÇAIS 3.2 Filtre ADSL à trois ports (Utilisés dans la plupart des cas ADSL) Un autre type de filtre est installé sur le point où le Router est connecté à la ligne téléphonique. Un seul filtre est nécessaire. Les ports de connexion sont généralement intitulés comme suit : • Line - Ce port se connecte à la prise murale. • ADSL - Ce port se connecte au Router. • Phone - Ce port se connecte à un téléphone ou à un autre appareil téléphonique.
FRANÇAIS 4. Configuration de votre(vos) ordinateur(s) pour l’utiliser avec le Routeur et Modem. Le CADSLR4(B)+ est équipé d’un Serveur DHCP intégré. Le Serveur DHCP affectera automatiquement une adresse IP à un ordinateur connecté si l’ordinateur connecté est réglé sur l’option « obtenir automatiquement une adresse IP ». Pour configurer votre ordinateur pour l’adresse IP automatique, procédez comme suit : 1. Cliquez sur « Start » -> « Run ». 2. Entrez la commande « NCPA.CPL » et appuyez sur « OK ».
FRANÇAIS La Fenêtre Propriétés de votre Connexion de Réseau Local s’affiche. 4. Sélectionnez « Internet Protocol (TCP/IP » et cliquez sur « Properties ». 4 4 La fenêtre Properties du Protocol Internet (TCP/IP) apparaît. 5. Réglez les propriétés sur « Obtain an IP address automatically » et appuyez sur «OK » pour enregistrer les paramètres. 6. Appuyez sur « OK » dans la fenêtre de propriétés de la Connexion de Réseau Local pour enregistrer les paramètres.
FRANÇAIS Avec le message de Commande de Windows, vous pouvez vérifier si vous avez reçu une adresse IP correcte sur votre Connexion de Réseau Local : 7. 8. Cliquez sur « Start » -> « Run ». Entrez la commande « CMD » et appuyez sur « OK ». L’Invite suivante apparaît. 9. Entrez la commande « IPCONFIG» et appuyez sur ENTER. 9 Vous verrez s’afficher les informations suivantes Adresse IP : 192.168.1.xxx (Où xxx peut être un nombre entre 2 ~ 254). Masque de Sous-réseau : 255.255.255.
FRANÇAIS C C Si les actions ci-dessus ne suffisent pas à résoudre votre problème d’adresse IP, vous pouvez réinitialiser l’appareil sur les paramètres par défaut avec le Bouton Reset situé sur la façade arrière de l’appareil. Appuyez sur le Bouton Reset pendant +/- 10 secondes pour charger les Paramètres par Défaut. Lorsque les LED de LAN s’éteignent et se rallume, le CADSLR4(B)+ charge les Paramètres par Défaut. Attendez environ 10 secondes et recommencez l’opération C pour renouveler votre adresse IP.
FRANÇAIS 1. Lancez votre navigateur Internet (par ex. : Internet Explorer, FireFox ou Safari). 2 2. Entrez l’adresse IP du CADSLR4(B)+ dans la barre d’adresse de votre navigateur Internet (Par défaut : http://192.168.1.1/). La page Login du CADSLR4(B)+ s’affiche à l’écran : 3 3 3. Entrez le Nom d’utilisateur et le Mot de passe et cliquez sur « Login » pour entrer dans les pages de configuration.
FRANÇAIS 1 2 3 6 7 1. 2. Sélectionnez votre pays dans la liste déroulante « Country ». Sélectionnez votre ISP dans la liste déroulante « ISP ». Remarque : Si votre pays et/ou ISP n’est pas affiché l’une des 2 listes déroulantes vous avez besoin de définir manuellement la connexion. Cliquez sur le bouton "Config" (7) dans l'écran de démarrage rapide "Quick Start" et poursuivez au chapitre 4.2 pour configurer manuellement votre Connexion Internet.
FRANÇAIS 5.1.1 Encapsulation sélectionnée = PPPoE (LLC) ou PPPoA (LLC ou VC-MUX) Lorsque vous sélectionnez PPPoE ou PPPoA comme encapsulation, vous voyez s’afficher l’écran suivant : Indiquez le Nom d’utilisateur et le Mot de passe donnés par votre Fournisseur Internet et appuyez sur « Apply » pour enregistrer les paramètres et réinitialiser le CADSLR4(B)+.
FRANÇAIS 5.1.2 Encapsulation sélectionnée = 1483 Bridge LLC – Static IP Lorsque vous sélectionnez 1483 Bridge LLC avec Static IP comme encapsulation, vous voyez s’afficher l’écran de configuration suivant : Indiquez les informations de Static IP donnés par votre Fournisseur Internet (Adresse IP, Masque de sous-réseau, Passerelle et DNS) et appuyez sur « Apply » pour enregistrer les paramètres et réinitialiser le CADSLR4(B)+.
FRANÇAIS 5.1.3 Encapsulation sélectionnée = 1483 Bridge LLC – Dynamic IP (DHCP) Lorsque vous sélectionnez 1483 Bridge LLC avec Dynamic IP comme encapsulation, vous voyez s’afficher l’écran de configuration suivant : Conservez les paramètres actuels et appuyez sur « Apply » pour enregistrer les paramètres et réinitialiser le CADSLR4(B)+.
FRANÇAIS 5.1.4 Encapsulation sélectionnée = 1483 Bridge LLC – Bridge Lorsque vous sélectionnez 1483 Bridge LLC avec Bridge Connection comme encapsulation, vous voyez s’afficher l’écran de configuration suivant : Indiquez le groupe LAN sur Group 1 (Par défaut) et appuyez sur « Apply » pour enregistrer les paramètres et réinitialiser le CADSLR4(B)+. Lorsque le redémarrage est terminé, le CADSLR4(B)+ crée pour vous la connexion ADSL.
FRANÇAIS 5.2 Configuration manuelle de votre Connexion à Internet Si votre pays et/ou ISP n’est pas affiché dans le Guide de connexion rapide du CADSLR4(B)+, vous avez besoin de définir manuellement la connexion. Cliquez sur le bouton "Config" (7) dans l'écran de démarrage rapide "Quick Start" pour entrer dans la configuration manuelle du CADSLR4(B)+.
FRANÇAIS Remarque : Les paramètres expliqués ici sont les paramètres de base nécessaires pour votre connexion ADSL. Contactez votre Fournisseur d’Accès à Internet pour connaître les paramètres de votre connexion. Pour plus d’explications sur les paramètres, veuillez consulter le Manuel d’Utilisateur (en anglais uniquement) présent sur le Cd-Rom. Sélectionnez « Open User Manual » dans le Menu à Lancement Automatique. 8. 9.
FRANÇAIS 6. Port Forwarding Le Conceptronic CADSLR4(B)+ est équipé d’un Pare-feu intégré pour empêcher les attaques d’Internet dans votre réseau. Ce Pare-feu bloque automatiquement tout le trafic entrant de ports non utilisés. Lorsqu’un port bloqué est nécessaire pour un service ou pour une application (par exemple : un Serveur FTP ou un Serveur WEB), vous pouvez créer une Règle Port Forwarding Virtuel dans les Pages de Configuration.
FRANÇAIS Vous verrez s’afficher la page de Configuration de « Port Forwarding" suivante : 6 9 10 7 6. 7. 8 Sélectionnez l’IP de LAN de votre ordinateur qui a besoin d’une Règle Port Forwarding. Si l’IP n’est pas dans la liste (par exemple : si le dispositif utilise un IP Statique), vous pouvez utiliser le bouton « New IP » pour ajouter l’IP du dispositif. Sélectionnez la Catégorie de votre Règle de Port Forwarding. Remarque : Plusieurs ports sont prédéfinis dans la configuration.
ITALIANO Conceptronic CADSLR4+ / CADSLR4B+ Guida d’installazione rapida Vi ringraziamo per aver acquistato il Router e Modem Wireless ADSL2+ di Conceptronic. La presente Guida per l’installazione dell’hardware spiega passo a passo come installare il Router e Modem Wireless ADSL2+ di Conceptronic. Se dovessero esserci dei problemi, vi consigliamo di visitare il nostro sito di supporto (andate su www.conceptronic.
ITALIANO 2. Spiegazione del Router e Modem ADSL2+ • Pannello frontale 1 2 3 N.
ITALIANO 3. Come collegare il CADSLR4(B)+ alla linea ADSL La maggior parte dei provider ADSL hanno bisogno di un filtro fra la linea telefonica e il CADSLR4(B)+ affinché la linea ADSL non interferisca con i servizi telefonici normali. I due tipi di filtri più comuni sono quelli descritti qui di seguito. Nota: Nella confezione del CADSLR4(B)+ non viene accluso nessun filtro per la connessione ADSL.
ITALIANO 3.2 Filtro ADSL a tre porte (usato nella maggior parte delle connessioni ADSL) Un altro tipo di filtro viene installato nello stesso punto in cui il router si collega alla linea telefonica. È necessario un unico filtro. Le porte di connessione appaiono di solito con le seguenti etichette: • Line - È la porta per la connessione alla presa a muro. • ADSL – È la porta per la connessione al router. • Phone – È la porta per la connessione a un telefono o a un altro dispositivo telefonico.
ITALIANO 4. Come configurare il/i computer per usarlo/i con il Router e Modem Il CADSLR4(B)+ è dotato di un server DHCP incorporato, il quale assegna automaticamente un indirizzo IP al computer connesso, nel caso in cui quest’ultimo sia impostato sull’opzione “Ottieni automaticamente un indirizzo IP”. Per configurare il computer in modo tale da ottenere automaticamente l’indirizzo IP, attenersi alle seguenti istruzioni: 1. Fare clic su “Start” Æ “Esegui”. 2. Introdurre il comando “NCPA.
ITALIANO Apparirà la schermata delle Proprietà della Connessione alla rete locale. 4. Selezionare il “Protocollo Internet (TCP/IP)” e fare clic su “Proprietà”. 4 4 Apparirà la schermata delle Proprietà del Protocollo Internet (TCP/IP). 5. Impostare le Proprietà su “Ottieni automaticamente un indirizzo IP” e premere “OK” per salvare le modifiche. 6. Premere “OK” nella schermata delle Proprietà della Connessione alla rete locale per salvare le modifiche.
ITALIANO Con il prompt di comandi di Windows è possibile verificare se è stato ottenuto un indirizzo IP corretto per la connessione di rete locale: 7. 8. Fare clic su “Start” Æ “Esegui”. Introdurre il comando “CMD” e premere “OK”. Apparirà il prompt di comandi. 9. Introdurre il comando “IPCONFIG” e premere INTRO. 9 Dovrebbero apparire le Indirizzo IP Maschera di sottorete Gateway di default seguenti informazioni : 192.168.1.xxx (dove xxx può variare fra 2 ~ 254). : 255.255.255.0 : 192.168.1.
ITALIANO C C Nel caso in cui i passi suddetti non servano per risolvere il problema di indirizzo IP, è possibile riportare il dispositivo ai parametri di default con il pulsante di Reset posto sul pannello posteriore. Mantenere premuto il pulsante Reset per dieci secondi circa per riattivare i parametri di default. Quando il LED LAN si psegnerà e si riaccenderà, il CADSLR4(B)+ tornerà sui parametri di default. Attendere più o meno dicei secondi e ripetere il passo C per rinnovare l’indirizzo IP. 5.
ITALIANO 1. Aprire il web browser (ad esempio: Internet Explorer, FireFox o Safari). 2 2. Introdurre l’indirizzo IP del CADSLR4(B)+ nella barra degli indirizzi del web browser (per default: http://192.168.1.1/). Apparirà una finestra di login del CADSLR4(B)+ sullo schermo: 3 3 3. Introdurre il nome utente e la password dopo di che fare clic su “Login” per accedere alle pagine di configurazione.
ITALIANO 1 2 3 6 7 1. 2. Nota: 3. 4. 5. Selezionare il paese nell’elenco a discesa “Country”. Selezionare l’Internet Provider nell’elenco a discesa “ISP”. Nel caso in cui il paese o l’Internet Provider non appaiano in un dei due suddetti elenchi a discesa, sarà necessario configurare manualmente la connessione. Fare clic sul pulsante “Config” button (7) in “Quick Start” e procedere al capitolo 4.2 per la configurazione manuale della connessione a Internet.
ITALIANO 5.1.1 Incapsulamento prescelto = PPPoE (LLC) o PPPoA (LLC or VC-MUX) Quando viene selezionata l’opzione PPPoE o PPPoA come incapsulamento, apparirà la seguente videata di configurazione: Introdurre il Nome utente e la Password forniti dall’Internet Provider e premere “Apply” per salvare la configurazione e riavviare il CADSLR4(B)+.
ITALIANO 5.1.2 Incapsulamento prescelto = 1483 Bridge LLC – IP statico Quando viene selezionata l’opzione 1483 Bridge LLC con IP statico come incapsulamento, apparirà la seguente videata di configurazione: Introdurre le informazioni relative all’indirizzo IP statico fornite dall’Internet Provider (indirizzo IP, maschera di sottorete, gateway e DNS) e premere “Apply” per salvare la configurazione e riavviare il CADSLR4(B)+.
ITALIANO 5.1.3 Incapsulamento prescelto = 1483 Bridge LLC – IP dinamico (DHCP) Quando viene selezionata l’opzione 1483 Bridge LLC con IP dinamico come incapsulamento, apparirà la seguente videata di configurazione: Mantenere la configurazione attuale e premere “Apply” per salvare la configurazione e riavviare il CADSLR4(B)+.
ITALIANO 5.1.4 Incapsulamento prescelto = 1483 Bridge LLC – Bridge Quando viene selezionata l’opzione 1483 Bridge LLC con connessione Bridge come incapsulamento, apparirà la seguente videata di configurazione: Impostare il Gruppo LAN su Group 1 (default) e premere “Apply” per salvare la configurazione e riavviare il CADSLR4(B)+. Una volta terminato il processo di riavvio, il CADSLR4(B)+ creerà la connessione ADSL. Una volta realizzata la connessione, la spia dell’ADSL del CADSLR4(B)+ si accenderà.
ITALIANO 5.2 Come configurare manualmente la connessione a Internet Connection Nel caso in cui il Paese o l’Internet Provider non appaiano nella Configurazione per la connessione “Quick Start” del CADSLR4(B)+ sarà necessario definire la connessione manualmente. Fare clic sul pulsante “Config” (7) della videata “Quick Start” per accere alla configurazione manuale del CADSLR4(B)+.
ITALIANO 7. Nota: 8. 9. Impostare il valore VCI corretto della connessione ADSL. la configurazione spiegata è solo quella di base, necessaria per la configurazione ADSL. Rivolgetevi all’Internet Provider per ottenere i parametri di configurazione corretti per la connessione. Per maggiori informazioni sulla consultare il Manuale utente (solo in inglese!) contenuto nel CD-ROM accluso. Selezionare “Open User Manual” (Apri Manuale Utente) dal Menu di avvio automatico.
ITALIANO 6. Reindirizzamento Il CADSLR4(B)+ Conceptronic Il C54APRA2+/C54APRB2+ Conceptronic è dotato di un firewall incorporato per evitare attacchi provenienti da Internet contro la rete in uso. Il firewall blocca automaticamente tutto il traffico in entrata nelle porte non usate. Quando è necessaria una porta bloccata per un servizio o un’applicazione (ad esempio un server FTP o un server WEB) è possibile creare una Regola per Server Virtuale nelle Pagine di configurazione.
ITALIANO Apparirà la pagina di configurazione di “Port Forwarding” (Reindirizzamento): 6 9 10 7 6. 7. Nota: 8 Selezionare l’indirizzo della LAN del computer che ha bisogno della regola di reindirizzamento. Se l’indirizzo IP non appare nell’elenco (se ad esempio il dispositivo usa un indirizzo IP statico) è possibile usare il pulsante “New IP” per aggiungere l’IP del dispositivo. Selezionare la Categoria della regola di reindirizzamento. Esistono diverse regole predefinite nella configurazione.
PORTUGUÊS Conceptronic CADSLR4+ / CADSLR4B+ Manual de Instalação Rápida Parabéns pela compra dos seus Router e Modem ADSL2+ da Conceptronic. O Manual de Instalação Rápida incluído fornece-lhe uma explicação passo a passo sobre como instalar o Router e Modem ADSL2+ da Conceptronic. Se tiver algum problema, aconselhamos consultar o nosso site de assistência (vá a www.conceptronic.net e clique em ‘assistência’ Aqui pode encontrar a Base de Dados das Perguntas Mais Frequentes.
PORTUGUÊS 2.
PORTUGUÊS 3. Ligar o CADSLR4(B)+ à sua linha ADSL A maioria dos fornecedores de ADSL precisa de um filtro entre a sua Linha Telefónica e o CADSLR4(B)+ para impedir que a linha ADSL interfira com os serviços normais de telefone. Os dois tipos básicos de filtros são descritos a seguir. Nota: O CADSLR4(B)+ não é entregue com um filtro para a ligação ADSL. Por favor, contacte o seu Fornecedor de Serviços Telefónicos ou de Internet para obter o Filtro ADSL correcto. 3.
PORTUGUÊS 3.2 Filtro ADSL de Três Portas (usado na maioria das situações de ADSL) Outro tipo de filtro é instalado no mesmo ponto em que o Router se liga à linha do telefone. Só é necessário um filtro. As portas de ligação estão normalmente marcadas da seguinte forma: • Line - Esta porta liga-se à tomada de parede. • ADSL - Esta porta liga-se ao Router. • Phone - Esta porta liga-se a um telefone ou a outro dispositivo telefónico. A figura seguinte ilustra a utilização adequada deste tipo de filtro.
PORTUGUÊS 4. Configuração do/s seu/s computador/es para usar o Router e Modem O CADSLR4(B)+ está equipado com um servidor DHCP incorporado. O Servidor DHCP atribui automaticamente um IP a um computador ligado se esse computador estiver configurado para “obtain an IP address automatically” (obter um endereço IP automaticamente). Para configurar o seu computador para IP Automático siga as instruções seguintes: 1. Clique em “Start” (Iniciar) Æ “Run” (Executar). 2. Introduza o comando “NCPA.
PORTUGUÊS A janela das Propriedades da sua Ligação de Área Local aparece. 4. Seleccione “Internet Protocol (TCP/IP)” (Protocolo de Internet (TCP/IP)) e clique em “Properties” (Propriedades). 4 4 A janela de Propriedades do Protocolo de Internet (TCP/IP) aparece. 5. 6. Configure as propriedades para “Obtain an IP address automatically” (Obter um endereço IP automaticamente) e carregue em “OK” para guardar as configurações.
PORTUGUÊS Com a Linha de Comandos do Windows pode verificar se recebeu um endereço IP correcto na sua Ligação de Área Local: 7. 8. Clique em “Start” (Iniciar) Æ “Run” (Executar). Introduza o comando “CMD” e carregue em “OK”. A Linha de Comandos aparece. 9. Introduza o comando “IPCONFIG” e carregue em “ENTER”. 9 Deverá ver a seguinte informação: IP Address : 192.168.1.xxx (em que xxx pode variar entre 2 ~ 254). Subnet Mask : 255.255.255.0 Default Gateway : 192.168.1.
PORTUGUÊS C C Se os passos anteriores não resolverem o problema do endereço IP, pode repor as configurações predefinidas de fábrica no aparelho com o Botão Reset do painel traseiro. Pressione e segure o Botão Reset durante +/- 10 segundos para repor as Configurações Predefinidas de Fábrica. Quando a Luz LAN apagar e ligar outra vez, o CADSLR4(B)+ volta a carregar as Configurações Predefinidas de Fábrica. Aguarde +/- 10 segundos e repita o passo C para renovar o endereço IP. 5.
PORTUGUÊS 1. Inicie o seu navegador (como por exemplo: Internet Explorer, FireFox ou Safari). 2 2. Introduza o endereço IP do CADSLR4(B)+ na barra de endereços do seu navegador (por defeito: http://192.168.1.1/). A página de início de sessão do CADSLR4(B)+ aparece no seu ecrã: 3 3 3. Introduza o Nome de Utilizador e a Palavra-passe e clique em “Login” para entrar nas páginas de configuração.
PORTUGUÊS 1 2 3 6 1. 2. Nota: 7 Seleccione o seu país na lista desdobrável “Country” (País). Seleccione o seu ISP na lista desdobrável “ISP”. Se o seu país e/ou ISP não aparecer numa das 2 lista desdobráveis anteriores, tem de configurar manualmente a sua ligação. Clique no botão “Config” (7) na “Quick Start” (Iniciação Rápida) e prossiga para o capítulo 4.2 sobre a configuração manual da sua Ligação à Internet.
PORTUGUÊS 5.1.1 Encapsulamento escolhido = PPPoE (LLC) ou PPPoA (LLC ou VC-MUX) Quando escolher PPPoE ou PPPoA como encapsulamento, vai ver o seguinte ecrã de configuração: Introduza o Nome de Utilizador e a Palavra-passe fornecidos pelo seu Fornecedor de Serviços de Internet e carregue em “Apply” (Aplicar) para guardar as definições e reiniciar o CADSLR4(B)+.
PORTUGUÊS 5.1.2 Encapsulamento escolhido = 1483 Bridge LLC – IP Fixo Quando escolher 1483 Bridge LLC com IP Fixo como encapsulamento, vai ver o seguinte ecrã de configuração: Introduza a informação do IP Fixo recebida do seu Fornecedor de Serviços de Internet (Endereço IP, Subnet Mask, Gateway e DNS) e carregue em “Apply” (Aplicar) para guardar as definições e reiniciar o CADSLR4(B)+.
PORTUGUÊS 5.1.3 Encapsulamento escolhido = 1483 Bridge LLC – IP Dinâmico (DHCP) Quando escolher 1483 Bridge LLC com IP Dinâmico como encapsulamento, vai ver o seguinte ecrã de configuração: Mantenha as configurações actuais e carregue em “Apply” (Aplicar) para guardar as definições e reiniciar o CADSLR4(B)+.
PORTUGUÊS 5.1.4 Encapsulamento escolhido = 1483 Bridge LLC – Bridge Quando escolher 1483 Bridge LLC com Ligação Bridge como encapsulamento, vai ver o seguinte ecrã de configuração: Defina o grupo LAN como Grupo 1 (Predefinido) e carregue em “Apply” (Aplicar) para guardar as definições e reiniciar o CADSLR4(B)+. Depois de reiniciar, o CADSLR4(B)+ vai-lhe criar a ligação ADSL. Quando a ligação estiver estabelecida, a luz do ADSL no CADSLR4(B)+ acende.
PORTUGUÊS 5.2 Configuração manual das suas Configurações de Ligação Se o seu País e/ou ISP não aparecer na Configuração de Ligação “Quick Start” (Iniciação Rápida) do CADSLR4(B)+ tem de configurar a ligação manualmente. Clique no botão “Config” (7) no ecrã de “Quick Start” (Iniciação Rápida) para introduzir a configuração manual do CADSLR4(B)+.
PORTUGUÊS Nota: 8. 9. As configurações explicadas são as configurações básicas necessárias para a sua ligação ADSL. Por favor, contacte o seu Fornecedor de Serviços de Internet para obter as configurações correctas para a sua ligação. Para mais informações sobre as configurações, consulte o Manual do Utilizador (apenas em Inglês!) no CD-ROM. Seleccione “Open User Manual” (Abrir Manual do Utilizador) no menu de Execução Automática.
PORTUGUÊS 6. Reencaminhamento de Portas O CADSLR4(B)+ da Conceptronic está equipado com um Firewall incorporado para impedir ataques da Internet à sua rede. Este Firewall bloqueia automaticamente todo o tráfico de entrada nas portas não usadas. Quando uma porta bloqueada é necessária para um serviço ou aplicação (por exemplo: um Servidor FTP ou um Servidor WEB) pode criar uma Regra de Reencaminhamento de Porta nas Páginas de Configuração.
PORTUGUÊS Vai ver a página de configuração “Port Forwarding” (Reencaminhamento de Portas): 6 9 10 7 6. 7. Nota: 8 Seleccione o IP LAN para o computador que precisa da Regra de Reencaminhamento de Portas. Se o IP não estiver na lista (por exemplo: se o dispositivo usar um IP Fixo) pode usar o botão “New IP” (Novo IP) para adicionar o IP do dispositivo. Seleccione a Categoria para a Regra de Reencaminhamento de Portas. Existem várias portas predefinidas na configuração.
MAGYAR Conceptronic CADSLR4+ / CADSLR4B+ Gyorstelepítési útmutató Köszönjük, hogy a Conceptronic ADSL2+ útválasztót és modemet választotta. A mellékelt hardvertelepítési útmutató lépésről-lépésre elmagyarázza, miként kell a Conceptronic ADSL2+ útválasztót és modemet telepítenie. Probléma esetén javasoljuk, hogy vegye igénybe a Support-site-en nyújtott segítséget(menjen a www.conceptronic.net-re és kattintson a ‘Support’-ra, ahol megtalálja a Gyakran Ismételt Kérdések adatbázist.
MAGYAR 2. Az ADSL2+ útválasztó és modem ismertetése • Előlap 1 2 3 Sz.
MAGYAR 3. A CADSLR4(B)+ csatlakoztatása ADSL vonalhoz A legtöbb ADSL-szolgáltató olyan szűrőről gondoskodik a telefonvonal és az CADSLR4(B)+ között, amely megakadályozza, hogy az ADSL-vonal a normális telefonszolgáltatást megzavarja. A szűrők két alapvető típusát az alábbiakban ismertetjük. Note: A CADSLR4(B)+-hoz nem mellékelünk az ADSL-csatlakozáshoz szükséges szűrőt. A megfelelő ADSL-szűrővel kapcsolatban lépjen érintkezésbe telefonos vagy internetes szolgáltatójával. 3.
MAGYAR 3.2 Háromportos ADSL szűrő (a legtöbb ADSL esetében ilyet használnak) Másmilyen szűrő telepítésére kerül sor ugyanazon a helyen, ahol az útválasztó a telefonvonalhoz csatlakozik. Csupán egy szűrőre van szükség. A csatlakoztatásra szolgáló portok címkézése általában az alábbi: • Line - Ez a port csatlakozik a fali dugaszhüvelyhez. • ADSL – Ez a port csatlakozik az útválasztóhoz. • Phone – Ez a port telefonhoz vagy más telefonos eszközhöz csatlakozik.
MAGYAR 4. A számítógép(ek) konfigurálása útválasztóval és modemmel történő alkalmazásra A CADSLR4(B)+ beépített DHCP-szerverrel egészül ki. A DHCP-szerver automatikusan IPcímet rendel hozzá a csatlakoztatott számítógéphez, amennyiben annak beállítása a következő: „obtain an IP address automatically”. A számítógépnek automatikus IP-hez történő konfigurálásakor kövesse az alábbi utasításokat: 1. Kattintson a következőkre: „Start” Æ „Run”. 2. Írja be a „NCPA.CPL” parancsot, majd nyomja le az „OK”-t.
MAGYAR A helyi hálózati kapcsolat tulajdonságainak ablaka jelenik meg. 4. Jelölje ki az „Internet Protocol (TCP/IP”-t, majd kattintson a „Properties”-re. 4 4 Az internetprotokoll (TCP/IP) tulajdonságainak ablaka jelenik meg. 5. Állítsa be a tulajdonságokat az „Obtain an IP address automatically”-re, majd a beállítások elmentéséhez nyomja le az „OK”-t. 6. A beállítások elmentéséhez nyomja le az „OK”-t a helyi kapcsolat tulajdonságainak ablakában.
MAGYAR A Windows parancssora segítségével ellenőrizheti, vajon megfelelő IP-címet kapott-e a helyi kapcsolat vonatkozásában: 7. 8. Kattintson a következőkre: „Start” Æ „Run”. Írja be a „CMD” parancsot, majd nyomja le az „OK”-t. Ezután megjelenik a parancssor. 9. Írja be a „IPCONFIG” parancsot, majd nyomja le az ENTER-t. 9 A következőket fogja látni: IP Address (IP-cím) : 192.168.1.xxx (ahol az xxx 2 ~ 254 között változhat). Subnet Mask (alhálózati maszk) : 255.255.255.
MAGYAR C C Ha a fenti lépések nem oldják meg az IP-címmel kapcsolatos problémát, az eszközt a jobb oldalán lévő Reset gomb segítségével lehet a gyári alapértelmezett értékekre visszaállítani. A gyári alapértékek betöltéséhez nyomja le és tartsa lenyomva a Reset gombot +/- 10 másodpercig. Amikor a LAN-LED kialszik, majd megint kigyullad, a CADSLR4(B)+ újra a gyári alapértékek szerinti beállításokat tölti be. Várjon +/- 10 másodpercig, majd ismételje meg a C lépést az IP-cím megújításához. 5.
MAGYAR 1. Indítsa el webböngészőjét (például Internet Explorer, FireFox vagy Safari). 2 2. Írja be az eszköz IP-címét a webböngésző címsorába (alapértelmezett: http://192.168.1.1/). A képernyőn a CADSLR4(B)+ bejelentkezési oldala jelenik meg: 3 3 3. Írja be a felhasználónevet és a jelszót, majd — hogy a konfigurációs oldalakhoz eljuthasson — kattintson a „Login”-re.
MAGYAR 1 2 3 6 7 1. 2. Jelölje ki az országot a „Country” legördülő listaablakban. Jelölje ki az ISP-t az „ISP” a legördülő listaablakban. Megjegyzés: Ha az adott ország és/vagy ISP nem jelenik meg a fenti két legördülő lista egyikén sem, kézzel kell konfigurálnia a kapcsolatot. Kattintson a „Config” gombra (7) a „Quick Start”-nál, majd menjen a 4.2. fejezethez az internetkapcsolat kézzel történő konfigurálásával kapcsolatban.
MAGYAR 5.1.1 Választott beágyazás = PPPoE (LLC) vagy PPPoA (LLC vagy VC-MUX) Ha beágyazásként PPPoE-t vagyr PPPoA-t választ, a következő konfigurációs képernyő jelenik meg: Írja be az internetszolgáltató által közölt felhasználónevet és jelszót, majd nyomja le az “Apply”-t, ha a beállításokat el akarja menteni, valamint a CADSLR4(B)+-t újra kívánja indítani.
MAGYAR 5.1.2 Választott beágyazás = 1483 Bridge LLC – statikus IP Ha beágyazásként a 1483 Bridge LLC-t választja, amelynek statikus az IP-je, az alábbi konfigurációs képernyő jelenik meg: Írja be a statikus IP-re vonatkozó, az internetszolgáltatótól kapott adatokat (IPcím, alhálózati maszk, átjáró és DNS), majd nyomja le az „Apply”-t, ha a beállításokat el akarja menteni, egyszersmind a CADSLR4(B)+-t újra kívánja indítani.
MAGYAR 5.1.3 Választott beágyazás = 1483 Bridge LLC – dinamikus IP (DHCP) Ha beágyazásként a dinamikus IP-jű, 1483-as Bridge LLC-t választja, akkor a következő konfigurációs képernyő jelenik meg: Tartsa meg az aktuális beállításokat és nyomja le az „Apply”-t, ha a beállításokat el akarja menteni, egyszersmind a CADSLR4(B)+-t újra kívánja indítani.
MAGYAR 5.1.4 Választott beágyazás = 1483 Bridge LLC – híd Ha beágyazásként a hídkapcsolású, 1483-as Bridge LLC-t választja, a következő konfigurációs képernyő jelenik meg: Állítsa be a LAN-csoportot 1. csoportra (ez az alapértelmezett), majd nyomja le az „Apply”-t, ha az alapbeállításokat el akarja menteni és a CADSLR4(B)+-t újra kívánja indítani. Amikor az újraindítás befejeződött, a CADSLR4(B)+ kialakítja az ADSL-csatlakozást. Amikor a kapcsolat létrejött, a CADSLR4(B)+-on az ADSL-jelzőfény kigyullad.
MAGYAR 5.2 Az internetkapcsolat konfigurációjának kézi telepítése Ha az adott ország és/vagy ISP nem jelenik meg a CADSLR4(B)+ „Quick Start” elnevezésű kapcsolattelepítése során, akkor kézzel kell a kapcsolatot definiálnia. Kattintson a „Quick Start” képernyőn a „Config”gombra (7), hogy a CADSLR4(B)+ kézi konfigurációjába beléphessen.
MAGYAR 7. Állítsa be az ADSL-kapcsolat szempontjából a megfelelő VCI-értéket. Megjegyzés: Az elmagyarázott beállítások az ADSL-kapcsolathoz szükséges alapbeállítások. A kapcsolat megfelelő beállításait illetően forduljon internetszolgáltatójához. A beállításokkal kapcsolatos részletes adatokat illetően lásd a CD-ROM-on található felhasználói kézikönyvet (csak angolul!). Jelölje ki az „Open User Manual”-t az Autorun menün. 8. 9.
MAGYAR 6. Port továbbítása A Conceptronic CADSLR4(B)+ beépített tűzfallal egészül ki, amelynek célja az internetről a hálózatra irányuló támadások megakadályozása. Ez a tűzfal automatikusan blokkol minden bejövő forgalmat az éppen nem használt portokon. Ha egy szolgáltatáshoz vagy alkalmazáshoz (például: FTP-szerver vagy WEB-szerver) blokkolt portra van szükség, a konfigurációs oldalakon elő is állíthat egy port-továbbítási szabályt.
MAGYAR Az alábbi „Port Forwarding” telepítési oldal jelenik meg: 6 9 10 7 6. 7. 8 Jelölje ki a port-továbbítási szabályt igénylő számítógéphez a LAN IP-t. Ha az IP a listán nem szerepel (például, ha az eszköz statikus IP-t használ), az eszköz IP-jének hozzáadására használhatja a „New IP” gombot. Jelöljön ki kategóriát az adott port-továbbítási szabályhoz. Megjegyzés: A konfigurációhoz több, előre definiált port is tartozik.
Declaration of CE Conformity The manufacturer Address Conceptronic Databankweg 7 3821 AL Amersfoort, the Netherlands Hereby declares that the product Type ADSL2+ ROUTER / MODEM ANNEX A & ANNEX B Product CADSLR4+ & CADSLR4B+ Complies with following directives: • 1995/5/EEC R&TTE directive: Telecommunications Terminal Equipment and Satellite Earth Station Equipment • 89/336/EECEMC directive: Electromagnetic Compatibility • 73/23/EEC Low Voltage Directive: Electrical equipment designed for use within
Licensing Information This Conceptronic product CADSLR4+ / CADSLR4B+ includes copyrighted third-party software licensed under the terms of the GNU General Public License. Please see The GNU General Public License for the exact terms and conditions of this license. Specially, the following parts of this product are subject to the GNU GPL: Linux Kernel 2.4.17 Busybox 0.61pre ARP 1.60 Dproxy 1.0 Cfgmgr 0.9 udhcp 0.9.7 br2684ctl 0.1 dhcp-fwd 0.4 IPtables 1.2.6a mini_httpd 1.19 MTD 20020722 SquashFS 2.4.
Licensing Information GNU GENERAL PUBLIC LICENSE Version 2, June 1991 Copyright (C) 1989, 1991 Free Software Foundation, Inc. Temple Place, Suite 330, Boston, MA 02111-1307 USA Everyone is permitted to copy and distribute verbatim copies of this license document, but changing it is not allowed. Preamble The licenses for most software are designed to take away your freedom to share and change it.
Licensing Information 1. You may copy and distribute verbatim copies of the Program's source code as you receive it, in any medium, provided that you conspicuously and appropriately publish on each copy an appropriate copyright notice and disclaimer of warranty; keep intact all the notices that refer to this License and to the absence of any warranty; and give any other recipients of the Program a copy of this License along with the Program.
Licensing Information The source code for a work means the preferred form of the work for making modifications to it. For an executable work, complete source code means all the source code for all modules it contains, plus any associated interface definition files, plus the scripts used to control compilation and installation of the executable.
Licensing Information Each version is given a distinguishing version number. If the Program specifies a version number of this License which applies to it and "any later version", you have the option of following the terms and conditions either of that version or of any later version published by the Free Software Foundation. If the Program does not specify a version number of this License, you may choose any version ever published by the Free Software Foundation. 10.