NEDERLANDS Conceptronic CLLRCMCE Gebruikershandleiding Gefeliciteerd met de aanschaf van uw Conceptronic Windows Media Center afstandsbediening. In deze handleiding wordt uitgelegd hoe u de Conceptronic Windows Media Center afstandsbediening kunt installeren en gebruiken. In geval van problemen adviseren wij u onze support-site te bezoeken (ga naar: www.conceptronic.net en klik op ‘Support’). Hier vindt u een database met veelgestelde vragen waar u waarschijnlijk de oplossing voor uw probleem kunt vinden.
NEDERLANDS 2.
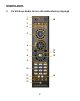
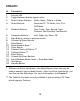
NEDERLANDS Nr Beschrijving 1 2 Activiteits-LED Wissel tussen de beschikbare display mogelijkheden 3 Directe knoppen naar: Radio, Muziek, Foto’s of Video 4 Directe knoppen naar: Opgenomen TV, Tv-gids, Live TV of DVD Menu 5 Afspeelknoppen: 6 Navigatieknoppen: Links, Rechts, Omhoog, Omlaag, OK 7 8 9 10 11 12 13 14 15 16 17 18 Back knop, terug naar het vorige scherm Volume Verhogen/Verlagen Mute knop Alfanumerieke knoppen * Clear knop Teletekst sneltoets knoppen ** Teletekst knoppen ** Enter knop
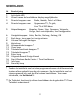
NEDERLANDS 3. Installatie van de afstandsbediening A. B. Plaats de 2 meegeleverde AAA batterijen in de afstandsbediening. Plaats de USB ontvanger in een vrije USB poort van uw computer. De computer zal de USB ontvanger automatisch detecteren en installeren. De USB ontvanger en de afstandsbediening zijn standaard met elkaar gekoppeld. U kunt, na de installatie van de USB ontvanger, direct gebruik maken van de afstandsbediening. 4.
NEDERLANDS 5. Stuurprogramma installatie voor Alfanumerieke toetsen Wanneer de USB ontvanger is gedetecteerd en geïnstalleerd kunt u de afstandsbediening direct in Windows Media Center gebruiken. Wanneer u alleen het standaard Windows stuurprogramma gebruikt, zullen de Alfanumerieke toetsen slechts als numerieke toetsen werken.
NEDERLANDS C. Klik op “Next” om door te gaan. D. Klik op “Install” om het stuurprogramma op uw computer te installeren. E. Als de Setup Wizard gereed is met de installatie kunt u op “Finish” klikken om de Setup Wizard te sluiten. Na de installatie van het stuurprogramma kunt u de Alfa functies van de Alfanumerieke toetsen gebruiken.
Declaration of CE Conformity The manufacturer Address 2L International BV Databankweg 7 3821 AL Amersfoort, the Netherlands Hereby declares that the product Type Wireless Media Center Remote Control Product CLLRCMCE Complies with following directives: 1999/5/EEC R&TTE directive: Telecommunications Terminal Equipment and Satellite Earth Station Equipment 2004/108/EEC EMC directive: Electromagnetic Compatibility 73/23/EEC Low Voltage Directive: Electrical equipment designed for use within certain volt
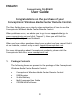
ENGLISH Conceptronic CLLRCMCE User Guide Congratulations on the purchase of your Conceptronic Windows Media Center Remote Control. The User Guide gives you a step-by-step explanation of how to use the Conceptronic Windows Media Center Remote Control. When problems occur, we advise you to go to our support-site (go to www.conceptronic.net and click ‘Support’). Here you will find the Frequently Asked Questions Database.
ENGLISH 2.
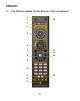
ENGLISH Nr Description 1 2 Activity LED Toggle between display aspect ratios 3 Direct Library Buttons: Radio, Music, Picture or Video 4 Direct Buttons: Recorded TV, TV Guide, Live TV or DVD Menu 5 Playback Buttons: Play, Pause, Stop, Record, Next, Previous, Fast Forward, Fast Rewind 6 Navigation Buttons: Left, Right, Up, Down, OK 7 8 9 10 11 12 13 14 15 16 17 18 Back Button, return to previous screen Volume Up/Down Buttons Mute Button Alpha-Numeric Keys * Clear Button Teletext Shortcut Butt
ENGLISH 3. Remote Control Installation A. B. Insert the 2 included AAA batteries in the Remote Control. Insert the USB Receiver in a free USB port of your computer. The computer will recognize and install the USB Receiver automatically. The USB Receiver and the Remote Control are paired by default. After the installation of the USB Receiver, you can start using the Remote Control. 4.
ENGLISH 5. Alpha-Numeric Driver Installation When the USB Receiver is recognized and installed, the Media Center Remote Control is ready to use. When only the default Windows Driver is used, the Alpha-Numeric Keys will only work as numeric keys (Example: When you press 3 times ‘5’, you will get the numbers ‘555’) To make use of the Alpha functions of the Alpha-Numeric Keys, you need to install the Alpha-Numeric Driver from the included CD-ROM. A. Insert the CD-ROM in your CD-ROM Drive.
ENGLISH C. Click “Next” to continue. D. Click “Install” to install the Alpha-Numeric Driver on your computer. E. When the Setup Wizard is completed, click “Finish” to exit the Setup Wizard. After the installation of the Alpha-Numeric Driver, you can use the Alpha functions of the Alpha-Numeric Keys.
Declaration of CE Conformity The manufacturer Address 2L International BV Databankweg 7 3821 AL Amersfoort, the Netherlands Hereby declares that the product Type Wireless Media Center Remote Control Product CLLRCMCE Complies with following directives: 1999/5/EEC R&TTE directive: Telecommunications Terminal Equipment and Satellite Earth Station Equipment 2004/108/EEC EMC directive: Electromagnetic Compatibility 73/23/EEC Low Voltage Directive: Electrical equipment designed for use within certain volt
ESPAÑOL CLLRCMCE de Conceptronic Guía de usuario Felicidades por la compra de su Mando a distancia para Windows Media Center de Conceptronic Esta Guía de usuario le ofrece una descripción paso a paso acerca de cómo utilizar el Mando a distancia para Windows Media Center de Conceptronic. En caso de surgir cualquier problema, visite nuestra página web de asistencia técnica (haga clic en el apartado de apoyo técnico de www.conceptronic.
ESPAÑOL 2.
ESPAÑOL Núm.
ESPAÑOL 3. Instalación del Mando a distancia A. B. Introduzca las 2 pilas AAA suministradas en el Mando a distancia. Introduzca el receptor USB en un puerto USB libre de su ordenador. El ordenador reconocerá e instalará el receptor USB automáticamente. El receptor USB y el Mando a distancia están acoplados por defecto. Después de haber instalado el receptor USB podrá empezara a utilizar el Mando a distancia. 4.
ESPAÑOL 5. Instalación del driver alfanumérico Una vez reconocido e instalado el receptor USB, el Mando a distancia para el Media Center estará listo para su uso. Con el driver por defecto de Windows. los botones alfanuméricos sólo funcionarán como botones numéricos. (Ejemplo: Si pulsa tres veces el botón “5”, obtendrá el número 555) Para poder utilizar las funciones alfabéticas de los botones alfanuméricos, necesitará instalar el driver alfanumérico del CD incluido. A.
ESPAÑOL C. Haga clic en “Siguiente” para continuar. D. Haga clic en “Instalar” para instalar el driver en su ordenador. E. Cuando la instalación haya finalizado, haga clic en “Finalizar” para salir del asistente de configuración.
Declaración de Conformidad El fabricante Dirección: 2L International BV Databankweg 7 3821 AL Amersfoort, Países Bajos, tel.
DEUTSCH Conceptronic CLLRCMCE Bedienungsanleitung Wir gratulieren Ihnen zum Kauf Ihrer Conceptronic Fernbedienung für Windows Media Centers. In dieser Bedienungsanleitung wird Ihnen Schritt für Schritt gezeigt, wie die Conceptronic Fernbedienung für Windows Media Centers bedient wird. Wenn Probleme auftreten sollten, besuchen Sie unsere Support-Seite (unter www.conceptronic.net) und klicken Sie auf ‚Support’. Dort steht Ihnen unsere FAQ-Datenbank mit den häufig gestellten Fragen zur Verfügung.
DEUTSCH 2.
DEUTSCH Nr.
DEUTSCH 3. Installation der Fernbedienung A. Legen Sie die 2 im Lieferumfang enthaltenen AAA-Batterien in die Fernbedienung ein. Stecken Sie den USB-Empfänger in einen freien USB-Port Ihres Computers ein. B. Der Computer erkennt und installiert den USB-Empfänger automatisch. Der USB-Empfänger und die Fernbedienung werden standardmäßig ‚gepairt’. Nachdem Sie den USB-Empfänger installiert haben, ist die Fernbedienung betriebsbereit. 4.
DEUTSCH 5. Alphanumerische Treiberinstallation Nachdem der USB-Empfänger erkannt und installiert wurde, ist die Fernbedienung für das Media Center betriebsbereit. Wenn der standardmäßige Windows-Treiber verwendet wird, funktionieren die alphanumerischen Tasten lediglich als Zifferntasten. (Beispiel: Wenn Sie dreimal die ‚5’ drücken, ist Ihre Eingabe die Zahl ‚555’.
DEUTSCH C. Klicken Sie auf „Next [Weiter]“. D. Klicken Sie auf „Install [Installieren]“, um den alphanumerischen Treiber auf Ihrem Computer zu installieren. E. Wenn der Einrichtungsassistent die Installation abgeschlossen hat, klicken Sie auf „Finish [Fertigstellen]”, um den Einrichtungsassistenten zu schließen. Nach der Installation des alphanumerischen Treibers können Sie die AlphaFunktion der alphanumerischen Tasten verwenden.
Der Hersteller Adresse CE - Konformitätserklärung 2L International BV Databankweg 7 3821 AL Amersfoort, Niederlande erklärt hiermit, dass das Produkt Typ Wireless Media Center Remote Control Produkt CLLRCMCE den folgenden Richtlinien entspricht: 1999/5/EWG R&TTE-Direktive: Telekommunikations-Endgerät und Satellitenbodenstation 2004/108/EWG EMV-Richtlinie: Elektromagnetische Verträglichkeit 73/23/EWG Niederspannungs-Richtlinie Elektrische Betriebsmittel zur Verwendung innerhalb bestimmter Spannungsgr
FRANÇAIS CLLRCMCE de Conceptronic Guide d’Utilisation Félicitations pour l’achat de votre Commande à Distance du Centre Média Windows de Conceptronic. Ce Guide d’Utilisation vous donnera une explication détaillée du mode d’utilisation de la Commande à Distance du Centre Média Windows de Conceptronic. En cas de problèmes, nous vous conseillons vivement de vous reporter à notre site Internet d’assistance en ligne (connectez-vous sur www.conceptronic.net et cliquez sur ‘Support’ (‘Assistance’)).
FRANÇAIS 2.
FRANÇAIS No Description 1 2 Témoin Lumineux d’Activité Interrupteur de bascule entre les divers formats d’affichage de l’image 3 Boutons d’Accès Direct à la Bibliothèque: Radio, Musique, Images ou Vidéo 4 Boutons d’Accès Direct: Enregistrements TV, Guide TV Guide, TV en Direct ou Menu DVD 5 Boutons de Lecture: 6 Boutons de Navigation: 7 8 9 10 11 12 13 14 15 16 17 18 Bouton de Retour, retour à l’écran précédent Boutons d’Augmentation/Diminution du Volume Bouton du Mode Silencieux Touches Alphan
FRANÇAIS 3. Installation de la Commande à Distance A. B. Insérez les 2 piles AAA incluses dans la Commande à Distance. Insérez le Récepteur USB dans un port USB libre de votre ordinateur. L’ordinateur reconnaîtra et installera automatiquement le Récepteur USB. Le Récepteur USB et la Commande à Distance sont jumelés par défaut. Après installation du Récepteur USB, vous pouvez commencer à utiliser la Commande à Distance. 4.
FRANÇAIS 5. Installation du Driver Alphanumérique Une fois le Récepteur USB reconnu et installé, la Commande à Distance du Centre Média est prête à l’emploi.
FRANÇAIS Le Gestionnaire d’Installation se lancera alors. C. Cliquez sur “Next” (“Suivant”) pour poursuivre. D. Cliquez sur “Install” (“Installer”) Alphanumérique sur votre ordinateur. E. Une fois le Gestionnaire d’Installation complété, cliquez sur “Finish” (“Terminer”) pour quitter le Gestionnaire d’Installation. pour installer le Driver Après installation du Driver Alphanumérique, vous pouvez utiliser les fonctions Alpha des touches Alphanumériques.
Le fabricant Adresse Déclaration de Conformité CE 2L International BV Databankweg 7 3821 AL Amersfoort, the Netherlands (Pays-Bas) Atteste, par la présente, que le produit Type Wireless Media Center Remote Control Produit CLLRCMCE Observe les directives suivantes: 1999/5/EEC Directive R&TTE relative aux: Équipements Terminaux de Télécommunications et Équipements Radioélectriques (Telecommunications Terminal Equipment and Satellite Earth Station Equipment) 2004/108/EEC Directive EMC relative à la: Com
ITALIANO Conceptronic CLLRCMCE Manuale d’uso Vi ringraziamo per aver acquistato il Telecomando Windows Media Center di Conceptronic. Il presente Manuale d’uso spiega passo a passo come usare il Telecomando Windows Media Center di Conceptronic. In caso di problemi, vi consigliamo di visitare il nostro sito di supporto (collegandovi su www.conceptronic.net e facendo clic su “Support”), dove si trova il database delle FAQ (Risposte alle domande più frequenti).
ITALIANO 2.
ITALIANO N.
ITALIANO 3. Installazione del telecomando A. B. Inserire nel telecomando le due batterie tipo AAA in dotazione. Inserire il Ricevitore USB in una porta USB disponibile del computer. Il computer rileverà e installerà automaticamente il Ricevitore USB. Il Ricevitore USB e il telecomando sono già accoppiati per default. Dopo l’installazione del Ricevitore USB, sarà possibile iniziare a usare il telecomando. 4.
ITALIANO 5. Installazione del driver alfanumerico Una volta rilevato e installato il Ricevitore USB, il Telecomando Media Center sarà già pronto per essere usato. Ad ogni modo i tasti alfanumerici potranno essere usati solo ed esclusivamente per introdurre numeri nel caso in cui venga usato il driver di Windows di default.
ITALIANO C. Fare clic su “Next” per continuare. D. Fare clic su “Install” per installare il driver alfanumerico sul computer. E. Una volta terminata la configurazione assistita, fare clic su “Finish” per uscire dal programma di configurazione assistita. Una volta installato il driver alfanumerico, è possibile usare i tasti alfanumerici anche per introdurre lettere.
Dichiarazione di conformità CE Il fabbricante 2L International BV Indirizzo Databankweg 7 3821 AL Amersfoort, Paesi Bassi dichiara qui di seguito che il prodotto Tipo Wireless Media Center Remote Control Prodotto CLLRCMCE risulta in conformità a quanto previsto dalle seguenti direttive comunitarie: 1999/5/CE: Direttiva R&TTE Apparecchiature terminali di telecomunicazione e apparecchiature di stazioni terrestri di comunicazione via satellite 2004/108/CE Direttiva CEM: Compatibilità elettromagnetica 73/
PORTUGUÊS Conceptronic CLLRCMCE Instruções de Uso Parabéns por ter adquirido o Controlo Remoto da Conceptronic para o Windows Media Center. Nestas Instruções de Uso encontrará a explicação passo-a-passo de como utilizar o Controlo Remoto da Conceptronic para o Windows Media Center. Se tiver algum problema, consulte o nosso sítio de suporte (vá a www.conceptronic.net e clique em “Suporte”). Aí encontrará a secção de perguntas e respostas frequentes (F.A.Q.).
PORTUGUÊS 2.
PORTUGUÊS Nº Descrição 1 2 LED de Actividade Comutador entre as proporções do ecrã 3 Botões Directos das Bibliotecas: 4 Botões Directos: TV Gravada, Guia de TV, TV em Directo ou Menu DVD 5 Botões de Reprodução: Reproduzir, Pausar, Parar, Gravar, Seguinte, Anterior, Avanço Rápido, Retrocesso Rápido 6 Botões de Navegação: Esquerda, Direita, Para Cima, Para Baixo, OK 7 8 9 10 11 12 13 14 15 16 17 18 Botão Retornar: para retornar ao ecrã anterior Botões Aumentar/ Reduzir Volume Botão Silêncio Te
PORTUGUÊS 3. Instalação do Controlo Remoto A. B. Introduza as duas pilhas AAA incluídas no Controlo Remoto. Introduza o Receptor USB numa porta USB disponível do computador. O computador reconhecerá e instalará o Receptor USB automaticamente. De forma predeterminada, o Receptor USB e o Controlo Remoto estão sincronizados. Após a instalação do Receptor USB, o Controlo Remoto já pode começar a ser utilizado. 4.
PORTUGUÊS 5. Instalação do Driver Alfanumérico Depois que o Receptor USB for reconhecido e instalado, o Controlo Remoto para o Media Center já estará pronto para ser utilizado. Quando for utilizado o Driver padrão do Windows, aAs teclas alfanuméricas funcionarão apenas como teclas numéricas. (Exemplo: Se a tecla “5” for premida 3 vezes, será obtido o número “555”) Para poder utilizar as funções alfabéticas das teclas alfanuméricas é preciso instalar o Driver Alfanumérico contido no CD-ROM incluído. A.
PORTUGUÊS C. Clique em “Seguinte” para continuar. D. Clique em “Instalar” para iniciar a instalação do Driver Alfanumérico no computador. E. Quando o Assistente de Configuração tiver terminado, clique em “Concluir” para sair do Assistente. Após a instalação do Driver Alfanumérico, poderão ser utilizadas as funções alfabéticas das teclas alfanuméricas.
O fabricante Morada Declaração de Conformidade CE 2L International BV Databankweg 7 3821 AL Amersfoort, Países Baixos Declara que o produto Tipo Wireless Media Center Remote Control Produto CLLRCMCE Cumpre as seguintes directivas: 1999/5/EEC Directiva R&TTE: Equipamento Terminal de Telecomunicações e Equipamento das Estações Terrestres de Comunicações Via Satélite 2004/108/EEC Directiva CEM: Compatibilidade Electromagnética 73/23/EEC Directiva de Baixa Tensão:Equipamento eléctrico desenhado para ser
MAGYAR Conceptronic CLLRCMCE Felhasználói útmutató Köszönjük, hogy a Conceptronic Windows médiaközpont távirányítóját választotta. A felhasználói útmutató lépésről-lépésre elmagyarázza, miként kell a Conceptronic Windows médiaközpont távirányítóját alkalmaznia. Ha probléma jelentkezne, azt tanácsoljuk, hogy keresse fel terméktámogatást nyújtó webhelyünket (látogasson el a www.conceptronic.net honlapra, majd ott kattintson a „Support”-ra).
MAGYAR 2.
MAGYAR Sz. Leírás 1. 2. Tevékenységjelző LED A megjelenítési oldalarányok váltása 3. Közvetlen könyvtárgombok: Radio (rádió), Music (zene), Picture (kép) vagy Video (videó) 4. Közvetlen gombok: Recorded TV (felvett tévéműsor), TV Guide (tévéútmutató), Live TV (élő tévéadás) vagy DVD Menu (DVD-menü) 5. Lejátszógombok: Play (lejátszás), Pause (szünet), Stop (állj), Record (felvétel), Next (következő), Previous (előző), Fast Forward (gyors előre), Fast Rewind (gyors vissza) 6.
MAGYAR 3. A távirányító telepítése A. B. Tegye be a két mellékelt AAA elemet a távirányítóba. Tegye be az USB vevőkészüléket a számítógép valamelyik szabad USB portjába. A számítógép automatikusan felismeri és telepíti is az USB vevőkészüléket. Az USB vevőkészülék és a távirányító alapértelmezésben össze van párosítva. Az USB vevőkészülék telepítését követően azonnal használhatja a távirányítót. 4.
MAGYAR 5. Az alfanumerikus illesztőprogram telepítése Ha az USB vevőkészüléket a számítógép már felismerte és telepítette is, a médiaközpont távirányítója használatkész. Az alfanumerikus billentyűk csak numerikus billentyűként működnek, ha az alapértelmezett Windows illesztőprogramot használják. (Példa: Ha háromszor megnyomja az „5”-öst, akkor a következő számokat kapja: „555”.
MAGYAR C. A folytatáshoz kattintson a „Next”-re. D. Az alfanumerikus illesztőprogramnak a számítógépen történő telepítéséhez kattintson az „Install”-ra. E. Amikor a telepítővarázsló végzett, a telepítővarázslóból való kilépéshez kattintson a „Finish”-re. Az alfanumerikus illesztőprogram telepítését követően az alfanumerikus billentyűk alfa funkcióját máris használhatja. (Példa: Ha háromszor megnyomja az „5”-öst, akkor a következő betűt kapja: „L”.
Declaration of CE Conformity The manufacturer Address 2L International BV Databankweg 7 3821 AL Amersfoort, the Netherlands Hereby declares that the product Type Wireless Media Center Remote Control Product CLLRCMCE Complies with following directives: 1999/5/EEC R&TTE directive: Telecommunications Terminal Equipment and Satellite Earth Station Equipment 2004/108/EEC EMC directive: Electromagnetic Compatibility 73/23/EEC Low Voltage Directive: Electrical equipment designed for use within certain volt
TÜRKÇE Conceptronic CLLRCMCE Kullanıcı Kılavuzu Conceptronic Windows Media Center Uzaktan Kumanda Satın Aldığınız İçin Tebrikler. Bu Kullanıcı Kılavuzu Conceptronic Windows Media Center Uzaktan Kumandasının adım adım nasıl kullanılacağı konusunda bilgi içermektedir. Problem ortaya çıkması halinde, destek sitemize gitmenizi tavsiye ederiz (www.conceptronic.net adresine gidin ve ‘Support’ bölümüne tıklayın). Burada Sıkça Sorulan Sorular Veritabanını bulacaksınız.
TÜRKÇE 2.
TÜRKÇE Nr Tanım 1 2 İşlem LED’i Ekran görüntü oranlarını değiştirir 3 Direkt Kütüphane Düğmeleri:Radyo, Müzik, Resim ya da Video 4 Direkt Düğmeler: Kaydedilen TV, TV Kılavuzu, Canlı TV ya da DVD Menüsü 5 Oynatım Düğmeleri: Oynat, Duraklat, Durdur, Kaydet, Sonraki, Önceki, Hızlı İleri, Hızlı Geri 6 Gezinti Düğmeleri: Sol, Sağ, Yukarı, Aşağı, Tamam 7 8 9 10 11 12 13 14 15 16 17 18 Geri Düğmesi, önceki ekrana dön Ses Yükseltme/Azaltma Düğmeleri Sessize Alma Düğmesi Alfa-Nümerik Tuşlar * Silme D
TÜRKÇE 3. Uzaktan Kumanda Kurulumu A. B. Birlikte verilen 2 adet AAA pili Uzaktan Kumandaya takın. USB Alıcıyı bilgisayarınızın boş USB portuna takın. USB Alıcı bilgisayar tarafından otomatik olarak algılanacak ve kurulumu yapılacaktır. USB Alıcı ve Uzaktan Kumanda varsayılan olarak eşleştirilir. USB Alıcının kurulumundan sonra Uzaktan Kumandayı kullanmaya başlayabilirsiniz. 4.
TÜRKÇE 5. Alfa Nümerik Sürücü Kurulumu USB Alıcı algılanıp kurulumu yapıldığında Media Center Uzaktan Kumandası kullanıma hazırdır. Varsayılan Windows Sürücüsü kullanıldığında Alfa Nümerik Tuşlar sadece nümerik tuşlar olarak çalışacaktır. (Örnek: 3 kez ‘5’e bastığınızda, ‘555’ sayısını elde edersiniz) Alfa-Nümerik Tuşların Alfa fonksiyonlarını kullanmak için birlikte verilen CD-ROM’dan Alfa-Nümerik Sürücüyü yüklemeniz gerekecektir. A. CD-ROM’u CD-ROM Sürücüsüne yerleştirin.
TÜRKÇE C. Devam etmek için “Next (İleri)”ye tıklayın. D. Bilgisayarınıza Alfa-Nümerik Sürücüyü yüklemek için “Install (Kur)”a tıklayın. E. Kurulum Sihirbazı tamamlandığında, Kurulum Sihirbazından çıkmak için “Finish (Son)”a tıklayın. Alfa-Nümerik Sürücünün kurulumu tamamlandıktan sonra Alfa-Nümerik Tuşların Alfa fonksiyonlarını kullanabilirsiniz.
Declaration of CE Conformity The manufacturer Address 2L International BV Databankweg 7 3821 AL Amersfoort, the Netherlands Hereby declares that the product Type Wireless Media Center Remote Control Product CLLRCMCE Complies with following directives: 1999/5/EEC R&TTE directive: Telecommunications Terminal Equipment and Satellite Earth Station Equipment 2004/108/EEC EMC directive: Electromagnetic Compatibility 73/23/EEC Low Voltage Directive: Electrical equipment designed for use within certain volt