ENGLISH Conceptronic CM3PVR User Manual Congratulations on the purchase of your Conceptronic Media Recorder & Player. This User Manual gives you a step-by-step explanation how to install and use the Conceptronic Media Recorder & Player. When problems occur, we advise you to go to our support-site (go to www.conceptronic.net and click ‘Support’. Here you will find the Frequently Asked Questions Database.
ENGLISH Product Features • • • • • • • • • • Built-in TV Tuner with TV channel auto-search. TV signal recording. AV signal recording from e.g. a VCR, DVD or Video Camera. Internal Cardreader with SD (HC), MMC and MS support. Record to internal HDD, Memory Card or USB Device. DVD quality of recorded files in MPEG4 (AVI) format (can be played on PC or other media player). Record Options: One-key instant record, Timer record, Time-shift.
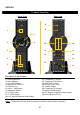
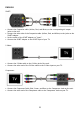
ENGLISH Product Overview Front View Rear view 8 9 1 7 2 6 3 10 18 11 17 12 16 4 15 13 5 14 Description of the numbers: 1. Infrared Receiver 2. Record Button 3. OK / Enter Button 4. MMC/MS/SD Card Slot 5. USB Host Port 6. Power / Stop Button 7. Navigation Buttons 8. TV-Tuner Input 9. TV-Tuner Output 10. A/V Input (Composite Video/Audio) 11. 12. 13. 14. 15. 16. 17. 18. 19. Component (Y) Output Component (Pb) Output Main Power Switch DC Input (12V, 2.
ENGLISH Remote Control Explanation The remote control is used to control the unit. On the inside cover of this manual you will find a picture of the remote control. The numbers of the buttons correspond with the table below, to explain each function of the remote control. Nr Button Description 1. 2. POWER ( REPEAT 3. 4. 5. 6. 7. 8. 9. 10. 11. OUTPUT COPY CLEAR AUDIO TITLE RETURN , , , MENU PLAY / PAUSE 12. 13. 14. 15. 16. 17. 18. 19. 20. 21. 22. 23. 24. 25. 26. 27. 28. 29. 30. 31. 32.
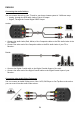
ENGLISH Connecting your CM3PVR Connecting the antenna cable(s) Note: The Tuner of the unit supports Signal Pass-through, to redirect the TV signal from the Tuner input to the Tuner output. The Pass-through function also works when the unit is turned off or disconnected from the power, so you can keep watching to your TV even if the unit is turned off. Tuner Input Tuner Output • Disconnect the main antenna cable from your TV, and connect it to the Tuner input of the unit.
ENGLISH SCART: • Connect the Composite cable (Yellow, Red, and White) to the corresponding AV output jacks on the unit. • Connect the other side of the Composite cable (Yellow, Red, and White) to the jacks on the SCART Adapter. • Set the switch of the SCART Adapter to “Input”. • Connect the SCART Adapter to the SCART Input of your TV. S-Video: • Connect the S-Video cable to the S-Video jack of the unit. • Connect the other end of the S-Video cable to the S-Video Input on your TV.
ENGLISH Connecting the Audio Cable(s) You can connect the unit to your TV and/or your home cinema system in 2 different ways: - Analog, through the RCA Audio Jacks of the A/V Output - Digital, Through the Coaxial Digital SPDIF Output Analog: • Connect the Audio Jacks (Red, White) of the Composite cable to the RCA Audio Jacks of the A/V Output. • Connect the other end of the Composite cable to the RCA Audio Jacks of your TV or Receiver.
ENGLISH • Connect the Audio/Video cable delivered with your Audio/Video device to the corresponding AV Output jacks on the Audio/Video device. • Connect the other side of the Composite cable (Yellow, Red, and White) to the AV Input jacks of the unit. Connecting the Power Cable When the unit is connected to your Audio/Video equipment, you can connect the power supply to the unit. • Connect the included power supply to the unit and to a free wall socket.
ENGLISH First-Time Configuration The unit needs to be configured when you turn it on the first time. • Select the correct input channel on your TV where the unit is connected to. (Composite, SCART, S-Video or Component). Note: From this point, the manual is based on the fact that your TV is set to the input channel of the unit. All steps described are related to the operation of the unit. • Check if the main power switch on the back of the unit is set to ‘I’.
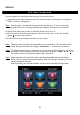
ENGLISH The following options are available in the Main Menu: [1] – [2] – [3] – [4] [5] [6] – [7] – Movies Music Photos AV Input TV Tuner Input Rec Schedule Setup Playback of stored records and movies. Playback of stored music. Playback of stored photos. View the Audio/Video Channel. View Live TV. Configure scheduled records. Configure the unit. Select the ‘Setup’ [7] option in the main menu to begin the configuration of the unit.
ENGLISH TV Tuner Configuration The TV Tuner Configuration helps you to search, store and configure your TV Channels. Search and store TV Channels: • Select the option ‘TV Tuner’ in the Setup Menu. • Set the ‘TV Signal’ to ‘Cable’ if you have connected the unit to your cable signal. Otherwise, select ‘Antenna’ if you have connected the unit to an aerial antenna. • Select the option ‘Auto Tuning’ to search for TV channels.
ENGLISH During the channel search, all found channels will automatically be stored in the memory of the unit. This can take some time. When the channel search is complete, the unit will return to the Setup Menu. Customize TV Channels: When the unit is finished with the search of TV Channels, you can customize the found channels. • Select the option ‘TV Tuner’ in the Setup Menu. • Select the option ‘Channel Set’ in the TV Tuner Menu. The Channel Set Menu will be shown on your TV.
ENGLISH You can change the following items: - Channel Number Active Fine-Tune Audio Format Change the channel which you want to change. Show or hide the selected channel in the channel list. Fine-tune the channel. Change the Audio Format for the current channel. - Swap Channel Use the ‘Swap Channel’ option to swap 2 channels. Select the new location for the current channel and press the ‘Enter’ button (24) on the remote control to swap the channels.
ENGLISH Watching Live-TV & Live-A/V The unit has 2 input sources to watch and record programs: • TV-Tuner Input • AV Input (Audio/Video Input) TV-Tuner Input You can watch live TV through the unit by selecting the option ‘TV Tuner Input’ in the Main Menu. While watching live TV, you can change the channels by pressing the ‘CH +’ or ‘CH -’ (20) button on the remote control. AV Input (Audio/Video Input) The unit has a Composite Audio/Video-Input on the backside.
ENGLISH During Timeshift, the screen will display the Timeshift information bar on your screen. You can hide this bar by pressing the ‘Display’ button (31) on the remote control. Press the ‘Play/Pause’ button (11) on the remote control again to resume playback from the point where Timeshift was activated. Press the ‘Fast Forward’ (18) or ‘Rewind’ (14) buttons on the remote control to play through the Timeshift buffer in higher speeds.
ENGLISH Recording Before Recording Before you start recording with your unit, you can set the record quality. The unit has 6 preset quality settings, which can be selected with the ‘Quality’ button (25) on the remote control. Note: The unit detects copy protection on the connected source, for example MacroVision protection on DVD discs. When a connected source is copy-protected, the unit will prevent recording and shows a warning message when the record button is pressed.
ENGLISH Scheduled Recording You can program the unit to record channels on specific times. You can program up to 8 scheduled recordings in the unit. • Select the option ‘Rec Schedule’ in the Main Menu, or press the ‘Timer’ button (23) on the remote control while watching Live TV through the unit. The Scheduled Recording screen will be shown on your TV. By default, the first schedule is selected, and the ‘Source’ is highlighted.
ENGLISH Note: When recording to USB or Memory Card, make sure you have a High-speed device attached. (An USB2.0 Device or High-Speed Memory Card) • Set the quality for the recording: ‘HQ’, ‘SP’ or ‘LP’. Press the ‘Enter’ button (24) on the remote control to continue. Note: Recording in ‘HQ’, ‘SP’ or ‘LP’ influences the quality of your record and the amount of space needed for the record. For example, if you unit is equipped with a 500GB HDD, the record time will be: HQ: 228 hours and 35 minutes. (app.
ENGLISH Playback Select your preferred playback mode from the Main Menu. You can select the following options: [1] - Movies [2] - Music [3] - Photos Play your records and other movies stored on the unit or USB Drive / Media Card. Play music files stored on the unit or USB Drive / Media Card. Display photos stored on the unit or USB Drive / Media Card. When one of the above options is selected, the file browser will be shown on your screen.
ENGLISH Playback of your recordings & other movies You can play the recorded programs and other movies, stored on the HDD of the unit, on your TV through the ‘Movies’ option of the unit. • Press the ‘Menu’ button (10) on the remote control to return to the Main Menu. • Select the ‘Movies’ [1] icon in the Main Menu with the ‘Navigation’ buttons (9) on the remote control, and press the ‘Enter’ button (24) on the remote control to open the ‘Movies’ Mode.
ENGLISH Playback of your Music You can play music files, which can be stored on the HDD of the unit, on your TV through the ‘Music’ option of the unit. • Press the ‘Menu’ button (10) on the remote control to return to the Main Menu. • Select the ‘Music’ [2] icon in the Main Menu with the ‘Navigation’ buttons (9) on the remote control, and press the ‘Enter’ button (24) on the remote control to open the ‘Music’ Mode.
ENGLISH Playback of your Photos & Pictures You can view your photos and pictures, which can be stored on the HDD of the unit, on your TV through the ‘Photos’ option of the unit. • Press the ‘Menu’ button (10) on the remote control to return to the Main Menu. • Select the ‘Photos’ [3] icon in the Main Menu with the ‘Navigation’ buttons (9) on the remote control, and press the ‘Enter’ button (24) on the remote control to open the ‘Photos’ Mode.
ENGLISH Computer Connectivity The unit can be connected to your computer to copy data (movies, music, pictures, records, etc.) from and to the internal HDD. Note: In our example below, we are using a computer running Windows XP, but the unit can be used on all computers with USB support and the capability of reading & writing FAT32 file systems. Connect the unit to your computer • Connect the delivered USB to Mini-USB cable to the backside of the unit and to a free USB port on your computer.
ENGLISH The HDD will disappear from the ‘My Computer’ window, and a removable drive will be shown. The Cardreader is now active. • To switch back to the HDD Mode, press and hold the ‘Arrow Down’ button on the front of the unit for 2 seconds. Playback on your computer You can play the recorded programs on your computer, when the unit is connected to the computer. Before you can play the recorded programs, you need to install the DiVX Codec & Player on your computer.
ENGLISH System Configuration When you select the ‘Setup’ [7] option in the Main Menu, the Setup Menu will be shown on your screen. The explanation below shows all available settings with the including description. System: TV System Screensaver Sys Language Time Format Set Date Set Time Reset Setting Select the TV System which corresponds with your TV. You can select between PAL and NTSC. (Default = PAL) Set the screensaver of the unit on or off. (Default = On) Select the system language for the unit.
ENGLISH TV Tuner: TV Signal Auto Tuning Channel Set Manual Tuning Select the TV Signal which is provided by your TV Provider. You can select between ‘Antenna’ and ‘Cable’. (Default = Cable). Use the ‘Auto Tuning’ option to search and store all found channels automatically to the memory of the unit. Use the ‘Channel Set’ option to customize the found channels, like finetuning, channel order and channel name. Use the ‘Manual Tuning’ option to search and store channels manually.
Declaration of CE Conformity The manufacturer 2L International BV Address Databankweg 7 3821 AL Amersfoort, the Netherlands Hereby declares that the product Type 3,5” MEDIAPLAYER WITH PVR Product CM3PVR Brandname Conceptronic Complies with following directives: 2004/108/EEC EMC directive: Electromagnetic Compatibility 73/23/EEC Low Voltage Directive: Electrical equipment designed for use within certain voltage limits The following standards were consulted to assess conformity: EN5502