
User manual


ENGLISH
35
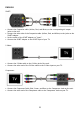
• Connect the Audio/Video cable delivered with your Audio/Video device to the
corresponding AV Output jacks on the Audio/Video device.
• Connect the other side of the Composite cable (Yellow, Red, and White) to the AV Input
jacks of the unit.
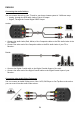
Connecting the Power Cable
When the unit is connected to your Audio/Video equipment, you can connect the power
supply to the unit.
• Connect the included power supply to the unit and to a free wall socket.
• Set the main power switch on the back of the unit to ‘I’ to power the unit.
The unit will now turn on.
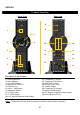
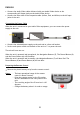
When the unit is powered and operational, the Navigation Buttons (7), The Record Button (2)
and the Power Button (6) will burn Blue.
When the unit is powered and in standby, the Navigation Buttons (7) will burn Red. The
Record Button (2) and Power Button (6) will not burn.
Preparing the Remote Control
• Remove the plastic battery strip from the remote control.
Notes:
- The best operational range of the remote
control is about 5 meters.
- Point the remote control to the IR receiver
which is embedded in the front panel of the
unit.
- The receiving angle of the IR receiver is ±30
degrees.
- Change the battery when it is weak or empty.