STORAGE CABINET Model No. KT6036To ensure that you have a speedy and pleasant time assembling your unit PLEASE READ THE INSTRUCTIONS CAREFULLY BEFORE BEGINNING ASSEMBLY. If you need assistance, DO NOT CALL THE STORE, call us. Our Customer Service Group is hers to help you. CALL MONDAY-FRIDAY, BETWEEN 8:00AM TO 3:00PM PACIFIC TIME. Please be sure to follow the construction order in the Assembly Manual and complete each step before you proceed to the next step. TOOLS REQUIRED: Call USA .
PARTS Top (1 ps.) Adjustable Shelves (4 cps) UNFINISHED THIS Side Bottom {1 pe.) DO NOT MOVE TARE Top Apron (1 pc.) Bottom Apron (1 pc.) UNFINISHED ONE SIDE Wood Dowel 1 (22 cps) © Cam lock (16 cps) me_ =t Metal Fastener {16 cps) = Shelf Support (16 cps) Page 2 Wood Handles (4 cps) (— Machine Screw 8/32 X 1" (4 pea) e Screw 5 X 5/8" (21 cps) Euro Hinge (8 cps) 123 [ ] Left Side Right Side Divider Back Panel Door 1 pe.) (1 pe.
Insert 5-Wood Dowels into each Side Panel. See diagram above, Soft surface Insert 4-Metal Fasteners into each Side Panel. See Diagram above.
Soft surface Step 4 Important Be sure all wood dowels and metal fasteners are located in the opposite holes BEFORE insert the cam locks. UNFINISHED Cutout THIS SIDE Soft surface Page 4 Insert 3-Wood Dowels into Top and 3-Wood Dowels into Bottom. See diagram above. fasteners' Insert 6-Metal Fasteners into Top, | and 2-Metal Fasteners into Bottom . | See Diagram above.
Soft surface ‘Step 6 Cam Locks Insert 2-Cam Locks into the large prevailed holes, point the arrow on the Cam in the direction of the side edge. Push the Cam into the hole. Then use a screwdriver, to turn each Cam approximately 1/2 turn in the direction of the arrow {clock-wise} to lock it in place, {Applies only on Bottom apron {unfinished back side and Top Apron. See Diagram above. Cam Locks chert 4-Cam Locks into the large prevailed holes, point the arrow on the Cam in the direction of the side edge.
Step 7 Attach Top fo the previous fasteners are located in the opposite| holes BEFORE insert the cam locks. Cam Locks Insert 6-Cam Locks into the large prettified holes, paint the arrow on the Cam in tha direction of the side edge. Push the Cam into the hole. Then use a screwdriver, to furn each Cam approximately 1/2 turn in the direction of the arrow (clock-wise) to lock it in place. See Diagram above. Step 8 Page 6 IMPORTANT: Back Panel must be NOTE: DO NOT LIFT OR TILT ON SIDE OR EDGES.
Step 8 ._l KEEP PERPENDICULAR THE HINGES WITH THE EDGE OF THE DOOR. ex) Door /. /] Insert 2 Screws 8 X 5/8" in each Hinge as shown. See Diagram above. Attach each door with 4-Screws 8 X 5/8" use per-drilled holes for guide as shown. See diagram Above.
Step Shelf Support Inge rt 8-Shelves Support into Side holes in the position you decided then place the Adjustable Shelves. See Diagram above. IF NECESSARY ADJUST ONE SHELF SUPPORT BY ROTATING 180° NOTE: For safety, it is recommended to place items on the Storage Cabinet starting with the bottom shelf first working your way up the Cabinet, shelf by shelf to top shelf. As an added safety feature, we recommend to affix the Storage Cabinet to the wall.
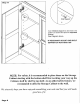
SECURED TO WALL / Ser e{ s/ Plastic TOP OF BOOKCASE Screw GX5/8" Young children may be injured by tipping furniture. The use of a tipping restraint is highly recommended. This hardware,when properly installed, could provide protection against the unexpected tipping of furniture due to improper use. WARNING: This product is only a deterrent. It is not a substitute for proper adult supervision. i : Installation Instructions: : 1. Attach one of the carer brace securely to the top back edge of the furniture.
Step 13 Insert 1 Screws 8-32 X 1" in each Door to install Wood Handle as shown. See . Diagram above. There are three adjustments that can be made on a European/cup cabinet door hinge. The two adjustments are: vertical, in-and-out and horizontal. horizontal + _ 1.5mmy 3 4. Vertical hinge adjustment via slots in the Horizontal hinge adjustment sptl?atgoor ub or down? Why change the horizontal adjustment? Y ACLU P + To close gap between the doors if necessary. To line up a row of doors.