
Instructions / Assembly


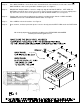

List of Parts (Quantity per Model)
Wood Parts: HARDWARE PACK
Number Description Qty. Description Picture (not drawn to scale)
1. Right Side 1 Fastener Pins 8
2. Bottom 1
3. Top 1 Cams 8
4. Left Side 1
5. Vertical Partition 2 Screws for Back Panel 10
6. Horizontal Partition 7
7. Back Panel 1 Label Holder Channels 7
Labels 24
Step 1.
Dear Customer, please READ INSTRUCTION STEPS carefully before beginning. Assemble in general area you
want your new Literature Organizer to be placed.
Step 2. On a clean soft surface, such as a carpet or the inside of the carton, place RIGHT SIDE # 1, with pre
drilled holes
and 7 grooves facing up, and solid wood finished edge facing to you. See Figure 1.
Step 3. Insert and screw 4 fastener pins into the 4 predrilled holes of the RIGHT SIDE# 1. See Figure 1.
Step 4. On a clean soft surface, such as a carpet or the inside of the carton, place LEFT SIDE # 4, with predrilled holes
and 7 grooves facing up, and solid wood finished edge facing to you. See Figure 1.
Step 5. Insert and screw 4 fastener pins into the 4 predrilled holes of the LEFT SIDE# 4. See Figure 1.
Step 6. With your friend, install BOTTOM # 2 vertically into corresponding holes of RIGHT SIDE # 1, with the 4 large
predrilled holes facing the inside of the Literature Organizer. Press together firmly and carefully to close all
gaps. See Figure 1.
Step 7. With your friend, install TOP # 3 vertically into corresponding holes of RIGHT SIDE # 1, with the 4 large
predrilled holes facing the inside of the Literature Organizer. Press together firmly and carefully to close all
gaps. See Figure 1.
Step 8. Install 4 Cams into the large predrilled holes of the BOTTOM # 2 and TOP # 3. The large predrilled holes of
BOTTOM # 2 are located at the inside of the unit, where it is installed into the RIGHT SIDE # 1. The large
predrilled holes of TOP # 3 are located at the inside of the unit, where it is installed into the RIGHT SIDE # 1.
Point the arrow on the Cam in the direction of the fastener pin. Push the Cam into the large predrilled hole. Use
a screwdriver, to turn each Cam clock-wise ½ turn to lock it in place. DO NOT OVER TIGHTEN. See Figure 2.
Step 9. With your friend, carefully install LEFT SIDE # 4, into the dowels of TOP # 3 and BOTTOM # 2 and with 7
grooves facing the inside of the Literature Organizer and solid wood finished edge facing front of unit.
Press together firmly and carefully to close all gaps. See Figure 1.
Step 10. Install 4 Cams into the large predrilled holes of the BOTTOM # 2 and TOP # 3. The large predrilled holes of
BOTTOM # 2 are located at the inside of the unit, where it is installed into the LEFT SIDE #4. The large
predrilled holes of TOP # 3 are
located at the inside of the unit, where it is installed into the LEFT SIDE #4. Point
the arrow on the Cam in the direction of the fastener pin. Push the Cam into the large predrilled hole. Use a
screwdriver, to turn each Cam clock-wise ½ turn to lock it in place. DO NOT OVER TIGHTEN. See Figure 2.