TM OPERATING INSTRUCTIONS COMPACT DISC STEREO RADIO SYSTEM
WARRANTY ONE (1) YEAR LIMITED WARRANTY CONCERTONE warrants to the original retail purchaser of this radio that it or any part therein, under normal use and conditions, be proven defective in material or workmanship within 1 year from the date of original purchase, such defect/s will be repaired or replaced at CONCERTONE’S option without charge for parts and repair labor.
NAMES OF CONTROLS 1 10 2 9 3 11 12 4 5 13 14 15 6 17 7 8 16 18 19 1. 2. 3. 4. 5. 6. 7. 8. 9. 10. Mounting hole TONE control knob POWER indicator DISPLAY window TUNING/SKIP button POWER ON/OFF button STOP/BAND button REMOTE SENSOR A/A+B/B SPEAKER selector switch SPEAKER BALANCE control knob 11. 12. 13. 14. 15. 16. 17. 18. 19.
NAMES OF CONTROLS - REMOTE CONTROL 1. 2. 3. 4. 5. 6. 7. 8. 9. 10. 11. 12. 13. 14. 15. 16. DISPLAY button POWER ON/STANDBY button FUNCTION (CD/TUNER/AUX) button PRESET/REPEAT button STOP/BAND button TUNING/ SKIP buttons MEMORY button RANDOM button SLEEP button SNOOZE button PLAY/PAUSE button TUNING/ SKIP buttons X-BASS button INTRO button TIMER button VOLUME +/- button USING THE REMOTE CONTROL CORRECTLY • Point the Remote Control at the REMOTE SENSOR located on the unit.
TURNING ON THE UNIT TO TURN ON THE UNIT Press the POWER ON/OFF button, the POWER ON indicator will light up. Select the desired function and the corresponding function indicator will light up. TO TURN OFF THE UNIT Press the POWER ON/OFF button to STANDBY, the POWER ON indicator will turn off and the clock display will be shown. CLOCK SETTING 1. In standby mode, press and hold the MEM button for about 3 seconds until time format blinks on display. 4. Press the TUNING/ SKIP buttons to set correct hour. 2.
TIMER OPERATION The power can be turned on automatically at a preset time so that you can wake up and listen to the CD or RADIO. Make sure the clock is correct before TIMER PLAY. Please refer to CLOCK setting procedure. 6. Press the FUNCTION button to select the desired program source: CD: Insert a disc. TUNER: Select a BAND and station. AUX: To listen to audio signals from external units. 7. Set volume level and X-Bass, and then press POWER button to standby mode. 8.
LISTENING TO THE RADIO TUNING INTO A STATION MANUALLY 1. Press the FUNCTION button to TUNER. 3. Press the SKIP a station. TUNING/ buttons to select 2. Press the STOP/BAND button to select the desired band “AM” or “FM”. TO SEARCH FOR A STATION AUTOMATICALLY Press the TUNING/SKIP button for 1 to 2 seconds, and a station is searched for automatically. After tuning in a station, the search stops. The search may not stop at a station with a very weak signal.
CD PLAYBACK 1. Press the FUNCTION button to CD. 2. Press the CD OPEN/CLOSE button to open CD door. Place a disc in the CD tray with the label faceing front and then press the CD OPEN/CLOSE button to close CD door. The total number of tracks will show on the display. NOTE: 1. Do not push the CD door to close it. 2. CD door cannot open while power is off. Locating a particular point in a track 3. To start playing, press the PLAY/PAUSE button. TO INTERRUPT PLAYBACK Press the PLAY/PAUSE button.
PROGRAMMING TRACKS - in a CD stop mode (Up to a maximum of 20 tracks) 1. Press the MEM button. 2. Press the SKIP the desired tracks. 3. Press the buttons to select To check the program While in the stop mode, press the MEM button. The disc, track and program numbers will appear on the display. Press the MEM button again to view the other programmed selections. These displays do not appear during programmed play. MEM button again. 4.
INTRODUCTION PLAY - at CD stop mode and CD play mode (for remote only) This function allows the first 10 seconds of each track of the disc to be played. Press the INTRO button. INTRO appears in the display on the unit. RANDOM PLAY - at CD play mode and CD stop mode (for remote only) All the tracks on the disc can be played in random order. Press the RANDOM button. RANDOM appears in the display on the unit.
SPECIFICATIONS TUNER SECTION Frequency range Antenna AMPLIFIER SECTION Power output 10% T.H.D. FM 87.5 -108 MHz AM 520 - 1,710 kHz (USA and Canada) External 75ohm automotive type antenna Power requirements (A) 5W x 2 (B) 5W x 2 12/16 Volts DC COMPACT DISC PLAYER SECTION Frequency Response Signal to noise ratio Dynamic Range Total harmonic Distortion Separation 40 - 20,000 Hz 60 dB 70 dB 0.5% (Normal) T.H.D.
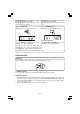
SYSTEM CONNECTIONS CONNECTION DIAGRAM Make correct connections as illustrated in the connection diagram. A B From Antenna From TV or other AUX input SPEAKER CONNECTIONS Make sure you connect each lead to the correct terminal according to the colors of leads listed as illustrated in the diagram. Insulate the end of the unused lead with a piece of tape. Notes: • Use speakers with an impedance of 4 to 8 ohms, and with adequate power handling capacities. Otherwise, speaker may be damaged.