User’s Guide www.concord-camera.com 6340z UG-ENU (516084-00).
ENGLISH TABLE OF CONTENTS GETTING STARTED Package Contents ..........................................................................................................................................3 System Requirements ....................................................................................................................................4 Safety Information ..........................................................................................................................................
Taking Pictures in A/S/M (Advanced) Mode.................................................................................................19 Taking Pictures in A (Aperture Priority) Mode.........................................................................................19 Taking Pictures in S (Shutter Priority) Mode ..........................................................................................19 Taking Pictures in M (Manual) Mode ..............................................................
GETTING STARTED PACKAGE CONTENTS Please contact your dealer immediately if any of the items below are missing or damaged. Camera Li-ion Rechargeable Battery Pack Case Compact Power Adapter Software Installation CD-ROM x 2 (including multilingual User’s Guide) USB Cable Quick Start Guide Wrist Strap TV out cable 3 6340z UG-ENU (516084-00).
GETTING STARTED SYSTEM REQUIREMENTS Windows: • PC with processor better than MMX Pentium 300 MHz • Windows 98 SE (Second Edition)/2000/ME/XP • Minimum 128 MB RAM • USB port • CD-ROM drive • 1024 x 768 monitor, 24-bit color (true color) Macintosh: • Power Mac G3 or later • Mac OS 9.0, 9.1, 9.2 and OS X • Minimum 64 MB RAM • USB port • CD-ROM drive • 640 x 480 monitor with thousands of color (millions of color recommended) Specifications are subject to change without prior notice.
GETTING STARTED FCC COMPLIANCE AND ADVISORY This device complies with Part 15 of the FCC Rules. Operation is subject to the following two conditions: 1.) This device may not cause harmful interference, and 2.) This device must accept any interference received, including interference that may cause unsatisfactory operation. This equipment has been tested and found to comply with the limits for a Class B peripheral, pursuant to Part 15 of the FCC Rules.
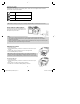
GETTING STARTED CAMERA COMPONENTS Front /Charge LED Tripod Socket Status LED (green) Back W (Zoom Out) button T (Zoom in) button Flash Ready LED (orange) Top Speaker Microphone 6 6340z UG-ENU (516084-00).
GETTING STARTED Side USB port Wrist Strap Holder Battery/Memory Card Door ATTACHING THE WRIST STRAP Attach the wrist strap as illustrated below: 1 2 3 Note: Don’t swing the camera when carrying it by the wrist strap. USING THE CASE Store the camera in the case when it is not in use. 7 6340z UG-ENU (516084-00).
PREPARING THE CAMERA INSTALLING THE BATTERY PACK The camera can use either the supplied 3.7V 900 mA Rechargeable Battery Pack or the Compact Power Adapter as power source. Charge the Battery Pack before you use it. 1. Slide the Battery/Memory Card Door in the direction of the buttons. 2. Insert the battery pack in the direction of the button marked on the battery pack. 3. Close the Battery/Memory Card Door. CHARGING THE BATTERY PACK 1. Put the battery pack inside the camera body. 2.
PREPARING THE CAMERA Battery Status Symbols The following icons indicate the various battery status. These icons will not appear when the camera is powered with a compact power adapter. Sufficient battery Low battery Battery is over. Recharge the battery. Note: When the battery is running out, the message “Replace Battery” will be displayed on the LCD. USING COMPACT POWER ADAPTER Connect the DC plug of the power adapter to the camera’s DC-IN in terminal.
PREPARING THE CAMERA ABOUT CAMERA MEMORY AND STORAGE Internal Memory The digital camera is equipped with a 16 MB internal memory. If no SD card is inserted in the camera, all pictures/video clips recorded by the camera will be stored in the internal memory. SD Memory Card When SD card is inserted in the camera, all pictures and video clips recorded by the camera will be stored on the SD card by using the Design Rule for Camera File System (DCF) protocol.
PREPARING THE CAMERA Power Off The camera will be powered off automatically after being idled for sometime. The auto power off setting can be changed. (p. 12) One minute before the camera is auto off, the LCD will be turned off. When the LCD is automatically power off, the green status LED remains light. In this situation, you may press any button to turn the camera back on. To turn off the camera manually, slide the Power Switch to the right side. SETTING THE DATE AND TIME 1. 2. 3. 4. 5. 6. 7. 8.
PREPARING THE CAMERA SETTING AUTO POWER OFF 1. 2. 3. 4. Press the MENU button. Press the button to select the Setup Menu. Press the or button to select Power Save. Press the or button to set auto power off values: off, 1 min ~10 min. 5. Press the MENU button to close the menu window. SETTING TV OUTPUT STANDARD 1. 2. 3. 4. 5. Press Press Press Press Press the MENU button. the button to select the Setup Menu. the or button to select TV Output. the or to set the video output signal standard: NTSC or PAL.
PREPARING THE CAMERA ABOUT MENUS AND SETTINGS This chart shows the options for each menu settings. Mode Menu Item Auto Camera Mode Resolution Available Setting P.16 Quality P.16 P.18 Drive Mode A/S/M Camera Mode File No. Reset On / Off Quick View 10 sec / 2 sec / Off P.27 P.16 Digital Zoom On / Off P.15 Mode A/S/M P.19 Resolution P.16 Quality P.16 Drive Mode EV P.18 +2/+1.7/+1.3/+1.0/+0.7/+0.3/ 0.0/-0.3/-0.7/-1.0/-1.3/-1.7/-2.0 P.21 File No.
PREPARING THE CAMERA BASIC FUNCTIONS TURNING THE LCD ON OR OFF Press the button repeatedly to change the LCD display mode. Shooting Mode LCD On (with Information) LCD On (no Information) LCD Off Playback Mode LCD On LCD On (without exposure data) LCD On (no Information) About the Information Displayed on the LCD Monitor The LCD monitor displays various information in Shooting and Playback mode. Shooting Mode Playback Mode Quality 14 6340z UG-ENU (516084-00).
PREPARING THE CAMERA USING THE ZOOM The camera has a 3x optical zoom lens with an effective zoom range 7.7 mm to 23.1 mm (equivalent to 37 mm to 111 mm in 35 mm film format) as well as 4x digital zoom capability. 1. Press T (Tele) to zoom in to your subject. • While the optical zoom is activated, mechanical sound come from the lens movements can be heard. You can also see the lens retracts. • While the digital zoom is activated, the zoom scale indicator (4.5x, 6.0x, 7.5x, 9.0x, 10.
TAKING PICTURES/VIDEO CLIPS TAKING PICTURES IN AUTO MODE In this mode, all you have to do is pressing the Shutter button. The camera will set aperture and shutter speed etc. automatically. 1. Turn the Mode dial to A mode. 2. Frame the subject in the LCD. • For best result, stand at least 0.8 m (2.62 ft.) away from the subject in normal mode. 3. Press T or W button to zoom in or out the subject. 4. Press the Shutter button down halfway and hold there for a few seconds.
TAKING PICTURES/VIDEO CLIPS Resolution Purpose (Large) 2848 x 2136 Print large prints (Medium 1) 2048 x 1536 Print on small size paper (Medium 2) 1408 x 1056 Send images by e-mail 640 x 480 Shoot more images (Small) Quality Purpose Fine Shoot normal quality images Normal Shoot more images USING THE FLASH Use the flash according to the guidelines below: Auto The flash fires automatically according to the lighting condition. Force On The flash always fires.
TAKING PICTURES/VIDEO CLIPS TAKING PICTURES IN MACRO MODE Use the Macro mode to shoot close-up of subjects in the range as listed below: Mode Focus Range W Mode 5 cm – 80 cm (0.16 ft. – 2.62 ft.) T Mode 30 cm – 80 cm (0.98 ft. –2.62 ft.) 1. Press the button to turn the LCD monitor on (if necessary). button. 2. Press the appears on the LCD monitor. • The icon 3. After Macro mode is selected, the Flash will be set at Off button to change flash mode. mode. Press 4. Shoot the image. Note: 1.
TAKING PICTURES/VIDEO CLIPS TAKING PICTURES IN A/S/M (ADVANCED) MODE TAKING PICTURES IN A (APERTURE PRIORITY) MODE When the camera is set in the aperture-priority mode, it selects a shutter speed to match the brightness automatically. The larger the number for the aperture value, the smaller the aperture opens, and consequently the less the amount of light enters. A larger aperture setting produces a lighter image, while a lower aperture value produces a darker image. 1. 2. 3. 4. 5.
TAKING PICTURES/VIDEO CLIPS TAKING PICTURES IN M (MANUAL) MODE You can set the shutter speed and the aperture value manually to achieve a particular effect. This is convenient for shooting fireworks and other images where it is difficult to set the correct exposure automatically. 1. 2. 3. 4. 4. Turn the mode dial to A/S/M (advanced) mode. Press the MENU button. Press the or button to select Mode. Press the or to set the camera mode to M (Manual) Mode. Press the MENU button to close the menu window.
TAKING PICTURES/VIDEO CLIPS SETTING THE WHITE BALANCE If the White Balance is set to match the light source, the camera reproduces colors more accurately. 1. 2. 3. 4. 5. Auto Settings are automatically set by the camera Cloudy For recording under overcast, shady or twilight skies Day light For recording outdoors on a bright day Fluorescent For recording under fluorescent lighting Tungsten For recording under tungsten lighting Turn the Mode dial to A/S/M (advanced) mode. Press the MENU button.
TAKING PICTURES/VIDEO CLIPS RECORDING MOVIE CLIPS The digital camera can shoot video clips with sound. The resolution can be set to either at L (640 x 480) or at S (320 x 240) when using SD card as storage. Resolution Purpose (Large) 640 x 480 (15 fps) TV (Small) 320 x 240 (25 fps) Web video 1. Turn the Mode dial to video mode. The LCD monitor displays the maximum recording time (in seconds). 2. Press the Shutter button fully down to start record. The movie mode icon turns into red.
TAKING PICTURES/VIDEO CLIPS FUNCTIONS AVAILABLE IN EACH CAMERA MODE Function Mode Auto Advanced (A/S/M) Video EV -2.0~+2.
REVIEWING YOUR FILES REVIEWING YOUR FILES REVIEWING THE STORED FILES You can view the recorded pictures and video clips on the LCD monitor. The playback function is available in each shooting mode. 1. Press to view the captured photo or video clip. The last recorded image or video clip appears on the LCD monitor. ) will be shown on the right side of the LCD. Press OK to • If the file is video clip, the vide clip icon ( play the video clip. Press OK again to pause or resume. 2.
REVIEWING YOUR FILES DELETING FILES FROM MEMORY Delete the files that you don’t want to keep to free memory space. You can delete individual files or all files when the camera is in review mode. Deleting One File 1. In Review mode, press or button to search for the unwanted file. button to enter deleting menu. 2. Press the 3. Press or button to select Yes or No. 4. Press OK to confirm. • If No is selected, no change will be made. • If Yes is selected, the file will be deleted.
REVIEWING YOUR FILES RUNNING A SLIDE SHOW 1. Press to enter Review mode. 2. Press MENU button. 3. Press the or to select Slide Show and then press the OK button. 4. Press the or to select PLAY and then press OK. The slide show begins automatically from the first picture. 5. Press the OK button to pause or resume slide show. 6. Press MENU button to stop the slide show. 7. Press the MENU button to close the menu window. Note: For video clips, only the first frame will be shown.
SETTING FILE NAMES & PRINTING ORDER ABOUT FILE NUMBER AND FOLDER CAPACITY Images or video clips are assigned file numbers from 0001 to 9999, and folders are assigned folder numbers from 100 to 999. Each folder usually contains up to 999 images. If a photo is taken when the file number has reached 0999, or when the files are copied (p.26), the camera will create a new folder. For example, if the current folder is “100-xxxx”, the new folder will be named “101-xxxx.
SETTING FILE NAMES & PRINTING ORDER CHOOSING THE PICTURES FOR PRINTING You can select images for printing and specify the number of print copies. This is extremely convenient for sending the images to a photo developing service or for printing on a direct print function compatible printer. 1. 2. 3. 4. 5. 6. 7. Insert an SD card and transfer the files from internal memory to SD card. to enter review mode. Press Press the MENU button. Press the or to select Print. Press the OK button to enter its sub-menu.
MAKING CONNECTIONS CONNECTING THE CAMERA WITH YOUR TV The camera allows you to view individual files on the television. To begin, check your television documentation to determine what video standard you should set your camera to. NTSC Japan, U.S.A., Canada, etc. PAL Europe, Asia (excluding Japan), Oceania, etc. Setting Video Output Signal Mode 1. Press MENU button. 2. Press to select “Setup” menu. 3. Press the or to highlight TV Output. 4. Press the or to select NTSC or PAL. 5.
MAKING CONNECTIONS Downloading files by using an USB cable Note for Win 98 SE users: The camera driver must be installed before proceeding to download the files. 1. Connect one end of the supplied USB cable to the computer’s USB port. 2. Power the camera on. 3. Connect the other end of the USB cable to the camera’s USB port. The LCD shows “USB CONNECT” when the connection to the computer is successfully. 4. Double click “My Computer”. 5. Double click “Removable disk”. 6. Double click “DCIM”.
INSTALLING SOFTWARE (FOR WINDOWS USERS) INSTALLING THE CAMERA DRIVER (FOR WIN 98 SE USERS) Note for Win 98 SE user: You must install the camera driver before proceeding to download files from the camera to your computer by using the USB cable. Once the camera driver is installed, you do not need to install it again. 1. Start up your computer, and insert the software installation CD-ROM into the CD-ROM drive. The splash screen will appear. (Fig. 1.
INSTALLING SOFTWARE (FOR WINDOWS USERS) INSTALLING QUICK TIME PLAYER 6.5 The video clip files recorded with this camera is in MPEG-4 format and can only be played with the installation of Quick Time Player 4.0 or above. Please install the Quick Time Player from the supplied CDROM before proceeding to play the video clips on your computer. 1. Start up your computer, and insert the Quick Time Player CD-ROM into the CD-ROM drive. The Quick Time setup screen will appear in a few seconds. (Fig. 1.
INSTALLING SOFTWARE (FOR WINDOWS USERS) 8. Click [Next]. Setup starts. (Fig. 1.7 & Fig. 1.8) Fig. 1.7 Fig. 1.8 9. When the Quick Time Settings screen appears (Fig. 1.9), click [Next]. 10. Choose the connection speed and then click [Next]. (Fig. 2.0) Fig. 1.9 Fig. 2.0 Fig. 2.1 Fig. 2.2 11. Click [Next]. (Fig. 2.1) 12. Click [Finish]. (Fig. 2.2) 33 6340z UG-ENU (516084-00).
INSTALLING SOFTWARE (FOR WINDOWS USERS) 13. Now the setup is complete. Click [Close]. (Fig. 2.3) The Quick Time Player is shown. (Fig. 2.4) Fig. 2.3 Fig. 2.4 INSTALLING ROXIO PHOTOSUITE 5.0 SE (OPTIONAL) Roxio PhotoSuite 5.0 SE is a photo editing application that is included for free in the supplied CD-ROM. This software is for Windows XP/ME/2000/98SE users. 1. Start up your computer, and insert the software installation CD-ROM into the CD-ROM drive. The splash screen will appear. (Fig. 1.
INSTALLING SOFTWARE (FOR WINDOWS USERS) 5. Type in user information and then click “Next”. (Fig. 1.5) 6. Select a destination folder in which the software will be installed and then click “Next”. (Fig. 1.6) For most users, C:\Program files\ is the most appropriate choice. Fig. 1.5 Fig. 1.6 7. Click on “Place Shortcut on Desktop” and “Copy Content files to hard drive” if you like to and then click “Next”. (Fig. 1.7) Fig. 1.7 Fig. 1.8 8. Read the Release Notes (fig. 1.
INSTALLING SOFTWARE (FOR WINDOWS USERS) INSTALLING ADOBE ACROBAT READER 5 (OPTIONAL) The Acrobat Reader can be used to view the electronic user’s guide. Step 1 Start up your computer, and insert the software installation CD-ROM into the CD-ROM drive. The splash screen will appear. (Fig. 1.1) If it does not appear, double-click My Computer and find the CD-ROM drive, then double-click it. Fig. 1.1 Step 2 Step 3 Click on Adobe Acrobat Reader. Click [Next >]. (Fig. 1.2) Fig. 1.2 Step 4 Step 5 Fig. 1.
INSTALLING SOFTWARE (FOR WINDOWS USERS) USING THE ROXIO PHOTOSUITE 5.0 SE Important! Please reboot the system after installation of PhotoSuite before starting the application software. Roxio PhotoSuite 5.0 SE gives you the ability to edit, crop and print the photos you download onto your computer from the digital camera. Refer to the application help documentation for information on how to use the software. To start this program, click Start > Program > Roxio PhotoSuite 5 37 6340z UG-ENU (516084-00).
APPENDIX TROUBLESHOOTING Problem Cause Solution The camera cannot be turned on. Battery is dead. Fully charge the battery or use a compact power adapter. The battery compartment door is open. Make sure the battery compartment door is securely closed. The flash is charging. Wait till the flash is fully charged. Memory is full. Delete unwanted files or insert a new SD card. Maximum file number is exceeded. Turn “File No. Reset” on, then format the card or insert a new card.
APPENDIX SPECIFICATIONS Sensor 6.1Mega Pixels CCD Size : 1/1.8 inch Lens Samsung 3× zoom lens View Finder Optical with real image Color LCD Display 1.5” TFT LCD Panel Focus Range Normal Mode : 80 cm (2.62 ft.) ~ infinity Macro Mode : 5 ~ 80 cm (0.16 - 2.62 ft.) (W), 30 ~ 80 cm (0.98-2.62 ft.
APPENDIX Communication Interface USB 1.1 Self-Timer 2 steps, 2/10 sec. with beep sound Playback Mode Single / 6 thumbnails / slide show TV System NTSC / PAL selectable Power Supply Battery : Rechargeable battery, 3.7V 900mA DC input : 5V 2.0A DC adapter Dimensions 101 × 56 ×34 (mm) (3.98 x 2.21 x 1.34 inches) Weight Camera Body w/o battery : 174 g (6.14 oz.), w/battery : 201 g (7.09 oz.) Ambient temperature Operating : 0 to 40 ˚C Storage : -20 to 60 ˚C 40 6340z UG-ENU (516084-00).
APPENDIX GETTING HELP Troubleshooting Section in this User’s Guide Please refer to the Troubleshooting section (p.38) first, as it contains some of the most common problems that users encounter. Website Customer Support/FAQ For problems that are not listed in the Troubleshooting section, please visit our customer support website at www.concord-camera.com to view the Frequently Asked Questions (FAQ) by clicking the appropriate camera model picture in the “Camera Support” Section.
Visit Concord on the Internet www.concord-camera.com Concord 6340z User’s Guide Copyright 2004 Concord Camera Corp. 6340z UG-ENU (516084-00).indd 42 Version 1.