User’s Guide www.concord-camera.
ENGLISH CONGRATULATIONS Congratulations on the purchase of your new camera. Your camera has been carefully engineered and manufactured to give you dependable operation. Read this manual before operating the camera to become more familiar with it. This manual has been written and formatted with depth and detail so that you can easily follow the instructions to maximize the features of your camera.
Table of Contents GETTING STARTED ............................................................................................................4 Package Contents ............................................................................................................................. 4 System Requirements ...................................................................................................................... 5 Camera Overview...................................................................
SOFTWARE INSTALLATION ............................................................................................24 Installing Your Camera Driver ......................................................................................................... 24 Installing the Ulead Photo Explorer 8.0 .......................................................................................... 25 Installing the Ulead Cool 360 ............................................................................................
GETTING STARTED GETTING STARTED PACKAGE CONTENTS Check that all of the items shown below are included with your camera. • TV Cable • Digital Camera • USB Cable • Camera Case • Wrist Strap • 2X AAA Batteries • CD-ROM(Includes Camera Driver, • Quick Start Guide Photo editing software, multi-lingual User’s Guide etc.
GETTING STARTED SYSTEM REQUIREMENTS Windows: • PC with processor better than MMX Pentium 300 MHz • Windows XP/2000/ME/98SE • Minimum 128 MB RAM • USB port • CD-ROM driver • 1024 x 768 monitor, 24-bit color (true color) Macintosh: • Mac OS 10 or later Specifications are subject to change without prior notice.
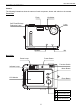
GETTING STARTED CAMERA OVERVIEW Camera The following illustrations show the names of each component, button and switch on the camera.
GETTING STARTED Top View Shutter Button Bottom View Tripod Socket Battery Door SD Card Slot Side View Macro Switch Strap Eyelet USB Port Terminal TV OUT Terminal 7
GETTING STARTED LCD indications Shooting Mode EV Value Pictuire Size Macro Indicator Battery Capacity White Balance Indicator Zoom Indicator Capture Mode Indicator Flash Mode Indicator Memory Capacity (Remaining Number of Storable Pictures) Review Mode .
GETTING STARTED LOADING THE BATTERIES The camera uses 2x AAA alkaline or rechargeable batteries. 1. Slide the battery door and lift it open. 2. Insert the batteries according to the polarity indication engraved on the battery contact as shown. 3. Close the battery door. Checking the Battery Level The battery level indicates the power of the batteries. Full (white) Low (red, can not use flash) When “Low Battery” is shown on the LCD, replace thebatteries with the new ones.
GETTING STARTED To remove the SD card: Press the memory card into the slot then release. When the card is partially ejected, pull it out. Note:If the “Memory Full! ” warning message appears on the LCD, it means the SD card or internal memory is full. Please remove the memory card and insert a new one or transfer all images to your computer. TURNING THE CAMERA ON AND OFF Press the Power button to turn the camera on. The green Power lamp will light up, the LCD will turn on automatically.
TAKING PICTURES AND VIDEOS CLIPS TAKING PICTURES AND VIDEOS CLIPS TAKING PICTURES 1. Power on the camera. (Capture mode). 2. Slide the Function switch to 3 1 Note: In picture taking mode, the icon will be shown on the lower left side of the LCD. If this icon is not shown, press the button 2 icon is shown. repeatedly until the 3. Frame your subject with the LCD or viewfinder. 4. Hold the camera still and press the Shutter button to take the picture.
TAKING PICTURES AND VIDEOS CLIPS TAKING VIDEO CLIPS 4 The camera can capture video clips with sound( Sound playback only on 1 TV&PC). 1. Turn on the camera. 2. Slide the Function switch to 3. Press the 2 (Capture mode). button repeatedly until the Video Mode icon appears on the LCD. 4. Use the viewfinder or LCD to frame your subject. 5. Press the Shutter button to start recording the video. • During recording, the recording time is displayed. 3 6. Press the Shutter button again to stop recording.
TAKING PICTURES AND VIDEOS CLIPS USING THE DIGITAL ZOOM The camera provides up to 4x digital zoom. In Video mode, when picture size is set to QVGA only 2x digital zoom can be achieved. 1. Press the to zoom in. The digital zoom bar will be shown on the LCD. 2. Press the to zoom out or return to the normal mode. Important: 1. Hold your camera steady when using Digital Zoom to prevent blurred pictures, caused by jittery movement.
TAKING PICTURES AND VIDEOS CLIPS SETTING WHITE BALANCE When the white balance is set to match the light source, the camera can take picture more accurately. 1. Slide the Function switch to (Capture mode). 2. Press the MENU button, the LCD will show White Bal (White Balance) in highlight. 3. Press the Enter button to enter its submenu. 4. Press the or button to select the desired white balance mode. 5. Press the MENU or ENTER button to exit.
TAKING PICTURES AND VIDEOS CLIPS SETTING SIZE / RESOLUTION 1. Slide the Function switch to (Capture mode). 2. press the MENU button. 3. Press the or to select PS (Pict Size) and then press the Enter button. 4. Press the or button to select the desired size/resolution. 5. Press the Enter or MENU button to exit.
TAKING PICTURES AND VIDEOS CLIPS Setup menu and features ): Beeper( When Beeper is set on, a beep sound can be heard when the camera ON is powered on . No beep sound can be heard if Beeper is set at OFF mode. OFF (Default) Auto Power Off( ): When Auto Power Off is activated, after one minute of inactivity, the LCD will automatically power off. Then the camera will automatically ON power off after being idled for around 3 minutes.
TAKING PICTURES AND VIDEOS CLIPS Language( ): English (Default) Setting the language to English. Français Setting the language to French. Deutsch Setting the language to German. Español Setting the language to Spanish. Italiano Setting the language to Italian. Nederlands Setting the language to Dutch. Português Setting the language to Portuguese.
REVIEWING YOUR FILES REVIEWING YOUR FILES VIEWING FILES 1. Slide the Function switch to (Playback mode). The last picture or video clip will be shown on the LCD. The file type will be shown on the lower left corner of the LCD: = Picture, 2. Press the = Video Clip button to skip to the previous file, press the button to skip to the next file. 3. To review video clips, press the Enter button. • While playing video clips, you may press the Enter button to pause or resume the playing.
REVIEWING YOUR FILES shows options as below: Single To display one picture each time. Thumbnails To display up to six files on the LCD at a time. Slide Show To play a slide show of all the stored files one by one. 4. Press the or button to select ([Thumbnail]) and then press the Enter button. • Up to six thumbnail view files appears on the LCD. For video clips, only the first frame can be seen. 5. Press the or button to select specific picture/video that is shown in the current screen.
DELETING STORED FILES DELETING STORED FILES Note: Once file is deleted, it cannot be recovered. DELETING ONE FILE 1. Slide the Function switch to 2. Press the (Playback mode). or button to select the picture or video you want to delete, and then press the or button to highlight Del (Delete) and then press the Enter button. The LCD MENU button. 3. Press the shows options as below: Delete One To delete the current picture or video. Delete All To delete all pictures and videos.
DELETING STORED FILES FORMATTING THE INTERNAL MEMORY OR SD CARD Caution: 1. Formatting will delete all pictures and video clips from the memory. 2. During the formatting process, never remove the memory card or batteries, as it will damage the card and/or the camera. 3. When a memory card is not inserted into the camera, selecting the formatting function will format the internal memory instead. All pictures and video clips stored in the internal memory will be deleted. 1.
PRINTING STORED PICTURES PRINTING STORED PICTURES SELECTING PICTURES FOR PRINTING You can select pictures for direct printing by a photo developing service center or on a direct print compatible printer. 1. Insert the SD card. 2. Slide the Function switch to or 3. Press the (Playback mode). button to select the picture you want to print. 4. Press the MENU button. or 5. Press the button to highlight Pr (Print) and then press the Enter button.
PRINTING STORED PICTURES PRINTING PICTURES DIRECTLY 1. Select the desired pictures (see ‘Selecting Pictures for Printing’ section). 2. Take the SD card out of the camera. 3. Insert the SD card into the SD card slot of a direct printing compatible printer. 4. Refer to the instruction manual of the printer to print the pictures.
SOFTWARE INSTALLATION (FOR WINDOWS USERS) SOFTWARE INSTALLATION (FOR WINDOWS USERS) Option Description Enable the camera to become an external drive on your computer Camera Drivers under Windows 98SE, and enables the PC-Cam function under any of required Windows systems. Enables you to playback and transfer the files(pictures and video Ulead Photo Explorer 8.0SE clips) from the camera to your computer, to use the camera as PC camera, and to organize, edit and share photos etc.
SOFTWARE INSTALLATION (FOR WINDOWS USERS) To ensure the complete installation and enable the camera to function well, please do select “restart your computer”. Step 7 INSTALLING THE ULEAD PHOTO EXPLORER 8.0 Step 1 Make sure that your camera is not connected to the computer. Step 2 Make sure the computer is powered on Windows 98SE, ME, 2000 or XP is running. Step 3 Close any other applications or software you may be running. Step 4 Insert the supplied CD-ROM into the CD-ROM drive.
SOFTWARE INSTALLATION (FOR WINDOWS USERS) Click [Next]. Step 7 Read the agreement, and then click [Yes]. Step 8 Click [Next]. Step 9 Click [Next].
SOFTWARE INSTALLATION (FOR WINDOWS USERS) Click [Next]. Step 11 Click [Next]. Step 12 Click [Next]. Step 13 Click [Next].
SOFTWARE INSTALLATION (FOR WINDOWS USERS) Installing stars. Please wait for a few seconds. Step 15 (For Win 98SE/2000/ME) Note: If you selected to read the Readme file in step 15, the Readme window will pop up. Close the window after reading. Click [Next]. Step 16 Click [Finish]. Remember to restart your computer to ensure successful installation.
SOFTWARE INSTALLATION (FOR WINDOWS USERS) INSTALLING THE ULEAD COOL 360 (OPTIONAL) Step 1 Make sure that your camera is not connected to the computer. Step2 Make sure the computer is powered on and Windows 98SE, ME, 2000 or XP is running. Step 3 Close any other applications or software you may be running. Step 4 Insert the supplied CD-ROM into the CD-ROM drive. The installer will pop up automatically.
SOFTWARE INSTALLATION (FOR WINDOWS USERS) Read the agreement, and then click [Yes]. Step 9 Click [Next]. Step 10 Click [Next]. Step 11 Click [Next].
SOFTWARE INSTALLATION (FOR WINDOWS USERS) Installation starts. Step 13 If you do not want to install Internet Explorer Plugin, click [No].Otherwise, click [Yes]. Step 14 Click [Next]. Step 15 Click [Next]. Step 16 Click [Finish].
SOFTWARE INSTALLATION (FOR WINDOWS USERS) Click [Exit]. Step 18 INSATLLING ADOBE ACROBAT READER (OPTIONAL) Step 1 Make sure that your camera is not connected to the computer. Step 2 Make sure the computer is powered on and Windows 98SE, ME, 2000 or XP is running. Step 3 Close any other applications or software you may be running. Insert the supplied the CD-ROM into the CD-ROM drive. The installer will pop up Step 4 automatically.
SOFTWARE INSTALLATION (FOR WINDOWS USERS) The files will be saved into C:\Program Files\Adobe Reader automatically. OR You may change the default folder by clicking [Browse] and selecting a different folder in your computer. Click [Next]. Step 8 Installation progress. Step 9 Click [OK].
DOWNLOADING PICTURES AND VIDEO CLIPS ONTO YOUR COMPUTER DOWNLOADING PICTURES AND VIDEO CLIPS ONTO YOUR COMPUTER PREPARING TO DOWNLOAD FILES TO YOUR COMPUTER Note: For Win 98SE, you must install the driver before downloading files. 1. Slide the Function switch to (Playback mode). 2. Turn on the camera. 3.
DOWNLOADING PICTURES AND VIDEO CLIPS ONTO YOUR COMPUTER FOR MACINTOSH USERS 1. Connect the camera to the computer. • After a few moments, the external hard drive will appear on the desktop. 2. Double-click the “Removable Disk” removable drive that is on your desktop. 3. Double-click DCIM. 4. Double-click the folder that contains the desired images to view. • The stored pictures (JPG) and video clips (AVI) stored in the memory will be displayed. 5. Drag and drop the image you want to save in the computer.
USING JENOPTIK C 3.1 SL AS A WEB CAMERA (FOR WINDOWS ONLY) USING JENOPTIK C 3.1 SL AS A WEB CAMERA (FOR WINDOWS ONLY) Note : You must install the camera’s driver before using the web camera. 1. Slide the Function switch to (Capture mode). 2. Make sure that the camera is securely connected to your computer . 3. Turn on your camera.
USING JENOPTIK C 3.1 SL AS A WEB CAMERA (FOR WINDOWS ONLY) 4. Make sure the drive option is CD-ROM drive, then locate and double click Win98 folder, then click “OK” . 5. Click “OK” to continue and complete the installation. For Win 2000 1. The installation message will pop up. Click “Next”. 2. The warning message of “Digital Signature Not Found” will pop up. Click “Yes” to continue to complete the installation.
USING JENOPTIK C 3.1 SL AS A WEB CAMERA (FOR WINDOWS ONLY) 2. The “ Hardware Installation” warning will appear, click “Continue Anyway” to proceed. Note: The message of “Hardware Installation” will occur 2 times successively, just click “Continue Anyway” to proceed. 3. Click “Finish” to complete the installation.
UNPLUGGING YOUR CAMERA FROM THE COMPUTER UNPLUGGING YOUR CAMERA FROM THE COMPUTER Windows 98SE: Unplug the Mini-USB from the camera directly. Windows ME/2000/XP: 1. Turn the camera off. 2. Click once on the “Unplug or Eject Hardware” icon on the right hand side of your task bar. (fig. 1.1) 3. Select “Stop Concord camera USB Mass Storage Device” fig.1.1 4. Click [OK] in the “Safe to Remove Hardware” prompt. 5. Unplug the Mini-USB from the camera. (fig. 1.2) Macintosh: 1.
CONNECTING THE CAMERA TO TV CONNECTING THE CAMERA TO TV SETTING TV MODE The camera allows you to view individual files and to take pictures or record clips on the television. To begin, check your television documentation to determine the suitable type of TV broadcast standard: NTSC or PAL. 1. Slide the Function switch to (Capture mode). 2. Press the MENU button. 3. Press the or 4. Press the and button to select Ad (Advance) and then press the Enter button.
TROUBLE SHOOTING TROUBLE SHOOTING Problem Possible Cause Possible Solution The power is not on. Press the Power button to turn the camera on. The batteries were not loaded properly. See “Loading the Batteries”. Batteries are depleted. Replace with unused alkaline or fully recharged batteries (two AAA-size batteries). The battery cover is not closed properly. Close the cover correctly and securely. The camera is in the Playback Function mode. Slide the function switch to Capture Function mode.
TROUBLE SHOOTING Cannot take a picture or a video clip when using an SD memory card. Part of the picture/ video clip is missing. Camera is not responding during picture capture. The LCD is not displaying anything. The camera does not recognize your SD card. The computer cannot download files from the camera. The SD card is locked or write protected. Remove the SD card from the card slot and slide the lock switch to off. Something was blocking the lens when taking the picture.
SPECIFICATION SPECIFICATION Image Sensor CMOS Sensor (2048 x 1536 pixel), Sensor area 1 / 2 “ Lens Specification F 2.8, f = 8.34 mm Focus Range Operating System Normal: 1.5 m (4.92 ft.) to Infinity, Macro:40 cm - 50 cm (1.31 ft - 1.
GETTING HELP GETTING HELP TROUBLESHOOTING SECTION IN THIS USER’S GUIDE Please refer to the Troubleshooting section first, as it contains some of the most common problems that users encounter. WEBSITE CUSTOMER SUPPORT/FAQ For problems that are not listed in the Troubleshooting section, please visit our customer support website at www.concord-camera.com to view the Frequently Asked Questions (FAQ) by clicking the appropriate camera model picture in the “Camera Support” Section.
SAFETY TIPS AND MAINTENANCE SAFETY TIPS AND MAINTENANCE Cleaning the camera body Please use a soft dry cloth to clean the camera. Cleaning the lens and LCD 1. Blow off dirt or dust with a blower or canned air. 2. Gently wipe the lens and/or LCD with a micro-fiber cloth. 3. To remove dirt or residue, moisten the cloth with lens cleaning fluid and gently wipe the lens and/or LCD. CAUTION: Do not apply the fluid directly onto the lens or LCD.
SAFETY TIPS AND MAINTENANCE • • Do not swallow batteries or small camera accessories. Keep the camera away from water and other liquids, and never let it get wet. Do not use outdoors when it is raining or snowing. • Should any form of liquid enter the camera, do not use it. Switch the camera off, and then remove the batteries. Do not continue to use the camera as this may cause a fire or electric shock.
SAFETY TIPS AND MAINTENANCE • • Avoid heat, liquid and direct sunlight when using and for when storing. Do not open the battery/card cover or remove the SD Memory Card while data is being read or written. • • Do not dismantle or modify. The recorded data may be lost if the card is affected by strong static electricity, electrical shock, during card repair or malfunction. • When using SD Memory Cards do not change the attributes (read-only, etc.
REGULATORY INFORMATION REGULATORY INFORMATION FCC INFORMATION FCC WARNING: This equipment meets the limits for a Class B digital device, pursuant to Part 15 of FCC rules. Only the cable supplied with the camera should be used. Operation with other cables is likely to result in interference to radio and TV reception and could void the user’s authorization to operate this equipment. This device complies with Part 15 of the FCC Rules.
Visit Concord on the Internet www.concord-camera.com JENOPTIK C 3.1 SL User’s Guide Copyright 2005 Concord Camera Corp. Version 1.