
Instructions / Assembly

9
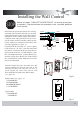
Installing the Wall Control
Before you begin, TURN OFF THE ELECTRICITY (at
the main circuit panel
this procedure, have a qualified electrician
unit.
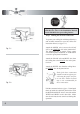
(see figure B).
Make sure to use wire
nuts on all connections.
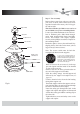
Push the Control Unit into the switch box and
secure it with the two screws at each end of the
unit (this procedure is the same as if you were to
put the original wall switch back into the wall)
Now attach the face plate to the Wall Control.
Fig. C
Fig. B
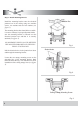
Fig. A
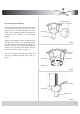
Disconnect the power and remove the existing
wall plate and switch.Set all knobs on the dual
slide wall-mounted control in the OFF position.
Installation of this control requires that a three-
conductor cable with ground wire be run betw-
een the control wall box and the ceiling fan out-
let box. Make wire connections and secure with
wire nuts supplied
(see figure A).
Connect BLACK wire from A.C. power supply
to BLACK wire ”AC IN L” from the wall-moun-
ted control. Connect BLACK wire from the ceil-
ing fan to BLACK wire ”TO MOTORL L” from
the wall-mounted control. Connect BLUE wire
from the ceiling fan to BLUE wire”FOR LIGHT”
the wall-mounted control.
Speed Control
Light Control
0: POWER OFF
H: HIGH SPEED
M: MEDIUM SPEED
L : LOW SPEED
0: POWER OFF
(see figure C)
or fuse box). If you feel unsure of
install this
GREEN
WHITE
BLUE
AC POWER
GROUND
BLACK
TO LIGHT
GROUND
TO FAN
AC IN
L
M
H
0
BLACK
BLUE
BLACK
INPUT
L
M
H
0
- : POWER ON