
User guide


57
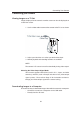
Connecting Your Camera
NOTE:
· When you disconnect the USB cable while the camera is on,
the camera will automatically turn off.
· It’s recommended to power the camera from a household power
outlet with an AC Adapter.
· If you are running Windows 98, the first time the camera is
connected to the PC a message will appear on your monitor
“Unknown device”; The driver installation will finish.
4.
Click on “My Computer” and a “Removable Disk” drive will be displayed.
5.
Double-click the “ Removable Disk” and you will see a “DCIM” folder.
6. All the images stored in the camera are transferred to the “DCIM”
folder. If an SD card is inside the camera, only the images on the
card will be transfered.
7. You can save your pictures to any location on your hard drive.
Use the MGI software to edit your photos.
Transferring Images to a Mac
1. Set the camera to review mode.
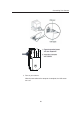
2. Connect the supplied USB cable to the camera and the computer's USB port.
Please refer to your computer manual for information regarding the USB port location.
3. Turn on the camera.
4. The INTERNAL icon will appear on your desktop and the iPhoto screen will pop up.
You may use either iPhoto or the INTERNAL icon to acquire images.
Using iPhoto: Click on Import to transfer pictures.
Using the INTERNAL icon:
1. Click on the INTERNAL icon.
2. The DCIM folder will appear. All the images stored in the camera are transferred
to this folder. Open the folder and double click to view the images.
Note:Windows XP users will see "Internal" instead of "Removable Disk."