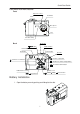
Quick Start Guide Camera Nomenclature Front Exposure sensor Viewfinder Flash Microphone Lens Self-timer lamp Mode dial Back button Shutter button LED indicator Viewfinder Power button Speaker / Zoom In / Up button / Self-timer / Left button / Continuous shutter / Right button / Zoom Out / Down button LCD Monitor screen Battery cover / / Flash / / Play / / Pause button / /Stop button Battery Installation 1. Open the battery cover by pushing and sliding it to the side.
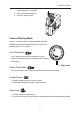
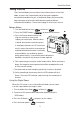
Quick Start Guide 2. Check inscription on battery chamber for correct negative/positive installation. 3. Install 2-AA alkaline batteries. 4. Close the battery cover. Camera Working Mode You can select the camera’s working mode by using the Mode dial located on the top of the camera. There are 4 working modes in this camera. Auto Photo Mode ( ) In this mode, the camera will automatically set the exposure and white balance according to your shooting environment.
Quick Start Guide Taking Pictures There are two Modes you can choose from to take a picture. In the Auto Mode, just press the shutter button and let the camera judge the environmental conditions for you. In the Manual Mode, you can manually adjust the exposure and set the white balance based on different environmental conditions. Please refer to page 21 of the user's manual. Taking a Picture 1. Turn the Mode dial to Auto ( ) or Manual ( 2. Press the POWER button ( ). ) to power on the camera. 3.
Quick Start Guide Reviewing Your Pictures and Videos Viewing Pictures You can view pictures and images in Playback mode. 1. Turn the Mode dial to Playback ( ). The LCD screen displays the last recorded image. 2. Use the RIGHT/LEFT button ( NOTE: ) to view different pictures. / · To view video clips, press the PLAY button ( ). · Press the STOP button ( · If you press STOP while the video is playing, the video will return to the first image. ) to stop the video.
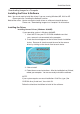
Quick Start Guide Downloading Images to a Computer Installing the Driver & Software Note: You do not need to install the drivers if you are running Windows,ME, 2000 or XP. Please go to the "Installing the Software" section. Note to Mac users: You do not need to install drivers or software to transfer pictures. Please see "Downloading Images to a Computer" for instructions. Installing the Driver Installing Camera Drivers (Windows 98/98SE) If your operating system is Windows 98/98SE: 1.
Installing the Software Installing the Software (Windows Users) You may choose to skip the software installation procedure if you already have photo editing software loaded on your computer or if you would like to transfer pictures without editing them. Please refer to the Downloading Images section for instructions on transferring pictures to you computer. If your operating system is Windows 98/98SE/2000/ME/XP: 1. Insert CD into your PC CD-ROM drive.
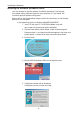
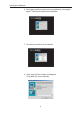
Installing the Software 3. The Software License Agreement window will be displayed. If you agree to this, click [YES], the window will then move to the next step. If you disagree, click [NO] and the install program will be canceled. 4. Click Next to continue the installation. 5. Select Destination Location.
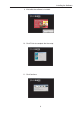
Installing the Software 6. We suggest creating a shortcut on your desktop by selecting this option. Click Next to continue the installation. 7. Click Next to continue the installation. 8. Start Copying Files window will displayed. Click [Next>] to start installation.
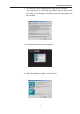
Installing the Software 9. Wait while the software is installed. 10. Click Finish to complete the the setup. 11 . Click Continue.
Installing the Software 12.Click Cancel if you would like to complete the registration at a later date. If you would like to register now, complete the registration form and click Register. 13. Select "Yes, I will restart my computer". MGI Video Wave will install next. Follow the on screen instructions. After the installation has finished, choose YES when asked to restart. Photo Vista will install next. Follow the on screen instructions.
Quick Start Guide Transfering Pictures(Windows Users) 1. If your operating system is Windows 98/98SE, make sure that you install the USB driver and imaging software that comes on the bundled CD-ROM first. Please see above and refer to Page 44 and 45 of the user’s manual. If your operating system is Windows ME/2000 or XP installing the driver is unnecessary, however; please remember to install the software. 2. Connect the supplied USB cable to the computer’s USB port. 3.
Technical Support Hot Line: Toll Free In the USA & Canada 1-866-522-6372 Toll Free In Europe UK: 0800-169-6482 BELGIUM: 0800-787-57 FRANCE: 0800-917-599 GERMANY: 0800-1800-563 SPAIN: 900-973-195 ITALY: 800-781-883 All Other Countries - Toll 31-53-482-9779