Add a Splash of Imagination Installation Instructions AirStep Evolution • AirStep Plus AirStep Basix • AirStep Advantage ® ® ® ®
Installation Instructions for AIRSTEP ADVANTAGE, AIRSTEP EVOLUTION, AIRSTEP PLUS and AIRSTEP BASIX The perimeter fastening method can be used for most applications and it provides not only subfloor masking benefits, but also provides the option to fit flooring net where it is not desirable to install trim. Plus AS-01 Adhesive provides a releasable bond, so in the event that it becomes necessary to get access to the subfloor, you can pull the sheet back without damaging it. AirStep Products are 12’ (3.
General Subfloor Information WARNING: EXISTING IN-PLACE RESILIENT FLOOR COVERING AND ASPHALTIC ADHESIVES. DO NOT SAND, DRY SCRAPE, DRY SWEEP, DRILL, SAW, BEADBLAST, OR MECHANICALLY CHIP OR PULVERIZE EXISTING RESILIENT FLOORING, BACKING, LINING FELT, ASPHALTIC “CUTBACK” ADHESIVE OR OTHER ADHESIVE. These existing in-place products may contain asbestos fibers and/or crystalline silica. Avoid creating dust. Inhalation of such dust is a cancer and respiratory tract hazard.
Flooring Layout • Unroll the flooring using care to prevent distortions and position it squarely in the room to achieve the best design layout. • Make relief cuts down to the floor/wall juncture at inside and outside corners. • Allow the flooring to relax and flatten. If necessary use a soft bristle push broom to remove any distortions or air pockets. If using a combination of QuikStik tape and staples, complete the taped areas first.
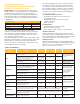
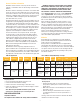
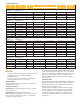
Seaming Specifications Pattern Number Pattern Name Economy Match Reverse Sheets Length Width Actual Repeat Length Actual Repeat Width AIRSTEP ADVANTAGE® Adhesive: AS-01 Seam Sealer: SU106 88000 - 88004 Savor™ No 54" (137.2 cm) 72" (182.9 cm 54” (137.2 cm) 72" (182.9 cm) 88010 - 88015 Playtime™ No Random 48" (121.9 cm) 54” (137.2 cm) 48" (121.9 cm) 88020 - 88023 Cherish™ No 27" (68.6 cm) 13.09" (33.3 cm) 54” (137.2 cm) 52.36" (132.9) 88030 - 88033 ™ No 27" (68.6 cm) 13.
Place a 3” (7.7cm) wide strip of scrap flooring under the entire length of the seam. Cut the seam in the center of the embossed line when seaming designs with grout lines that are wider than 5/32” (4mm). Cut the seam up on the shoulder of the grout line in the land area when seaming designs with narrower grout lines. Cut the seam with a sharp utility knife and steel straightedge. Hold the knife at a 90° angle from the floor and apply sufficient pressure to cut through both sheets in a single pass.