
Installation Instructions

C
arefree Plank is a floating flooring system that
utilizes an attached adhesive strip to connect the planks
together. No additional adhesive is required. You
simply connect the planks together by pressing the
edges into the adhesive strip. The planks bond to each
other, not to the floor.
General Information
• Carefree is recommended for installation in enclosed
heated areas where HVAC has been in operation for
at least 30 days. Do not install Carefree on ramps or
in rooms with sloping floors or floor drains.
• Always handle, store and transport Carefree
carefully to prevent distortions. Store and transport
cartons on a flat surface in neat stacks no more than
10 cartons high. Store cartons flat, never on the end
or side.
• The suboor and all ooring material must be
conditioned at a constant temperature between
65°F (18°C) and 85°F (29°C) for 48 hours prior to,
during and 48 hours after installation. Thereafter,
maintain a room temperature between 55°F (13°C)
and 85°F (29°C).
• When using ooring from two or more cartons,
make sure pattern and run numbers found on the
carton are the same. This information is stenciled
on the outside of each carton.
• Carefree is a oating oor. Allow a 1/8” space
for expansion between the planks and all vertical
surfaces. Cover the space with trim. Do not install
base cabinets on top of Carefree.
• Do not install Carefree in a dusty environment or
remove the paper liner from the adhesive strip until
ready to be covered with a plank.
Tools and Materials
• 100-pound, 3-section, roller
• Hand roller
• Chalk line
• Carpenter square
• Utility knife (tile cutter optional)
• Cutting board
• Tape measure
Preparing the Area
• Move all furniture, appliances, and xtures from
the room.
• Remove all binding strips or other restrictive
molding from doorways, walls, etc.
• Undercut wood door casing so that the ooring can
be slid under it.
Subfloor Requirements
Carefree Plank can be installed directly over a variety
of subfloor surfaces. All subfloor surfaces must be
clean, dry, smooth and free of movement. In remodel
applications remove all adhesive residue or other
substances that can prevent the floor from floating. All
protruding surface imperfections should be leveled.
Set nails and fasteners 1/32” below the surface. Fill
depressions wider than 1/8” with a portland
cement-based latex patching compound.
WARNING: DO NOT SAND, DRY SWEEP,
DRILL, SAW, BEADBLAST, OR MECHANICALLY CHIP
OR PULVERIZE EXISTING RESILIENT FLOORING,
BACKING, LINING FELT, ASPHALTIC “CUT-BACK”
ADHESIVE, OR OTHER ADHESIVE.
These products may contain asbestos bers and/or
crystalline silica. Avoid creating dust. Inhalation of
such dust is a cancer and respiratory tract hazard.
Various federal, state, and local government agencies
have regulations governing the removal of in-place
asbestos containing material. If you are considering
the removal of a resilient floor covering structure that
contains or is presumed to contain asbestos, you must
review and comply with all applicable regulations.
Regulations outside the United States may vary.
Copies of the Resilient Floor Covering Institute
Recommended Work Practices for the Removal
of Resilient Floor Coverings are available from:
Resilient Floor Covering Institute
401 East Jefferson Street • Suite 102
Rockville, MD 20850 • www.rfci.com
Layout – Determine the direction that planks
will be installed in the room. Normally the long
direction of the plank will be installed parallel with the
long direction of the room. To balance the flooring in
the room, mark the center of the oor. Measure the
distance from the mark to the wall. Divide this
measurement by the plank width (6”). If the remainder
is less than half a plank width (3”), then add 3” to the
remainder to determine the width of the plank in the
rst row.
Example: Room width 12’-2” or 6’-1” on each side
of the center mark 6’-1” (73”) divided by 6” equal 12
with a remainder of 1”. Since 1” is less than one half of
the plank width, add 3” to the remainder for a starting
plank width of 4”.
Note: Check to make sure that the joints in the
nished oor offset joints in the underlayment
by at least 2”. Adjust the layout if necessary.
Installation – Note: The rst row of planks can
be secured to the subfloor with a strip of thin
double face tape to prevent it from moving during
installation. Use a string or chalk line to make sure
the rst row is straight before the planks are secured
to the tape.
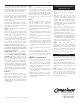
Lay the rst row of planks along the wall
starting in the left corner with the adhesive strips
facing out away from the walls (Fig. 1). Allow a
1/8” space between the edge of the planks and
the wall, base cabinets and any other vertical
surfaces. Remove the paper liner from the
adhesive strip at the end of the rst plank and
secure the end of the next plank by pressing
down on the planks.
Caution: The paper liner is slippery. Place it into
the trash immediately after it is removed from the
adhesive strip to avoid a slip hazard. Protect the exposed
adhesive strip from dust and foot trafc. Do not
remove the paper liner until you are ready to cover the
adhesive strip with another plank. Continue to install the
planks in the rst row including the cut piece at the end
of the row.
Lay the second row starting in the left corner with a
plank cut 2/3 the length or about 24” (Fig. 2). Place
the cut end against the wall. The piece you cut off
can be used at the other end of the row if the layout
permits. Remove the paper liner from the installed
plank in the rst row and place it in the trash. Lay the
plank by holding one end up while slowly positioning
the other end and edge into the adhesive strip against
the previous laid planks to achieve a tight joint. Do
not slide planks together. If adjustments are required,
lift the plank off the adhesive strip and reposition it.
Complete the second row including the cut piece at the
end of the row. Use a hand roller to secure the plank
in the adhesive strip and level the joints.
Carefree
®
by
Specification
• Single layer Sturd-I-Floor rated panel
23/32”or heavier
• Double layer construction, minimum
1” thick
• Minimum of 18” of well ventilated air
space below structural supports
Plywood, other hardwood veneer panels,
particleboard, OSB - Sand joints smooth
and set fasteners 1/32” below the surface.
Do not install over weathered or rough
underlayment.
With vapor emissions 5 pounds or less.
Do not install over expansion joints.
Minimum 2000 psi compression rating.
Must be smooth, dry and in sound
condition. Repair all cracks and
damaged areas.
The temperature of the floor should be
limited to 70°F (21°C) for 24 hours before,
during and 48 hours after installation.
There after the maximum floor temperature
should not exceed 85F(29C).
Must be single layer, fully adhered and in
good condition. Do not install over heavy
cushioned or cushioned backed flooring
or tile installed below grade. Heavily
embossed floors should be leveled with
embossing leveler.
Must be well bonded. Grind high spots
and ll low areas to a smooth surface
with a latex modied portland cement
underlayment to achieve a flat surface.
Subfloor Surface
Wood suboor
suspended over
joist or trusses up
to 19.2” OC
Wood
Underlayments
Concrete, on, above
and below grade
Lightweight
Concrete and
Gypsum Topping
Radiant Heated
Floors
Existing Resilient
Flooring and Tile
Note: Refer to warn-
ing statement above.
Ceramic, Marble
and Terrazzo
CAREFREE INSTALLATION INSTRUCTIONS
Figure 1
Figure 2 Figure 3
Adhesive Strip
Adhesive Strip