Table of Contents INTRODUCTION l Overview…………………………………………………………………………………..1 STREAMLINE CONSOLE l Overview…………………………………………………………………………………..2 l Features………….………………………………………………………………………..2 l Packing List…………………………………………………………………………….….3 l Assembly…………………………………………………………………………….. 4 ~ 6 l Installation…………………………………………………………………………………7 l Front Panel………………………………………………………………..………………8 l Specifications …………………………………………………………………………….
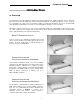
StreamLine Console ------------------------ Introduction l Overview The StreamLine offers the ultimate in styling and computer management. With a keyboard, mouse, TFT LCD panel and an 8-port KVM switch housed in an industry standard 19" 1U-height rack drawer, it saves you up to 1/3 of valuable real estate from a rack cabinet.
StreamLine Console ------------------------ StreamLine Console l Overview The StreamLine Console is a 19” 1U drawer designed for applications where space is at a premium, or CRT displays are undesirable. It features a 15” flat panel TFT display, keyboard and a touch pad. The drawer can be pulled out for operation from the rack on slides which latch in the extended position. When not in use, the display can be folded down, locked and secured while pushed in.
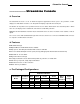
StreamLine Console l Packing List These are required to install the StreamLine Console: n StreamLine Console: assembled "LCD panel keyboard + mouse pad" drawer + Power Adapter. + n Rear bracket & extension kit: This kit contains two pieces of rear brackets and two pieces of aluminum extensions. Make sure you have the correct kit to fit the depth of your cabinet.
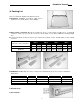
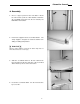
StreamLine Console l Assembly 1. Choose a proper position for the rack drawer. Mount the rear brackets (from the Rear bracket & extension kit), and lightly fasten them onto the rear vertical poles. Both will be removed later. 2. Remove the stopper from the assembled drawer. The safety stopper is designed to refrain the drawer from sliding out during transportation. “ WARNING “ After the safety stopper is removed, the drawer may slide out when tilted and cause serious injury. 3.
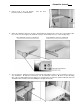
StreamLine Console 5. Remove both of the rear brackets. brackets hold the assembled drawer. Now, the front 6. Attach the aluminum extensions (from the Rear bracket & extension kit) to both sides of the KVM module box. Please note the length of the aluminum extensions and mount them in one of the following ways. Short aluminum extensions attachment 7. Long aluminum extensions attachment The rear brackets, aluminum extensions and slide rails have tight fit.
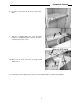
StreamLine Console 8. Push the rear brackets all the way in and fasten them. 9. Slide the assembled drawer out. Push the KVM module box evenly toward the drawer, and then lock both units by the screws. 10. Make sure the C-36 connectors are firmly mated during step 10. 11. Connect the power supply to the power jack on the KVM module to complete the installation.
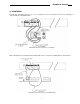
StreamLine Console l Installation Consider the StreamLine Console as a set of keyboard, mouse and monitor, and connect it directly to a computer with the 14 4 1 KVM module. StreamLine Console connects to a computer Or, the StreamLine Console with the 14 4 1 KVM module can be connected to a KVM switch as shown below.
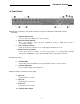
StreamLine Console l Front Panel n KVM Control and Status: (This section is effective only when an StreamLine KVM switch module is connected.) 1. Computer Selection Pad 2. Selected Computer Indicator Press one of these pushbuttons to select a computer. One of the indicators turns red when pushbuttons, hotkey or OSD menu selects a corresponding computer. 3. Local Console in operation 4. Remote Console in operation It turns green when a computer is accessed through the StreamLine Console.
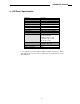
StreamLine Console l LCD Panel Specification LCD size Active Display Area Pixel Pitch (mm) Resolution Brightness Contrast Ratio Display Color User Control Input Signal Plug-n-Play VESA Power Management Viewing Angle Keyboard Mouse Touch Pad 15.1” TFT 304.1 x 228.1 (mm) 0.297 (H) x 0.297 (V) 1024 x 768 @60/70/75Hz 200 cd/M^2 400 16.7M (8 bits) OSD Control (auto saving) RGB analog, H/V separate VESA DDC 1/2B VESA DPMS compliant “on” mode: 23.
Limited Warranty IN NO EVENT SHALL ConnectPROs LIABILITY FOR DIRECT OR INDIRECT, SPECIAL, INCIDENTIAL OR CONSEQUENTIAL DAMAGES, LOSS OF PROFIT, LOSS OF BUSINESS, OR FINANCIAL LOSS WHICH MAY BE CAUSED BY THE USE OF THE PRODUCT EXCEEDS THE PRICE PAID FOR THE PRODUCT., ConnectPRO makes no warranty or representation, expressed or implied with respect to the contents or use of this documentation, and especially disclaims its quality, performance, merchantability, or fitness for any particular purpose.
20525 Paseo Del Prado Walnut, CA 91789 (888) 999-1983 www.connectpro.com info@connectpro.