
User manual


Because the main loop of the game runs very fast and does not wait for user inputs, it could turn out that the script block to display a number is
called up before the display of the last number has been completely cleared. To prevent this, the programme uses send ... to all and wait
blocks. This waits until the subroutine that has been called up has finished running.
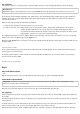
If the contact at Pin 0 is touched, the player has entered a guess. The variable y used for the guesses is set to the currently adjusted number n
and the 7-segment indicator is switched off. Depending on whether the number sought is larger or smaller than the last guess, the topmost or
bottommost segment of the 7-segment indicator flashes briefly three times.
Then the main loop of the game starts again and shows the last number guessed again. If the victory condition of the game is fulfilled, the
guessed number flashes five times. Then a new game round begins with a new secret number.
The script blocks you already know are used to display a number and to clear the 7-segment indicator.
Day 22
Today on the Advent calendar
• 20-Mohm resistor (red-black-blue)
Tennis game
Today for a change, we have another game that runs on the PC monitor and is controlled by clay contacts on the Arduino.
Components: 1x breadboard, 4x 20-Mohm resistor (red-black-blue), 5x connection cable, 6x clay contact
With some dexterity, the player must attempt to hit the ball back constantly with his or her paddle so that the ball does not fly against the red or
green wall. Each player has two clay contacts in order to move his or her paddle in the two directions. There is also an earth contact for each
player in order to have as few accidents from uneven earthing as possible.
If the ball touches the player's own wall because he or she has not put the paddle in the way in time, the opponent gets one point. The ball then
starts again at the starting position. The game can be stopped at any time by clicking on the red Stop icon. Whoever has more points has won.
The programme
The ball is controlled by four script blocks that all run simultaneously and are started when the user clicks on the green banner.
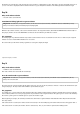
The main script creates the basic requirements for the game when you click on the green flag. The two point counters are set to 0 first. Then the
ball is put in its starting position at x:0 y:0. The ball should be released at a random angle. For this purpose, the direction is set to a random
value between -20 and -160.
Then the motion of the ball is continually repeated. It bounces off the edge when it touches it. Otherwise it flies four steps in the set direction.
This movement repeats infinitely in theory. However, because three other script blocks are started when the green banner is clicked, other
motions can still result.
The main script block for the initialisation and motion of the ball
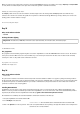
If the ball touches one of the two paddles, the movement direction is converted to the negative. The ball continues flying downward in the same
angle at which it came from above, or vice versa. To keep the motion somewhat unpredictable, the ball is first moved five steps so that in every
case it no longer touches the ball afterwards. Then the flight direction is changed compared to the previous direction by a random value between
-20 and 20 degrees.
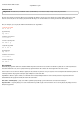
If the ball does not touch the paddle but rather touches the green bar on the right edge, the left player receives a point. Then the ball is returned
to its starting position and turned by a random value between -20 and 20 degrees so that it never takes exactly the same flight path twice but
still flies roughly in the same direction in which it last flew. The same thing happens when the ball touches the red bar on the left edge; the only
difference is that this time the right player gets the point.
This script block is executed if the ball touches the left red or the right green edge.
In Snap4Arduino, each Snap object can be connected to exactly one Arduino. The Player1 paddle thus evaluates all four clay contacts and
forwards the results accordingly. When creating the connection with the Arduino, therefore, this object must be selected.