eScope Software Guide
Contents eScope Software Guide Execute Software.................................................................3 Capture Photo...................................................................3 Capture Video...................................................................3 Time-lapsed Picture / Video........................................................4 Picture / Video Save as............................................................4 Calibration and Measurement Calibration.........................
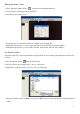
eScope Software Guide Execute Software Remark: Before executing the software, please make sure microscope is connected to the PC. Double click the shortcut icon eScope on desktop, and then the real-time image will show up on screen. * Slide mouse to the short cut icons in the main manual bar to quickly know the uses. (Please refer to eScope software interface instruction for more details.) Capture Photo a. Click ‘Capture Picture ’ shortcut icon in the main menu bar. b. Click ‘Capture > Photo F4’. c.
Time-lapsed Picture / Video a. Click ‘Time-lapsed Photo/Video ’ shortcut icon in the main menu bar. b. Click ‘Capture > Time-lapsed photo/video F5’. c. Press the key F5 on keyboard. * A new dialogue box appears in which you can enter desired setting data. * Under Time-lapsed photo, you can set the start time, interval time and total picture number. * Under Time-lapsed video, you can set the start time, interval time and total video number.
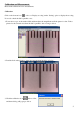
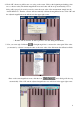
Calibration and Measurement Please make calibration before measurement. Calibration Click on the shortcut icon or choose ‘Display crossing’ under ‘Setting’ option to display the crossing. It’s used to check the dial is parallel or not. 1. Focus microscope on the attached dial and then adjust the magnification till the picture is clear. Take a picture for the selected area when the dial is parallel to the crossing as below. 2. Double-click on the picture to enter into measurement interface as below. 3.
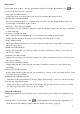
4. Click ‘OK’, the mouse will become a crossing on the screen. Click on the beginning and ending points across a known value (The default magnification rate and value will show up automatically). Now a dialog will popup as below and you need to enter the exact value of the measurement sample into the ‘Actual dimension’. Then the software will automatically calibrate the magnification rate. Click ‘OK’ and the adjusted magnification rate will show in the upper right corner..
Measurement Double-click on the picture to enter into measurement interface. Under the ‘Measurement’ icon , you can choose any desired options to measure. 1. Any Angle Line Measurement Simply click from one point and drag to the next point, and then click again to lock-in. 2. Straight Angle Line Measurement The Line measurement allows you to measure from one point to the next. Simply click and drag to the desired length, and then click again to lock-in. 3.
After clicking ‘Reset picture magnification’, the icon in the upper right corner is . 2. Change the magnification rate and capture several pictures, click on the picture to enter into measurement interface. And click ‘ > Set magnification > Set picture magnification’, now a dialog will show up as below, enter the magnification rate into the dialog and click ‘OK’. 3. If you want to use the same magnification rate to capture pictures, just click ‘ > Set magnification > Set capture magnification’.
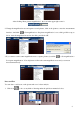
2. Click icon and set the font for the text in the popup dialogue as below. 3. You can add any text on the picture after setting. eScope Software Interface Instructions Main Interface Toolbar Instructions Show or hide the title Select language - Choose a desired language Device setting - If there are more than one devices, please choose the desired one. Crossing – Display or hide the crossing, it helps to measure the dial is vertical and parallel when capturing the picture for calibration.
Options instructions File Option Under ‘File’ option, there are select saving folder, open, delete, copy image, copy file, save as, photo save as display and exit. Select saving folder --- Set the stored path for all the pictures and videos. Open --- Open the selected picture and video. Photo save as display - Display the picture size, date & time, file name, magnification and the font size. The operations of delete, copy image, copy file, save as and exit will not list out in details.
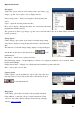
Picture and Video Saving Folder On the left side of the main interface, there are two folders for saving picture and video. All the pictures and videos will save into the folders automatically after capture and show in thumbnails. The picture or video won’t be deleted when software is not in use. We suggest save the important picture or video to other assigned folder and delete the useless picture and video.