Pompeii Oven Instructions Forno Bravo Pompeii Oven™ Plans Build an Authentic Italian Wood-Burning Oven © Forno Bravo, LLC 2007. All Rights Served. Ver. 1.
Pompeii Oven Instructions WARNING Read this before beginning your project No warranties of any kind, either expressed or implied, as to the accuracy of this information or its suitability for a particular purpose, are made. Forno Bravo hereby expressly disclaims any and all express or implied warranties, and does not make any warranty or guaranty, or make any representation whatsoever, express or implied, regarding the use or result of any information or services provided by this document.
Pompeii Oven Instructions Table of Contents Introduction ......................................................................................................................................................................4 The History of Brick Ovens ...........................................................................................................................................6 Why Build a Pompeii Brick Oven Instead of a Barrel Vault Oven.........................................................
Pompeii Oven Instructions Introduction interesting in reading more about the theory behind the An Introduction – Before You Build (see Appendix 4). Pompeii Oven design, read our Why Round description The Pompeii Oven is a set of free plans that describes how to build a traditional Italian brick pizza oven.
Pompeii Oven Instructions building your oven to the same dimensions we describe, us your favorite recipes and techniques, and we will post or you can make modifications to meet your specific size them in our food section. or space requirements. We do not describe a small 30"32" oven, because while you can readily build an oven this You can also buy your pizza peels, pizza oven size, the additional cost and effort of building the larger 36" accessories, and pizza flour from the Forno Bravo Store.
Pompeii Oven Instructions The History of Brick Ovens is a glass cameo technique that has not been re-created Some Background from James Bairey the Italian countryside, typically built before the second The Pompeii Oven project was born during a trip to war, are made from stone, not brick and terracotta -- Sorrento and Naples -- the birthplace of pizza, as well as giving them a very rough and rustic quality. For example, the home of both Pompeii and Herculaneum.
Pompeii Oven Instructions Building the First Oven The next step was to actually build a Pompeii Oven. Jim Hatch and I met on-line at a brick oven user group, and began exploring how to best put the Pompeii Oven idea to work in the real world. Jim's creative solutions to oven design and construction issues were great, and we concluded that the oven would work for an Englishspeaking audience. Jim took the plunge, and started the first Pompeii Oven.
Pompeii Oven Instructions Why Build a Pompeii Brick Oven floor in a barrel vault oven, there is not a good place Instead of a Barrel Vault Oven little room for food on the other side, and you cannot 1. for the fire. If you put it on one side, you have very The Pompeii Oven design heats up much more access the back.
Pompeii Oven Instructions Tuscan vs. Neapolitan Style WoodFired Ovens There are two basic styles of Italian wood-fired pizza oven: the Neapolitan oven, which has a more aggressive curve, flatter dome, and a lower dome height, and the Tuscan oven, which has less aggressive curve and a higher dome.
Pompeii Oven Instructions Getting Started: A Brick Oven • A smooth surface on which the cooking surface will rest. Overview 3. The Cooking Surface and Vent Floor The Pompeii Oven is comprised of a number of basic Pizza and bread are baked directly on the oven cooking components, which we will define here to give you a better surface, while other foods such as vegetables and roasts understanding how you will go about building your oven.
Pompeii Oven Instructions it both heats the cooking floor and food. The oven is You should use a chimney cap to minimize rainfall constructed using a high heat mortar (see Appendix 7). infiltration into your chimney and oven, and to stop sparks from leaving the chimney. We would recommend using high quality firebricks for both 8. Dome Insulation the oven dome and cooking surface.
Pompeii Oven Instructions flush with an interior wall. Indoor ovens can easily be set behind a partition wall constructed from metal studs and concrete board. 10. Finish Finish materials typically include stucco, brick, stone, tile, marble, travertine, and granite. © Forno Bravo, LLC 2007. All Rights Served. Ver. 1.
Pompeii Oven Instructions Oven Dimensions Foundation Oven Chamber and Opening Low Vault High Vault Interior Interior Opening Opening Diameter Height Width Height 36 14.5" 18 10 42 15.5" 19 11 36 18" 19 12 42 21" 20 12.5 Oven size Foundation Block Stand 36" 71" x 80" 63" x 70" 42" 77" x 86" 69" x 76" The foundation dimensions allow for 4" on the side and back of the stand, and 6" in the front to support finish materials and provide a clean reveal above ground level.
Pompeii Oven Instructions Top Elevation Cross Section: Igloo Front Elevation Cross Section: Walled Enclosure 7 ½” hearth; 4” insulating concrete on top of 3 ½” structural concrete. © Forno Bravo, LLC 2007. All Rights Served. Ver. 1.
Pompeii Oven Instructions Corner Installation: 31” (internal) Corner Installation: 39” (internal) Corner Installation: 35” (internal) Corner Installation: 43” (internal) © Forno Bravo, LLC 2007. All Rights Served. Ver. 1.
Pompeii Oven Instructions 1. Foundation Overview The Foundation Slab is exactly that -- the slab on which your oven stand and oven chamber will sit. We recommend a minimum thickness of 5 ½ inches (14 cm) for the Foundation slab, however your location, soil conditions and local building ordinances will dictate the thickness required. 1.1. Use a tiller to break up the soil.
Pompeii Oven Instructions 1.3. Framed, lined, with wire mesh and rebar. 1.5 The finished foundation ready to cure. Other Considerations Mix and pour the concrete (Photo 1.4), and then level it. Depending on where you live, you may have to excavate Use a 2"x4" to screed and level the concrete, then finish to 18” or more, of topsoil to reach a stable substrate such as a smoothness that works for you as the bottom of your hard clay.
Pompeii Oven Instructions 1.6. A complete outdoor kitchen foundation. 1.8. 2”x4”’s hold the form square and plumb. The weight of concrete in the foundation can be heavy (40 80lb bags or more), and mixing it by hand in a wheelbarrow might use up energy and time that will serve you better later in the project. Rent a mixer from Home Depot, and ask a friend (or pay a local teenager) to help you mix and pour the slab.
Pompeii Oven Instructions 2. The Oven Stand Overview The concrete block stand rests on the foundation slab, and provides the legs (structure) that support the insulating hearth. The hearth slab will be constructed to lie on top of the block stand and your oven dome in turn will rest on the hearth. The hearth stand is constructed using standard (8’ x 8” x 16” and 8” x 8” x 8”) concrete blocks. The hearth slab fits flush to the edges of the oven stand. 2.2. Stand with cast lintels.
Pompeii Oven Instructions pre-mixed mortar where necessary to ensure that the first Grind, or cut, 3/8" from the edges of each block that rests course of blocks is level., front and back, side to side, and on the angle iron, so that they lie flush with the rest of the on the diagonals (Photo 2.4). Take your time with this, fourth course. Finish laying the rest of the fourth course of because it will be increasingly difficult to correct problems blocks (Photo 2.6). later. 2.6. The finished stand. 2.
Pompeii Oven Instructions Tips and Hints Much like your foundation, remember that while it is When selecting the direction your oven will face, consider important that your stand is level, square, and plumb, the making sure that your opening does not face possible blocks will be completely covered with your finish material. winds, which might disrupt your cooking and fire Beautiful masonry work on your stand is not essential management. here.
Pompeii Oven Instructions 3. Framing the Hearth Take care with the additional mass under the oven. All Overview are capable of retaining enough heat for roasting a turkey, Your oven sits on a two-piece hearth, comprised of an or baking a full oven of bread, from a single firing.. If you insulating layer that rests directly under the oven cooking are not going to be baking very large volumes of bread, floor, and a structural layer that hold the oven in place.
Pompeii Oven Instructions Next, cut (12) lengths of 2"x4" that will serve as the legs The Bottom Tray that hold the bottom frame in place inside the stand Cut the two sheets of plywood lengthwise to fit into the opening. You will use 1/4" shims to accurately set the top opening (3/8" shorter so that it will easily come out later), of the frame. The top of the 2”x4” frame should be about and lay it on the frame. Tape the joint with masking tape.
Pompeii Oven Instructions the long sides of the frame together using (2) 2”x4” studs nailed cross the top of the frame, and 2”x4” studs set on an angle to the ground. Check for level (Photo 3.4). 3.4 Form sides held in place with 2”x4”’s. Tips and Hints Cut your frame and plywood for the bottom of the hearth form about 3/8" shorter than the actual opening. The concrete will not escape when you pour, and it will be easier to remove the form when your hearth has cured.
Pompeii Oven Instructions 4. Pouring the Hearth Overview If you are using insulating concrete, your hearth is poured in two parts: a 3 1/2" layer of structural, rebar reinforced standard concrete, followed by a 4" layer of insulating concrete. If you are using SuperIsol, you simply pour a rebar reinforced 3 ½” pad. 4.2. Structural layer waiting on insulating layer.
Pompeii Oven Instructions 4.4. Vermiculite concrete poured under the oven chamber. Tips and Hints We recommend mixing your vermiculite concrete by hand, rather than in a mixer, which tends to break the vermiculite up and reduce its efficiency. It is a light mixture that is easy to work with. Dry mix the vermiculite and Portland cement, so that the cement covers the vermiculite, then add water until you reach an oatmeal-like consistency. © Forno Bravo, LLC 2007. All Rights Served. Ver. 1.
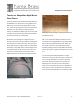
Pompeii Oven Instructions easier for you to get your floor perfectly level (Photo 5.2). 5. Setting the Cooking Floor The process is similar to setting ceramic tiles. Overview Your cooking floor can be made from either individual firebricks, set in an offset or herringbone pattern (Photo 5.1), where the oven walls rest directly on the cooking surface, or from a round refractory floor provided by Forno Bravo. The advantage of the firebrick floor is that it is made from materials you can purchase locally.
Pompeii Oven Instructions side, as close as possible to the next brick, avoiding letting sand, clay or grit get in between, which will keep your bricks from touching each other. Tap the floor with a rubber mallet until it is smooth and level (Photo 5.4.). 5.6. The cooking floor with the first course laid out. Tips and Hints If possible, hand select your cooking floor bricks for 5.4. The cooking floor set and ready to go. quality, ridges and chips, and use the best you have for the cooking floor.
Pompeii Oven Instructions 6. Starting the Oven Dome Overview The top of the Pompeii oven is a circular parabolic dome built from brick. The dome shape is designed to efficiently absorb heat from a wood fire, to evenly reflect stored heat, and to reflect heat from a live fire inside the oven down to the cooking surface. Photo 6.1 provides a good overview of the dome layout, 6.2 No forms. including the first chain of upright bricks, the curve of the dome, and side view of the oven opening. 6.
Pompeii Oven Instructions • • You can continually clean the inside of the dome About Your Brick brickwork, which will result in a better-looking end We recommend using low or medium duty firebrick for product. both the oven dome and cooking surface. The dome Finally, this approach reduces the risk of something firebricks provide a majority of the oven's ability to hold going wrong.
Pompeii Oven Instructions measurement before you rent and when you return it. (Neapolitan) vault design. These sizes provide you with One builder did not use enough water and forced the enough oven space to cook multiple pizzas at a time, or to saw to cut rapidly through the bricks, and as a result, cook a roast with multiple side dishes, without being too his charge for blade wear was almost what it would large or difficult to build, or too slow to fire.
Pompeii Oven Instructions build, you can decide which first course method works for 7. Building the Dome you. Overview At this point, you have reached a decision on the type of dome you want to build, the size of your oven, and the type of forms you will be using,. You are now ready to start building your dome. The next decision is to determine the orientation of your first course of bricks.
Pompeii Oven Instructions 7.4. Cut your shims to match the trial dome layout. 7.5. Using a shim to shape the dome without forms. Subsequent Courses Do not allow for an inside mortar joint, as you will be The subsequent chains are made up of brick cut in half setting the edges of the bricks facing inside the oven flush and set on their wide edge (4 1/2") with the clean edge with each other. facing inward.
Pompeii Oven Instructions 7.7. A keystone locks each course in place. 7.9. Closing in. Tips and Hints There are three ways of cutting the bricks for your dome: you can either purchase an inexpensive tile saw, or rent one; you can use a diamond-coated masonry blade on a standard circular saw or grinder (see Appendix 1 for more information); or you can score your bricks and break them. You can either purchase pre-mixed refractory mortar, or mix your own fireclay mortar.
Pompeii Oven Instructions 8. Building the Oven Opening Overview There are four traditional ways for framing your oven opening, though we recommend the first, and easiest method. The simplest, fastest and least costly way of framing the oven opening is to use fire bricks to frame the sides of the opening, and a length of 2"x 2"x3/16" angle iron to support the top of it. 8.2. An arched oven opening. 8.1. An angle iron framed opening. Note the lack of a reveal for the door jam. 8.3.
Pompeii Oven Instructions 8.5. A cast lintel forms oven opening. We recommend that you set back the vent side bricks back 1/2" to allow for a reveal that you will use to "form" the opening into the oven. You need to leave a lip that your door can close tightly against, fully sealing heat and steam inside the oven chamber, and completely cutting off the air supply. 8.6. The entry arch and vent has a clearly defined door stop. © Forno Bravo, LLC 2007. All Rights Served. Ver. 1.
Pompeii Oven Instructions 9. Finishing the Oven Dome Overview If you have chosen to build your oven with forms, there may come a time when you are no longer confident that the mortar you are using to attach your bricks will keep gravity from taking over, causing your next chain of bricks to fall in before you can set the keystone. If it looks like this might happen to you, it is time for you to use an internal support to hold the last few chains in place while 9.1 A removable form inside the oven.
Pompeii Oven Instructions Closing in the Oven The last 2-3 chains rest on a form. Cut your half bricks into quarters, giving you brick pieces that are roughly 2"x2"x4 1/2". Then, cut a series of wedge bricks to fill in the chain. Make a template for the keystone and tap in place to lock in the chain. Continue with your last few chains until you are down to a single brick that will close in your oven. 9.5. The perfect keystone. 9.4. Styrofoam forms.
Pompeii Oven Instructions backyard pizza baking (or even restaurant pizza baking for that matter). If you plan on baking large volumes of bread, and want your oven to retain enough heat to bake multiple batches of bread from a single firing, you can add additional mass by applying 1/2”-2” of high heat mortar to the outside of the oven. © Forno Bravo, LLC 2007. All Rights Served. Ver. 1.
Pompeii Oven Instructions 10. Oven Vent Overview Unlike a fireplace, where the chimney is inside the firebox in the back, the brick oven's vent and chimney are outside of the oven -- in the front. There are several different, and widely used methods for constructing the vent system for your Pompeii Oven. 1. A Steel Vent Have a steel vent fabricated, which can be attached to the oven enclosure and connected to a steel double wall chimney system, such as Simpson DuraTech, or a refractory chimney flue liner.
Pompeii Oven Instructions 10.6. A cast vent. 10.4 Another brick vent. Then, build vent walls using standard bricks that will 3. A Cast Concrete Vent support the vent. Set the vent walls back 1/2" from the oven opening to leave room for the oven door to meet Construct a wooden form the shape shown in Photos 10.5 flush with the opening. Connect the DuraTech Anchor and 10.6, leaving a 9 1/2" hole to attach the DuraTech Plate to the vent, or mortar a clay flue liner to the vent. Anchor Plate.
Pompeii Oven Instructions walls, make sure you have a workspace near the oven opening for setting down pizzas and baking dishes. 10.8. A metal vent with enclosed sides. 10.9. A metal vent left open. © Forno Bravo, LLC 2007. All Rights Served. Ver. 1.
Pompeii Oven Instructions 11. Arch and Door Arch A facade can be used to finish the front of the oven and hide the rough look of the vent. Although it may take some skill to create an arched entryway into the oven, you should find that your skills as a rough mason are more than adequate, particularly after the work you have done finishing your oven dome – look out Notre Dame! See Forno Bravo Photos (on 11.2. Another decorative entry arch. www.fornobravo.com) for some ideas on design.
Pompeii Oven Instructions 11.3. An oven door from the Forno Bravo Store. After you are done cooking your pizzas for the night and the fire has been raked out of the oven you can still cook a meal in it. An insulated door that is placed up against the inner revel on the oven side of the vent opening is used here. This door is located behind the vent opening (058doorstop.jpg). A simple, thick hardwood door can also be used, but make sure that your handles are isolated so that you do not burn your hands.
Pompeii Oven Instructions temperatures of 2100 deg. F to prevent the flue liner from 12. Attaching the Chimney bonding to the chimney walls. Overview Your chimney may be constructed with various materials Flue liners should conform to ASTM C 315 (Standard including Simpson DuraTech Chimney System Specification for Clay Flue Liners). They should be (UL103HT), refractory chimney flue liner, or a classical thoroughly inspected just prior to installation for cracks or brick and mortar chimney.
Pompeii Oven Instructions The Simpson DuraTech chimney system contains a ULapproved chimney cap. 12.3. Simpson Spark Arrestor. 12.2. Simpson DuraTech chimney system. Chimney Height and Size Flue sizing depends on such local conditions as prevailing wind, height of chimney, proximity of taller, nearby structures, etc. A good rule of thumb is to choose a flue that has an area of about 3-4 times the door height. Depending on what is nearby, you may need a taller chimney.
Pompeii Oven Instructions 13. Oven Insulation An Igloo design oven can incorporate insulating concrete Overview Igloo shape. Alternatively, you can construct the Igloo After your oven dome and vent have been assembled, the shape using rebar and stucco lathe, then pour loose oven is covered with insulation, typically a woven ceramic insulation into the cavity between the oven and enclosure.
Pompeii Oven Instructions thickness of the insulation remains the same: 1” Insulfrax and 4” Vermiculite, 6” Vermiculite, or 2”-3” Insulfrax. Tips and Hints If your walled enclosure is significantly larger than your oven, you can block off the corners with concrete board to minimize the amount of vermiculite that will be required to fill the open chamber. 13.4. Concrete board blocks off the corners. © Forno Bravo, LLC 2007. All Rights Served. Ver. 1.
Pompeii Oven Instructions 14. Enclosure Design Styles Overview The oven enclosure must be sealed to protect your Pompeii Oven and its insulation from water. It can be constructed from concrete block, rebar and stucco mesh, metal stud and concrete board or free standing brick or stone. Basically, the style of the enclosure is up to you, your imagination, and the availability of local materials. Stucco House The examples shown here from around the country will give you a start.
Pompeii Oven Instructions Brick House Stone House Wall Oven Gabled House Igloo Stone House © Forno Bravo, LLC 2007. All Rights Served. Ver. 1.
Pompeii Oven Instructions Corner Oven Gabled Stone House Stone House © Forno Bravo, LLC 2007. All Rights Served. Ver. 1.
Pompeii Oven Instructions 15. Igloo Enclosure Overview The Igloo is a traditional Italian and Mediterranean pizza oven design style where the enclosure follows the basic lines of the oven dome and chimney -- thus the Igloo. Instructions There are two ways of making the Igloo shape, both of which follow the guidelines set forth in Graphic 15.1. First, you can create the Igloo using stucco lathe and insulating concrete. The insulating concrete is then covered with a 15.1 The layers of an Igloo oven.
Pompeii Oven Instructions 15.4 Rough coat of stucco on wire lathe. Hints and Tips Consider using modern, latex-based color-in stucco for your final Igloo finish coat. They are waterproof and crackproof, and they will even match a color swatch. © Forno Bravo, LLC 2007. All Rights Served. Ver. 1.
Pompeii Oven Instructions 16. Walled Enclosures Finish Attach your concrete board using screws designed for Overview metal studs. You can finish your oven with stucco, brick, or The Gabled House, or walled enclosure, is one of the stone. The walled enclosure is also a traditional way to most traditional ways to finish a brick oven. There are finish a pizza oven.
Pompeii Oven Instructions 16.5. Attach concrete board. 16.2. The layers of a walled enclosure oven. Tips and Techniques Build your walled enclosure the same way you would build a partition wall using wood studs. Set the vertical studs on 16” centers, and always center your concrete board seams directly on your vertical studs.
Pompeii Oven Instructions large fire in a non-cured oven that a chunk of the oven 17. Curing Your Oven dome actually blew out the front door. Although it may seem that your oven is dry by the time you are finished with your installation, there is still moisture in Also, using a space heater can help, but only so far. It is the oven, mortars and concrete that must work its way out. not an alternative to fire curing.
Pompeii Oven Instructions After all your hard work, you are now ready to bake the best pizzas, bread and roasts that you have ever had. And that is, after all, the whole point in building your own Pompeii Oven. Enjoy your oven. You have earned it. Salute, Forno Bravo Tips and Techniques Note: There must be a period of time between completing the masonry work and beginning the actual firing cure. Longer is better than shorter, particularly for the actual dome cement.
Pompeii Oven Instructions Appendix 1. Materials and Tools List • A bucket, scrub brush and sponge for clean up. • Ratcheting cargo straps (optional). About $10 at WalMart. Used to hold the hearth form when your pour your concrete. Tools • A garden sprayer to keep your masonry damp. The prices provided are in US$, and are intended to give Material List 42" Oven you a general guideline for costs.
Pompeii Oven Instructions Cooking Floor (14) 80lb bags concrete for filling every other core About 65 full firebricks, set on their flat side (2) 1.5"x1.5"x56" angle iron (for front span) Fine mesh sand and fireclay (3) 60lb bag mortar (to level first course of blocks) Oven Dome Insulating Hearth About 135 full firebricks, cut in half (2) 4'x'8x3/4" sheets of plywood or particle board About (150-200) lbs high heat mortar (4) 2"x4"x8' wood studs (1) 4'x1.25"x1.
Pompeii Oven Instructions Hints and Tips Check Home Depot to locate vermiculite and perlite. You might find it in their garden center. If not, try pool supply (chemicals, etc.) and agriculture supply (fertilizer, etc.) stores. The large bag costs less than buying lots of small bags from a nursery. We recommend using a dust mask when working with the loose fill. Caution. Perlite can be coated with silicone to make it slide easily into block cores, where it's commonly used as an insulator.
Pompeii Oven Instructions Appendix 2. Brick Primer in the floor fit snuggly against each other, and a curved Choosing the Right Brick Oven Bricks cooking floor. edge will result in a gap between the bricks and in your Deciding what type of brick you will use is one of the first choices you will have to make when starting to build a A typical firebrick weighs about 8 pounds and is yellow. Pompeii Oven.
Pompeii Oven Instructions Red clay bricks are typically used for building the decorative arch and optional sides around the oven vent and vent landing, and can be used for any decorative feature. There are three types of brick that you should avoid: Concrete Brick These are the concrete bricks you see at Home Depot for about $.12. They are made from standard Portland cement-based concrete and are air-dried, not kiln fired. They will not withstand the heat inside your oven.
Pompeii Oven Instructions oven, and everyone benefits from your photographs, Appendix 3. Why the Pompeii recipes and everything you learn. Oven Plans are Free When I got hooked on brick ovens a number of years ago, Building a large English-language pizza oven community the choices were very limited. There were plans for a is fun, and will help grow awareness through word-of- barrel vault bread oven ($100 for a photocopied set of mouth, and through great food.
Pompeii Oven Instructions Appendix 4. Thermal Mass Primer the oven chamber as fast as you can replenish it. With this Overview required for the perfect 3-minute pizza. design it is virtually impossible to maintain the high heat Thermal mass and insulation are the two primary characteristics that describe an oven's ability to absorb At the same time, too little thermal mass can also be and hold heat, and make it useful for cooking. An oven's problematic.
Pompeii Oven Instructions throughout, it also demands that the oven's insulating Under the oven hearth, vermiculite concrete and layers be able to stop the heat in that layer, in order to SuperIsol, an engineered insulating panel, both provide an hold it inside the oven. effective layer beneath the thermal layers of the oven floor.
Pompeii Oven Instructions Appendix 5. Wood-Fired Oven Anatomy Fig 1. The basic components of a wood-fired pizza oven. © Forno Bravo, LLC 2007. All Rights Served. Ver. 1.
Pompeii Oven Instructions Appendix 6. High Heat Mortar Still, fireclay mortar is less heat resilient and thermally Overview a commercial oven, or simply want to "go the extra yard," A Forno Bravo modular oven, or a brick Pompeii Oven is but do not want to use Refmix, you can make your own assembled with a high-heat mortar. You have two basic refractory mortar with Calcium Aluminate. conductive than a true refractory mortar.