Operating Instructions Washing Machine Dear ASKO customer, Thank you for choosing this quality product from Scandinavia, which was made in Sweden. We want you to feel assured that the inside of your new machine is just as good as the outside and that the ethics and standards that went into the production of this machine are just as high as the quality and performance that you will receive from it. We hope that this product will give you many years of pleasure.
Contents Before using your machine for the first time Transport protection Packing material Washer door Checking water hardness Safety instructions General Installation Overflow guard function Transport/Winter storage Recycling Child safety Keep an eye on children! Automatic door opening Description of the washing machine Detergent compartment Front panel Options button Advice and tips before washing Sorting your laundry Clothing Laundry labels Laundry label symbols Coloured cotton Delicates Wool and silk A
Contents Service Before contacting the service division Quick guide Washing Load the laundry Detergent compartment Select the program Program finished 24 24 28 28 28 28 28 28 3
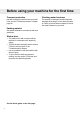
Before using your machine for the first time Transport protection Checking water hardness Has the transport protection been removed? If not, see the “Transport protection” chapter page 26. The quantity of detergent needed depends, amongst other things, on how hard the water is. Phone your local water company to check the water hardness in your area. Packing material Sort waste materials in accordance with local guidelines.
Safety instructions General Overflow guard function • Read the operating instructions and keep them in a safe place! • Installation should be carried out by qualified ASKO technicians. • The machine should only be used for washing items as described in these instructions. It is not intended for dry cleaning! • Use only detergent intended for machine washing! • Remove any transport protection devices before using the machine. See the “Transport Protection” chapter.
Child safety Keep an eye on children! • Always close the door and start the programme immediately once you have added detergent. • The appliance is not intended for use by young children or infirm persons without supervision. • Young children should be supervised to ensure that they do not play with the appliance.
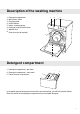
Description of the washing machine 1. 2. 3. 4. 5. 6. 7. 8. Detergent compartment Main power switch Program panel Serial Number Hatch - drainage pump Drainage pump (behind hatch) Washer door Outer door (not all models) 1 2 3 4 7 8 5,6 Detergent compartment 1. Detergent compartment - pre-wash 2. Detergent compartment - main wash 3. Fabric softener compartment 1 3 2 In the plastic bag containing these instructions and other things, you will find a plastic divider.
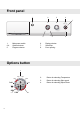
Front panel 1 2 5 6 7 3 1. 2-4. 5. Main power switch Options buttons Program selector 6. 7. 8. 4 8 Display window Start/Stop Door opening Options button 2 40 30 Cold 50 60 95 800 3 8 1200 4 2. 3. 4.
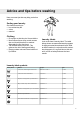
Advice and tips before washing Here are some tips that may help you before washing. Sorting your laundry Sort items according to: • how soiled they are • colour • material Clothing • Do up zips so that they don’t harm fabrics. • New coloured items may contain excess dye and should therefore be washed separately the first few times. • Turn delicate items inside out. This reduces the risk of burling and fading.
Advice and tips before washing Coloured cotton Save time and energy Coloured cotton items with the washing instruction 60 °C should be washed at 60 °C for the first time in order to remove any excess dye. If you do not do so, there is a risk that the colour will run. Use detergent without bleach in order to preserve the colour of the fabric. Use the White program to save time and energy. This program has a shorter main wash than Heavy white wash, but it is often long enough for normally soiled laundry.
Washing 1 Sort your laundry. See the "Advice and Tips" section before washing. Pre-wash Fabric softener Main wash Note! Place underwired bras in a laundry net. Note! Empty pockets. Coins, nails and the like can cause damage to the machine and fabrics. See the "Advice and Tips" section before washing. Powder detergent When using liquid detergent, follow the detergent manufacturer’s recommendations. We recommend always using a wash ball with very thick liquid detergent.
Washing 5 Select the program You can select a program by turning the program selector. A red field lights up beside the selected program Start the machine by pressing the Start/Stop button or selecting an option. Quick Synthetic Colour Lightly soiled laundry that only needs freshening up can be washed for a short time at40 °C. Synthetic This program is good for shirts and blouses made of synthetic and blended material. Wash white clothes at 60 °C and coloured clothes at 40 °C.
Washing 6 Select options and settings By changing options and settings you can adjust the washing program to suit your own specific requirements. The machine will remember which settings and options you chose for each program and will use them the next time you select that program. You can of course change the options if you want. 40 50 60 30 Cold 95 800 1200 Temperature Select temperature by pressing the Temperature button until the red field lights up beside the desired temperature.
Washing 8 Once the program has finished[ The door opens automatically once the program has finished. If you want to deactivate "automatic door opening", see the Child safety chapter. • Remove the laundry. • Turn off the main power switch, turn off the main power switch...and you will save energy. If you have small children or pets at home, close the washer door once you have removed the laundry.
Care and cleaning Checking the trap and drainage pump Cleaning the detergent compartment The washing machine has a trap, where coins, hairpins and the like can get caught. To clean the filter and drainage pump: 1. Make sure the machine is empty of water and that it is switched off at the mains. Pull the detergent compartment out as far as it will go. P1 P2 P3 P4 Start/ Stop Then pull it up and out as shown in the illustration. 2. Open the hatch for the drainage pump as shown in the illustration.
Care and cleaning Cleaning the inside of the machine to avoid unpleasant smells Modern detergents often allow clothes to be washed at low temperatures. This means that small deposits can build up in the machine. These, in turn, may lead to unpleasant smells developing; especially if constantly using cold wash. To avoid this, we recommend running a 95 °C wash program once a month. When you do this, use a small quantity of detergent. It is not necessary to put any washing in the machine. Do as follows: 1.
Troubleshooting The washer door will not open 1. Check that the main power switch is on. 2. Has the power supply been cut off? Check the house fuses (circuit breakers). The washer door cannot be opened if the power supply has been cut off. If nothing else works, the washer door can be opened as follows: • This must only be done in an emergency if the machine's glass door does not open automatically when the program has finished. • First check that there is no water left in the machine.
Troubleshooting Error messages If an error occurs while a program is running, the red fields around the buttons flash in slightly different ways. After taking the measures described below, turn off the machine to leave error message mode. L6 L1 L2 L5 L4 L3 The error messages that may be shown are: The door is not closed If L1 is flashing, you tried to start a program with the washer door open. Close the door and the program will start.
Technical information Technical data Height: Width: Depth: Weight: Cylinder volume: Max. washing capacity: Spin speed: Rated power: Heater output: Wash drum and liquid compartment material: Outer casing material: Water connection: Drain: 850 mm 595 mm 585 mm 73 (78) kg (with outer door) 50 l 6 kg 800 - 1200 See type plate. See type plate. Stainless steel Powder-coated and hot-galvanized sheet steel or stainless steel.
Transport protection Before the machine is used, the three transport protection devices should be removed as shown below. Each transport protection device consists of a screw, a washer and a rubber spacer. After the protection device has been removed, the rubber spacer acts as a plug for the holes for the device and also as a damper. • First remove the screws and remove the washers. • Then remove the rubber spacers.
Installation Positioning the washing machine Connection to water supply The washing machine can be installed as a built-in or freestanding unit. Position the machine so that the electrical plug is easily accessible. Water connection should be carried out by a qualified professional. Connect the machine using the accompanying supply hose. Water pressure should be 0.1–1MPa (approx. 1–10kp/cm2 ; 10-100N/cm2). There should be a stopcock or tap on the water pipe.
Installation Drainage connection Electrical installation The machine is supplied with a connected drainage hose that can be fastened to a laundry sink or similar. The height must be 600 - 900 mm above floor level. The lower position (600 mm) is always preferable. Ensure that the drainage hose has no kinks. Electrical connections must be via a plug connected to an earthed wall socket or by cable for fixed installation, with all-pole disconnection, by a qualified professional.
Installation Program plate in multiple languages Certain machines include double-sided program plates in different languages (see the detergent compartment and the bag with the user handbook that comes with the machine). You can replace or turn the card yourself to get the language most appropriate for you. To remove the card from its holder in the detergent compartment, press the card with your thumb and push it sideways (see picture). The card will then bend slightly and you can easily remove it.
Service Before contacting the service division Before you contact the service division, make sure that you know the model number (located on the front panel), and serial number. The model designation can be found on the detergent compartment. Type designation and serial number can be found on the type plate above the washer door.
Your notes 25
Your notes 26
Your notes 27
Quick guide 1 Washing • Empty pockets and refasten zips. • Read the item’s laundry label. • Sorting laundry. Note! Place underwired bras in a laundry net. 2 Load the laundry • Press the main power switch. • If the door is closed, press the Door opening button (key symbol). The red field lights up and the door will open after a few seconds. • Load the laundry and close the door. 3 Detergent compartment • Pour detergent into the main wash compartment, and pre-wash compartment as well if required.