
Installation Manual


Prior to Installation
• Check that all components are available
• Rently Access Panel 3
• Screw on co-ax antenna (4 in and 6 ft antennas provided)
• Exit Button
• Power Supply Controller
• Rently Hub
• Wall anchors or other mounting hardware
• Your preferred lock type including but not limited to:
• Electromagnetic Lock and lock bracket
• Electric Strike Lock
• Electric Bolt Lock
• Electric Cabinet Lock
• NOTE: This is a kit, and not all components will be used. Please
recycle parts that are not necessary for your application.
• Prepare the following tools. NOTE: additional tools may be
īÐĪķðīÐÌåďīřďķīĮĨÐÆðťÆĨĨăðÆĴðďĊȚ
• Hammer
• Drill
• Drill Bit Set
• Screwdriver Set
• Identify the door type and verify that you have the correct
mounting bracket and hardware for the install.
• Locate the power source for the power supply controller.
UZ}'ȚďķĉřĊÐÐÌĴďìŒÐÆÐīĴðťÐÌÐăÐÆĴīðÆðĊīķĊĨďœÐīĴď
the install location.
• To ensure the best performance, check to make sure your Rently
Hub is installed in an optimal location within 10 feet of your
Access Panel with minimal obstructions.
• ADA considerations:
• The Exit Button and the Rently Access Panel 3 should be
installed in accordance with your local ADA requirements.
Recommended height does NOT guarantee ADA compliance.
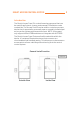
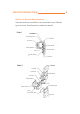
ACCESS PANEL INSTALLATION
4