
User`s manual


12/06/99 11
CONTROLLER ADJUSTING PROCEDURE
There is a six position selector switch on the face of the controller with
preset voltage settings for various panel and battery arrangements. Please
refer to the chart below for the switch position for your system.
Only one of the first four switches should be in the ON position at one time.
These preset voltage settings will work with the majority of the systems on the
market. If you need to change the voltage set point, the "panel voltage
adjusting pot" will allow you to do so. (Refer to the controller adjusting
procedures below).
Switch No. Used For Voltage Set Point
1 12 Volt Battery 11.8
2 12 Volt Panel 13.0
3 24 Volt Battery 23.3
4 20 Volt Panel 17.0
5 Low Water Cut-Off
6 High Water Cut-Off
7
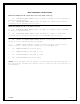
(THIS PROCEDURE IS FOR PANEL DIRECT SYSTEMS ONLY.)
The purpose of this procedure is to adjust the voltage of the PV array to its
peak power point and thus obtain the maximum water delivery from the pump. This
procedure should be performed with the panels at their normal operating
temperature at mid-day and the appropriate DIP switch in the ON position.
(Either #2 or #3 switch only).
1. With the system installed and pumping water, turn the panels away from the
sun until the pump flow rate is reduced by approximately 50%. If this is
not possible then shade the panels slightly until you obtain the same
results.
2. Connect a DC volt meter to the pump side of the controller. (LD+ and LD-)
3. Turn the small brass adjusting screw on the "Panel Voltage Adjusting Pot",
located on the front of the controller, until the highest possible voltage
is obtained.
4. Return the panels to their normal position. The pump will then operate at
its maximum output.