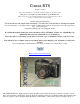
Contax RTS Posted 11-29-02 This camera manual library is for reference and historical purposes, all rights reserved. This page is copyright © by mike@butkus.org, M. Butkus, NJ. This page may not be sold or distributed without the expressed permission of the producer I have no connection with any camera company On-line camera manual library This is the full text and images from the manual. This may take 3 full minutes for all images to appear. If they do not all appear.
www.orphancameras.com information, it provides such capability in al I fields of photography as could not possibility be expected of other 35mm SLR models.' The New Bayonet Mount also a product of mutual cooperation between Carl Zeiss and Yashica - affords perfect coordination of the optical, mechanical and electronic systems. The exclusive 'Real Time' features are: 1.
The CONTAX RTS is designed to deliver superb photographic results when mounted with any one of the Carl Zeiss or YASHICA lenses with Contax/Yashica mount. The manufacturer will not be held responsible for pictures of substandard quality when the same camera is used in combination with lenses other than those specified above. * 'Real Time' is a computer terminology denoting absence of physical time-lag in disposition of information.
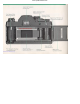
www.orphancameras.com Film Rewind: Film rewind crank-handle with unique clutch action * White line on top of the knob rotates to indicate proper film advance Camera Back: Back cover opens when the film rewind knob is pulled all the way out * Camera back interchangeable with Data Back or 250 Film Back (for use with motor drive unit) Other Features: Multiple exposure through depression of the film rewind release button.
www.orphancameras.
www.orphancameras.com www.orphancameras.
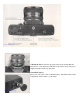
1. Mount the lens. Set the lens properly in the mount by matching the red index dot on the lens barrel with that on the camera body, and give it a right turn until it click stops into place. 2. Install the battery. Always use a 6V silver oxide or alkaline battery. Install the battery in the compartment with its minus (-) end in first.
www.orphancameras.com 3. Open the back cover and load the film. Before film loading, turn the shutter control dial off the 'AUTO' setting. Close the back cover after ascertaining that the sprocket teeth properly catch the perforations along both edges of the film. 4. Advance the film. By manipulating the film advance lever, advance the film until the exposure counter registers the figure '1'.
and align the index with the figure corresponding to the speed rating of the film in use. 6. Reset the shutter control dial to 'AUTO' setting. Turn the shutter control dial and align the 'AUTO' setting with the index on the camera top. When thus adjusted, the green shutter speed pointer overlaps the 'A' setting of the shutter speed scale in the viewfinder. 7. Align the exposure compensation pointer with 'X1' Turn the film speed dial and align the pointer with the 'X1' setting.
www.orphancameras.com 10. Check exposure. While sighting through the viewfinder, press the LED display pushbutton and check the shutter speed set automatically in relation with the preselected lens aperture. 11. Hold the camera steady and press the magnetic release. When shooting, use the Rubber Eye-Cup to ward off stray backlight. BASIC PROCEDURES OF OPERATION The CONTAX RTS is designed to offer utmost ease and versatility of operation in all fields of photography.
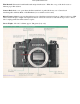
After removing the body cap and the lens rear cap, set the lens properly in the mount by matching the red dot on the lens barrel with that on the camera body. Then, give the lens a right turn until it click stops into place. To prevent hitches in focusing and exposure control, always make sure the lens is locked properly in its mount. Lens Interchanging To remove the lens from its mount, twist it to the left while keeping the lens release button depressed.
www.orphancameras.com CAUTION The shutter system and the exposure control of your CONTAX RTS will not function unless the battery is properly installed. Always use a 6V silver oxide or alkaline battery (Eveready 544, Ucar 544, Mallory PX28, Alkaline Eveready 537 or equivalent). 1. Open the battery compartment cover by turning it with the edge of a coin. 2. Install the battery with its minus (-) end facing inside, and close the battery compartment cover.
FILM LOADING Avoid direct sunlight when loading the film. 1. After sliding up the rubber eye-cup, open the back cover by pulling out the film rewind knob. As soon as the back cover is opened, the exposure counter will reset to 'S' (start position). 2. Place the film cassette in the film cassette chamber and push the film rewind knob back to its original position. · Use a standard 35mm cassette film of 12, 20 or 36 exposure load. 3. Clip the film tip on the take-up spool as illustrated.
www.orphancameras.com 4. After making sure that the shutter control dial is set at a position other than the 'AUTO' setting, advance the film until the sprocket teeth properly catch the perforations along both edges of the film. Then, close and press the back cover until it locks into place. 5. Fold out the film rewind crank-handle and turn it in the direction of the arrow to take up the film slack.
SETTING FILM SPEED After the film has been loaded properly, set the film speed dial according to the speed rating of the film in use. To set the film speed, lift and turn the collar around the film speed dial and align the index with the figure corresponding to the ASA or DIN rating of the film in use. · Always see to it that the index is set properly in the click stop position. If set improperly, the accuracy of the exposure control will be affected.
www.orphancameras.com · The magnetic release will fail to function if the film wind is incomplete. In case it fails to operate, manipulate the film advance I ever once again to complete the film wind. How to check the film advance. If, in the course of film winding, the white line on the film rewind knob rotates accordingly, it is an indication that the film is advancing properly.
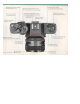
The viewfinder of your CONTAX RTS shows the field covered by the lens in use always at the maximum aperture. In addition to the bright field, it provides preview of all necessary information for obtaining correct exposure. Microprism focusing spot The standard viewing screen features a microprism center focusing spot which affords precise focusing most readily. For details on how to secure focus, refer to the pertinent section.
www.orphancameras.com at the 'AUTO' setting. If the LED dot comes on in alignment with 'A' or 'B', incorrect exposure is indicated; therefore, the lens aperture and/ or shutter speed setting must be readjusted accordingly. When the green pointer overlaps the 'A' setting, it means that the camera is set for fully automatic exposure.
SHOOTING POSTURE Otherwise perfect shots are often spoiled by erratic movement of the camera at the critical moment of exposure. Make it a rule to support the camera firmly with your left hand and, while gently gripping the camera body with your right hand, press the magnetic release with the ball of your right index finger. Also, see that you are fully acquainted with the proper procedure of operation of your camera.
www.orphancameras.com Your CONTAX RTS features fully automatic through-the-lens electronic exposure control. By simply presetting the film speed and lens aperture, its highly sophisticated electronic circuit functions to vary the shutter speed continuously and automatically according to the subject brightness, thus ensuring correct exposure under any light condition.
3. Press tag LED display pushbutton while sighting through the viewfinder. Depression of this pushbutton provides a check of exposure condition before or after film wind. If the LED dot comes on within the range of 2000 (1/2000 sec.) and LT (4 sec.), it indicates that correct exposure will be obtained at the preselected aperture. In case two LED dots appear, it is an indication that an in-between shutter speed will be set automatically.
www.orphancameras.com the moment of exposure. · When the magnetic release is depressed, the LED dot will come on momentarily to display the shutter speed at which exposure is being made. · Correct exposure can be obtained through various combination of the lens aperture and shutter speed. Depending on the subject condition, therefore, alter the aperture setting to provide exposure at the right shutter speed.
1. When the LED dot comes on in alignment with a figure below '30', correct exposure will be obtained, but utmost precaution must be taken to prevent camera shake. To prevent erratic movement of your camera at the critical moment of exposure, (1 ) reset the aperture ring to a wider lens opening in order to provide automatic setting of a higher shutter speed, or (2) mount the camera on a tripod. 2.
www.orphancameras.com (Keep the shutter control dial at the 'AUTO' setting and the exposure compensation pointer aligned with 'X 1'.) 1. Press the LED display pushbutton and check the shutter speed. 2. While keeping the pushbutton depressed, turn the aperture ring until the LED dot aligns with the figure corresponding to the desired shutter speed.
exposure load of the film, avoid advancing the film any further. If forced, the film may tear away, making it impossible to rewind it into its cassette. 2. Give the film rewind release button on the camera base a push. This button will reset automatically when the film advance lever is manipulated; therefore, it is unnecessary to keep it depressed with your fingertip during film rewinding operation. 3. Fold out the film rewind crank-handle and turn it in the direction of the arrow.
www.orphancameras.com 1. It affords instantaneous tripping of the shutter. The magnetic release system of your CONTAX RTS does not use a mechanical plunger with long operating stroke. Instead, it functions strictly on electrical principle and therefore trips the shutter instantaneously. When you press the magnetic release, you are in effect switching on the magnetic release circuit. 2. It permits direct use of various off-hand controls.
Electronic Exposure Control The electronic exposure control of your CONTAX RTS is based on through-the-lens light reading at full aperture. For light reading, an SPD (silicon photo diode) is used. This sensor responds to variation of light intensity at a speed several thousand times faster than the CdS cell used m most SLRs and shows high sensitivity in extremely low light levels. . Light reading range Your CONTAX RTS provides an extremely wide light reading range from EV -1 to 19 (F1.4 at ASA 100).
www.orphancameras.com On Auto, the shutter speed is set automatically according to the subject brightness and on the basis of the preselected lens aperture. It varies continuously and, therefore, provides precise exposure even at in-between speed. On manual operation, however, the shutter will not function at inbetween speed settings. Switch to manual operation in the following instances: · When photographing by preselecting a precise shutter speed. · In flash photography. · In B (bulb) photography. 1.
· The 'B' setting is used for extremely long exposure. When the shutter control dial is set at 'B', the green pointer in the viewfinder will also overlap the 'B' setting. When thus adjusted, the shutter will remain open over the duration the magnetic release is kept depressed. To avoid camera shake when making exposure, mount the camera on a tripod or set it on a firm, plane surface and tri p the shutter by using a cable switch. Make sure the switch is pushed in properly.
www.orphancameras.com · For backlit subjects, set the pointer at '2' or '4'. When shooting against light or when photographing subjects against a background of a bright window or snow scene, your main subject will appear under-exposed if exposure is made in the normal manner. To bring out fine details of your main subject, align the exposure compensation pointer with the '2' or '4' setting on the scale. · For spotlit subjects, set the pointer at '%' or "Gil'.
3. To activate the self-timer, push the self-timer start lover in the direction of the arrow. The self-timer will then trip the shutter at a delayed action of approximately 7 to 10 seconds. · When using the self-timer to trip the shutter, slide the rubber eye-cup mount upward as illustrated to prevent light from entering through the viewfinder eyepiece. By thus shielding the viewfinder eyepiece, exposure inaccuracy due to light filtering in from the eyepiece can be prevented effectively.
www.orphancameras.com To lock the mirror, turn the mirror lock lever to the right until the white line is set horizontal to the camera base. Then, push in the depth-of field preview button. The button will be locked in pushed-in state and the diaphragm will close down to the preselected aperture. Before locking the mirror in flip-up position, compose, focus and make exposure adjustment. After making the exposure, reset the mirror to its original viewing position.
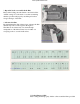
unit or a flash gun. Shutter Speed Setting for Flash Exposure Shutter Speed Electronic Flash Flashbulb FP M MF 1/60 O 1/30 O O O O 1/15 O O O O 1/8 O O O O 1/4 O O O O 1/2 O O O O 1 O O O O Correct Exposure Setting in Flash Exposure Correct exposure in flash photography is determined on the basis of the guide number of the electronic flash unit or flashbulb in use.
www.orphancameras.com guide number is given in meters, convert the flash-to subject distance into meters and then divide.
INTENTIONAL MULTIPLE EXPOSURES The photographic technique under which exposure of the same or different subject is made more than once on the same frame is called intentional multiple exposure. 1. Trip the shutter and make the first exposure. 2. Give the film advance lever a full wind while keeping the film rewind release button depressed. By doing so, the shutter will be charged without advancing the film. 3. Press the magnetic release and make the second exposure.
www.orphancameras.com blower brush, after removing the screen. Interchangeable focusing screens 1. Split-Image Screen Sectioned Matte Screen DEPTH OF FIELD 2. Matte Screen 4.
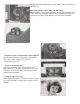
When the camera lens is focused on a certain objects in the foreground and background will appear acceptably sharp in the picture. The range over which the foreground and background objects are reproduced acceptably sharp is called the depth of field. The photos on this page were taken with the lens focused of the subject at the identical distance. At F1.4, objects in the foreground and background appear blurred but, at F16, they are reproduced sharp and clear.
www.orphancameras.com these surfaces directly with your fingers. To wipe off smears on the mirror and lens surface, use a soft, lintless cloth. Take utmost precautions when cleaning the viewing screen surface. · Keep the shutter in released state when your camera is not in use. lit possible, take out the battery from the battery compartment. · Do not subject your camera to sudden changes in temperature. It may cause the electrical contacts to corrode and may bring about poor electrical contact.