
User's Manual


Introduction Getting Ready
Taking Pictures
Playback Set Up
EN-104
NEXTBACK
Contents Glossary Index Nomenclature Menus and Settings Troubleshooting
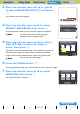
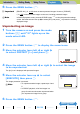
4 Move the selector lever left l or right r to select the image
you want to erase.
5 Move the selector lever up u to select
[EXECUTE], then press E.
The image is erased and the next image appears.
If there are no further images, the "NO IMAGE" message appears.
6 Press the MENU button K.
Erasing a selection of images (SELECT AND ERASE)
You can use this function to select images and then erase them
collectively.
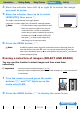
1 Turn the camera on and press the mode
buttons UD until "P" lights up on the
mode select LED.
2 Press the MENU button K to display the menu icons.
BNote
• To erase another image, repeat steps 4 and 5.
• When you select an image from a group of
continuous shots, a screen is displayed to
confirm that you want to erase the group. Move
the select lever up u to select [EXECUTE],
then press E to erase all the images from
within the group of continuous shots.
BNote
In SINGLE playback mode, the erase confirmation screen is displayed when you
move the selector lever down d, even if you did not choose erase [J] from the
menu. Move the selector lever up u to select [EXECUTE] and press E to erase the
currently displayed image.
A Important
• You cannot erase protected images (Æ p.107).
• When you erase an image with a postrecorded voice message (Æ p.110
), the sound file
is also erased.
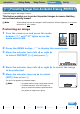
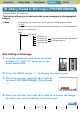
ERASE
IMAGE?
EXECUTE
CANCEL