
User's Manual


Introduction Getting Ready
Taking Pictures
Playback Set Up
EN-139
NEXTBACK
Contents Glossary Index Nomenclature Menus and Settings Troubleshooting
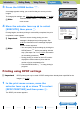
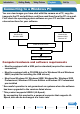
Viewing images on a Windows PC
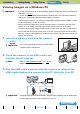
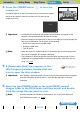
1 Insert the memory card into the camera.
(Æ p.30
)
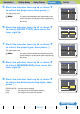
2 Place the camera in the USB cradle and
connect the AC adapter.
3 Use the USB cable supplied with the camera to connect the
USB cradle holding the camera to the PC, then start the PC.
A Important
• If you are using Windows 98 or Windows 98SE, install the USB drivers before connecting the
USB cable. (Æ p.137)
• If you are using Windows Me, Windows 2000 or Windows XP, you do not need to install the
USB drivers. Connect the USB cable without installing the drivers.
• To view images on your PC, you must have image-viewing software already installed. (To play
movies, QuickTime 4.1 or later is required.)
• Always use the AC adapter when you connect the camera to a computer to view and copy
images, etc. If the battery runs out and the camera turns off, files may be corrupted.
• To view movies that have a large number of pixels or a high frame rate, first copy the movie to
your PC and then play the copy of the movie. If you use your PC to play back a movie that is
stored on a memory card loaded in the camera, the data transfer rate may be too slow for the
movie to play smoothly.
A Important
You cannot view images on the PC unless there is
a memory card in the camera.
BNote
Refer to "Using the USB Cradle" (Æ p.36) for
details on attaching the USB cradle.
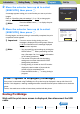
A Important
Check the sizes of the USB connectors. Plug the small connector into the USB cradle
and the large connector into the USB port on your PC.