INTELLIGENT LABEL SENSORS OPERATIONS MANUAL CS2000 & CS2000-QD CONTROL TECHNOLOGIES 2617 Fremontia Drive San Bernardino, CA 92404 Phone: 877-880-5389 Fax: 877-880-5537 www.con-tech.
Table of Contents General Information ............................................................................................... Features ....................................................................................................... Diagram ........................................................................................................ CS2000 Quick Start ........................................................................................ CS2000-QD Quick Start ......................
General Information Features: • 10 to 30 VDC input - reverse polarity protected • Fast RISC microprocessor controlled • Easy one touch setup - label sensitivity easily adjusted, to the optimal setting, by the push of a button • Missing label compensation - outputs a stop pulse even when a label is missing • Level shift or leading edge pulse output selectable • Light or dark operation selectable • Low label contrast setting available • Push-button may be momentarily depressed to output a stop
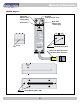
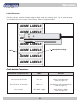
General Information CS2000 Diagram: Red LED: Indicates output state Yellow LED: Indicates label backing (web) Push-button WEB OUT LABEL Green LED: Indicates label + label backing EASY SETUP 1. Position web under sensing area and hold button down until yellow LED comes on. 2. Release button and yellow LED will flash. 3. Move label under sensing area and green LED will come on. 4. Setup complete.
General Information CS2000 Quick Start: 1. Connect red wire to supply voltage 2. Connect black wire to supply common 3. For NPN Output - connect orange wire to black wire For PNP Output - connect orange wire to red wire 4. Connect white wire to your controller - refer to page 6 for wiring diagrams 5. Turn on power 6. Peel off a label and position the label backing (web) under the sensing area 7. Depress the push-button until the yellow LED comes on (1 sec.), then release 8.
General Information CS2000-QD Quick Start: 1. Plug the CS2000-QD's male connector into a suitable 4 pin female connector 2. Connect brown wire to supply voltage 3. Connect blue wire to supply common 4. For NPN Output - connect black wire to blue wire For PNP Output - connect black wire to brown wire 5. Connect white wire to your controller - refer to page 7 for wiring diagrams 6. Turn on power 7. Peel off a label and position the label backing (web) under the sensing area 8.
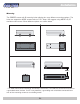
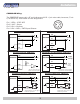
Installation Mounting: The CS2000 comes with 8 mounting holes allowing for many different mounting options. The holes are tapped for #8-32 screws and are 0.31" deep. We suggest using #8-32 x 3/8" stainless steel screws. Some different options are shown below. FORK * To avoid electro-static discharge and sensor malfunction, the CS2000 should be mounted to a grounded metal surface. If this is not possible, a grounding wire should be connected from one of the mounting screws to a suitable ground.
Installation CS2000 Wiring: The CS2000 comes with an 8' - 4 conductor cable. Refer below for wire designations.
Installation CS2000-QD Wiring: The CS2000-QD comes with a 6" quick disconnect M12 - 4 pin male cable/connector (Turck P/N RS4.4T-2). Refer below for wire designations. Pin Pin Pin Pin 1. 2. 3. 4.
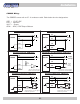
Operation Label Placement: For best results, position straight edge of label under the sensing area. Try to avoid sensing on rounded corners or other curved areas. Refer to diagram below. ACME LABELS ACME LABELS AC Sensing Area ACME LABELS Label ACME LABELS Web (label backing) ACME LABELS ACME LABELS Push-button Functions: Push-button is depressed for...
Operation LED Functions: Yellow - comes on when label backing (web) is under the sensing area Red - comes on when output is active - NPN sinking or PNP sourcing Green - comes on when label over label backing is under the sensing area Operation Features: The CS2000 has 3 different operation features that can be changed to accommodate individual needs. They are Output Mode, Light/Dark Operation, and Contrast Setting.
Adjusting Label Sensitivity Overview: The CS2000 will automatically adjust its label sensitivity, to the optimal setting, by simply depressing a push-button. This adjustment process is referred to as "Easy Setup." It is recommended that the operator adjust the label sensitivity for each new roll of labels due to differences in label rolls. Easy Setup: To adjust label sensitivity for each new roll of labels follow steps 1-4. 1. Peel off a label and position the web (label backing) under the sensing area. 2.
Missing Label Compensation Overview: The CS2000 has the capability to detect a single missing label and output a stop pulse as though the label were present. In order for Missing Label Compensation to function properly the operator must first: a) have Pulse Output selected - see Program Mode (page 12) for more information. b) adjust the label sensitivity - see Easy Setup (page 10) for more information. c) have the labeling machine set to desired speed. Enabling Missing Label Compensation: 1.
Program Mode Entering Program Mode: Program Mode is used to change any or all of the Operation Features. To enter Program Mode depress the push-button until the yellow and green LED's begin toggling (30 sec.), then release. The LED's will then output the current set-up configuration (and every 3 sec. thereafter). For example: an output of yellow, yellow, yellow tells you that the current configuration is Level Shift, Light Operate, and Normal Contrast Setting. Table of Features: 1 OUTPUT MODE *A.
Specifications General: Power Supply..................................................... 10-30 VDC, reverse polarity protected Power Consumption............................................ 50mA max. Output.............................................................. NPN / PNP open collector Output Current................................................... 100mA max., reverse polarity & short circuit protected Response Time..................................................
Specifications Dimensions: 0.44 11.2 0.625 15.9 0.09 2.4 0.50 12.7 0.22 5.6 0.625 15.9 Sensing Area 0.75 19.1 1.00 25.4 0.53 13.5 0.38 9.5 0.625 15.9 WEB OUT LABEL EASY SETUP 3.00 76.2 2.00 50.8 3.125 79.4 1. Position web under sensing area and hold button down until yellow LED comes on. 2. Release button and yellow LED will flash. 3. Move label under sensing area and green LED will come on. 4. Setup complete. CS2000 0.59 15 1.00 25.4 - 14 - 3.50 88.
Cleaning Instructions Cleaning Instructions: 1. 2. 3. 4. 5. 6. 7. 8. 9. 10. 11. 12. Begin by removing the sensor lid's 4 screws with a 1/16" L wrench. Gently lift the sensor's circuit board out by grasping the switch and pulling upward. Do not remove the insulation tape. Clean the lens of the sensor's photo eye with a clean soft cloth moistened with 99% isopropyl alcohol (available from most electronics supply & tool distributors - e.g. TechniTool, Contact East, Jensen Tools, Future Active, etc.
Warranty Terms & Conditions Warranty: The CS2000 Label Sensor is warranteed for a period of two (2) years from the time of purchase. Control Technologies guarantees the CS2000 to be free from defects in materials or workmanship, and that, if used correctly will perform within specifications. The warranty covers normal wear and tear, but does not cover physical abuse, physical damage, improper installation, or exposure to voltages greater than 35V.