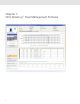
www.vdoroadlog.com RoadLog™ EOBR Owner’s Manual Version 1.
Table of Contents Table of Contents Introduction.................................................................................. 5 The RoadLog EOBR is used in conjunction with:........................ 5 Getting Started.......................................................................... 5 Chapter 1: VDO RoadLog™ Fleet Management Software........................................................... 6 1. Managing your Fleet with the VDO RoadLog™ System....... 7 2. Getting Started ......................
Table of Contents Chapter 3: VDO RoadLog™ EOBR Operation.... 57 1. VDO RoadLog EOBR Fundamentals................................... 57 Operating RoadLog:................................................................ 58 On/Off Button and Operation Modes........................................ 60 USB Connector....................................................................... 60 Printer ..................................................................................... 61 GPS Antenna / Connector ....
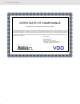
DOT Certificate of Compliance Continental Automotive Systems US, Inc. CERTIFICATE OF COMPLIANCE DEPARTMENT OF TRANSPORTATION REGULATIONS The VDO RoadLog electronic logging system has been sufficiently tested, under the conditions in which it will be used, to meet or exceed the requirements of section 49 CFR 395.15 of the United States Federal Motor Carrier Safety Regulations in effect at the time of its manufacture.
Introduction Introduction The VDO RoadLog Electronic On Board Recorder (EOBR) is the simple, affordable, all-in-one solution for automated daily log book and compliance reporting. It provides cost-effective HOS monitoring that you can have up and running in minutes.
Chapter 1: VDO RoadLog™ Fleet Management Software 6
Managing your Fleet with the VDO RoadLog™ System 1. Managing your Fleet with the VDO RoadLog™ System The VDO RoadLog Electronic On Board Recorder (EOBR) was designed to allow Drivers, Fleets and Owner Operators to record and report Hours of Service (HOS), Driver Vehicle Inspection Reports (DVIR), Fuel Tax Reporting and other data quickly and easily, and without monthly fees. Entry errors in traditional paper logbooks interfere with your asset tracking and operations planning.
Getting Started 2. Getting Started System Requirements VDO RoadLog Fleet Management Software requires: • A PC with Windows® 8, Windows® 7, Windows Vista with Service Pack 2, or Windows XP with Service Pack 3. • Adobe® PDF Reader (or any software that allows reading of PDFs). • An Internet connection. • Two open USB ports. • A CD drive. • 400 MB of free hard drive space.
Getting Started Activating the RoadLog Fleet Management Software In order to use the RoadLog Fleet Management Software, you will need to install the Software and activate the VDO RoadLog Fleet Key. Whenever you use the Fleet Management Software, an activated VDO Fleet Key or VDO Driver Key must be inserted in the PC. If the Fleet Key is not already activated, it can be activated by filling the data in the Company window that appears after installation of the RoadLog Fleet Software application.
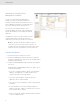
Getting Started Note: The installer will check to see if PostgreSQL database is installed on the machine. If it is not installed, the setup will automatically install it. You may see a message(s) indicating that there are software updates available. Click Yes to allow installation of the updates. When you see the Fleet Key Activation screen, enter your company information in the fields shown. Be careful to enter the information accurately – once saved, the US DOT number cannot be changed.
Getting Started Instructions on how to perform each of these steps are featured below. Create Driver Create Tractor Create Trailer Create Documents Import to RoadLog Export to RoadLog Important note: It is recommended to read the instructions prior to using this software. However, some users may choose to create these entries before reading this manual completely.
Getting Started Note: The .CID file is unique to your Fleet Key. It will not work with other Fleet Keys or with generic USB flash drives. The activated Fleet Key must be plugged into a USB port on the computer for the Fleet Management Software to run. Adding additional Fleet Keys You may wish to have more than one Fleet Key for your company. Additional Fleet Keys can be purchased from VDO RoadLog retailers or by contacting RoadLog Customer Support: Customer Support Email: roadlog-support@vdo.com Tel.
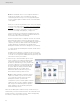
Navigating RoadLog Fleet Management Software: First Look 3. Navigating RoadLog Fleet Management Software: First Look The RoadLog Fleet Management Software four main elements: The Quick Start Screen: This floating layer is seen at the first start up and it is designed to help you through your initial software configuration and to enable easy access to common tasks at start up.
Navigating RoadLog Fleet Management Software: First Look The Action Palettes: Seen at the upper left, the Action Palette provides access to the frequently used actions. The options shown in the Action Palette change, depending on which Navigation button is active.
Navigating work area Screens and Tabs 4. Navigating work area Screens and Tabs The easiest way to understand the Fleet Software’s capabilities is to review the screens and their tabs’ functions. An overview of the functions of each section is described below; a detailed explanation of how to work in the screen and tabs is provided in Screens & Tabs: Features & Functions. Viewer Screen HOS Tab: • View, edit and print Driver HOS data in logbook, tabular and map form.
Navigating work area Screens and Tabs Speed Graph Tab: • [This feature will be implemented in a free upcoming release] Events Tab: • View a complete list of all events recorded automatically by RoadLog, including vehicle status changes and Driver actions. Report Screen Create, view, save and print reports for: • DVIR status. • HOS download reminders. • IRP driven miles [This feature will be implemented in a free upcoming release]. • IRP vehicles list.
Navigating work area Screens and Tabs Drivers / Vehicles Driver Profile Tab: • Create RoadLog identities for Drivers. • Choose from existing profiles for Drivers and vehicles (using the icon in the actions palette). Trailer Assignments Tab: • Assign trailers to the currently selected Driver. • Un-assign trailers from the currently selected Driver. Shipping Assignments Tab: • Assign Shipping Documents to the currently selected Driver. • Un-assign Shipping Documents from the currently selected Driver.
Navigating work area Screens and Tabs Company Configuration Screen Company Tab: • Enter and maintain Company and IRP data as well as time zone settings and download warnings. Shipping Documents Tab: • Create new Shipping Document numbers for use in making Shipping Assignments to Drivers. Supporting Documents Tab: • Create a list of predefined Supporting Document types, such as “Receipt Fuel” and “Receipt Meal,” to allow Drivers easy and consistent creation of Supporting Documents.
Navigating work area Screens and Tabs Annotations Tab: • Create a list of predefined annotations such as “Waiting while loading.” Fuel Vendor List Tab: • Create a predefined list of fuel vendors and fueling types such as “Normal refueling” or “Bulk refueling.” Fuel Types Tab: • Create a predefined list of fuel types such as “Gasoline” or “Diesel” for use in creating reports on fueling events.
Navigating work area Screens and Tabs Asset Part List Tab: • Create a predefined list of Part Names and associated Part Codes to be used in creating DVIRs for tractors and trailers. • Create a predefined list of Types of Defects associated with each Part Name and assign each Type of Defect with a priority level and Defect Code, both for use in creating DVIRs. Application Tab: • Set the language to be used. • Set the file types that can be used for Supporting Document scans.
Creating and working with Driver Keys 5. Creating and working with Driver Keys Creating Drivers To use RoadLog, each Driver must have a profile in the Fleet Management Software and must have a personal Driver Key activated with that profile. The RoadLog Driver Key is a proprietary USB drive that allows Drivers to log in to the RoadLog EOBR and download and transfer their records to the Fleet Management Software or transfer their data between multiple vehicles equipped with RoadLog EOBRs.
Creating and working with Driver Keys • Click the Driver icon in the Action palette, and select the Driver you wish to assign to the Key from the drop down box that appears. Note: Only Drivers for whom a serial number is not already assigned will appear on the drop-down list of Drivers. Once the Driver’s profile data and relevant company information has been downloaded to the Driver Key, that Driver can now automatically log in to the RoadLog EOBR by inserting the Key.
Transferring data 6. Transferring data Uploading Driver data to the Fleet Management Software At the end of the workday, Drivers will download their data from RoadLog to their Driver Key. Once Drivers download their data from RoadLog to the Driver Key, the data can be entered into the Fleet Management Software: • Insert the Driver Key into the PC’s USB port. • Select Drivers / Vehicles from the main navigation. • From the Action palette click Import From Roadlog.
Screens & Tabs: Features & Functions 7. Screens & Tabs: Features & Functions Viewer Screen – HOS Tab The HOS tab displays Driver information across the top of the work area: name, employee number, date of birth, Driver ID, the currently displayed date as selected in the action palette calendar and the cycle chosen for the HOS schedule. Note: The Driver information seen here is entered and maintained on the Driver Data Tab of the Master Data screens.
Screens & Tabs: Features & Functions Events Grid Below the logbook view, the events grid shows a record of the same data seen in the logbook. Annotating the Events Grid Clicking on some cells in a segment row allow you to edit the value in the cell, either by directly typing in a new value or by selecting a new value from a drop-down menu.
Screens & Tabs: Features & Functions Note about Odometer readings: The RoadLog EOBR is typically calibrated to observe the odometer reading from the engine’s computer. The engine computer’s odometer reading can vary significantly from the odometer reading displayed on the dashboard. These conflicting odometer readings both come from different message sources within the vehicle. Therefore, odometer readings from this device may not match the odometer reading displayed on the dashboard.
Screens & Tabs: Features & Functions Violations / Exemptions Violations are instances where the Driver’s record of duty status has violated FMCSA regulations. Violations are highlighted by red dots on the Logbook Timeline and by red dots in the Events Grid. Clicking on the red dot in the Events Grid reveals a second grid showing details of the Violation including Date / Time, Odometer, Event Code, Type, Short Description and Description.
Screens & Tabs: Features & Functions Creating a DVIR in the Fleet Management Software The Driver in the RoadLog can create DVIRs, or they can be created in the Fleet Management Software. To create a DVIR in the Fleet Management Software: • Click on Viewer in tha main navigation. • Select the date you want to record the DVIR for in the calendar, and then click on Create new DVIR in the Action Palette. • Complete the fields in the tab. Fields outlined in orange are mandatory.
Screens & Tabs: Features & Functions Exporting DVIRs to RoadLog To export DVIRs to RoadLog, insert a Driver Key in the USB port. • Click on Drivers / Vehicles in the main navigation. • Click on Export to RoadLog in the Action Palette. • Click on the Key you wish to export to. If more than one Key is inserted, select the correct drive. All Driver files are automatically transferred to the Driver Key. Importing DVIRs from RoadLog To import DVIRs from RoadLog, insert a Driver Key in the USB port.
Screens & Tabs: Features & Functions Each Supporting Document record shows: • Entry date/time: Entered automatically when the record is created. • Supporting Document Number: The number assigned automatically by the software when the supporting Document is created. • Description: The description is selected from the list of predefined Supporting Document types established in the Company Configuration / Supporting Documents tab.