
User Manual Part 2


38
Screens & Tabs: Features & Functions
Trailer Screen
To view the Trailer screen:
• Click Drivers / Vehicles in the main navigation.
• Click the
Icon in the Action Palette and select the
trailer that you want to view. If no trailers exist, you
must first create one to see the Trailer screen.
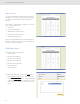
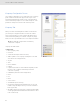
When a Trailer is selected in the Action Palette, the Trailer
Profile screen in shown. Data includes:
• Trailer number (this is a unique identifier assigned
when the trailer entry is first created and cannot be
edited).
• Make.
• Type.
• Axle.
• Weight.
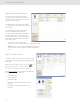
Trailer Assignments Tab
To view the Trailer Assignments tab:
• Click Drivers / Vehicles in the main navigation.
• Click the
Icon in the Action Palette and select the
Driver that you want to assign trailers to or from. The
Trailer tab shows two columns used to assign trailers
to a Driver and to remove trailer assignments from a
Driver.
Note: Trailer numbers shown in the columns are
assigned in the Create Trailer tab.
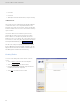
To assign a trailer to a Driver from the Trailer Assignments
tab:
• From the Action Palette, click on the Driver icon and
select the Driver that you want to assign the trailer to.
• Click on a trailer number in the left column to highlight
it.
• Clicking on the right-pointing and left-pointing arrow
buttons will move Trailer numbers from the “Not
assigned” column to the “Assigned” column for the
selected Driver.
Note: The double arrow buttons will move all entries
in the column.
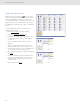
• To remove a trailer assignment from a Driver, use the
left-facing arrows to move trailer assignments from
the “Assigned” column to the “Not assigned” column.
• When completed, click Save.