
User Manual Part 5


97
Vehicle Inspection Reports: Creating DVIRs
From the DVIR Menu screen, follow the DVIR procedure as
described in
Creating a Post-trip DVIR, below.
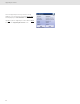
Once all pre-trip DVIRs are submitted, the log in process is
completed. RoadLog displays the Login Completion
screen.
Remove the Driver Key and tap OK. RoadLog displays the
Driver Overview screen.
Creating a Post-trip DVIR
A post-trip inspection requires that you check Assets
(vehicle and current trailer(s)) and sub-assemblies at the end
of a trip. If defects are noticed, they must be recorded
manually in RoadLog.
RoadLog automatically prompts the Driver to perform a
post-trip inspection when:
• A Driver logs out of the system
• Drivers change their status to either Personal Use or
Sleeper Berth
• A Trailer is detached from the Vehicle
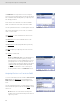
The post-trip DVIR inspection begins at the Confirm DVIR
Data screen:
Check the Vehicle location and odometer. Edit the location if
required.
Note: If the system is not receiving a clear GPS signal,
you may have to enter your location manually.
You can enter your location by tapping the Location field.
When you tap the field, the Keyboard comes up. Type in the
location and tap Go.
Tap Next to continue. RoadLog displays the DVIR Menu
screen that shows the assigned assets list (vehicle and
current trailer(s)).
If you are not detaching any trailers and want to skip the
post-trip inspection, tap Skip.
Note: If you are detaching any trailer(s), you must
perform a DVIR.
Tap Next to perform DVIR post-trip inspection. RoadLog
displays the DVIR Menu screen.
Login Completion
Confrim DVIR Data
DVIR Assets
DVIR Menu