
User Manual Part 5


99
Vehicle Inspection Reports: Creating DVIRs
To create a new part in the list, tap on the Other Part field.
RoadLog displays the Keyboard screen. Enter the first
letter(s) of the defective component and then tap List. A
Parts List screen containing the predefined parts that match
the typed characters will appear.
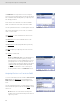
If the part you wish to add does not appear in the stored list,
enter the part’s name in its entirety, and then tap Go. The
DVIR Creation screen is displayed, highlighting the newly
added part.
Once you have selected or added the defective part, tap
Edit. RoadLog displays the DVIR Defect Details screen.
Use the up and down arrows to scroll through the DVIR
Defects Details list. Tap on and highlight the defect you
want to assign to the selected part.
Note: Defect lists are created in the RoadLog Fleet
Software. You may select a defect from the list or add
another defect if it does not appear on your list.
To create a new defect in the list, tap on the “Other Defect”
field. RoadLog displays the Keyboard screen.
Enter the first letter(s) of the defect detail and then tap List.
A Defects List screen containing the predefined defects for
the part matching the typed characters will appear.
If the defect you wish to add is not in the stored list, enter
the full name of the defect, and then tap Go. The DVIR
Defect Details screen, with the “Other Defect” field
complete, is displayed. Tap Add to add the new defect to
the list.
Once you finish adding new defective part types to the list,
tap Done.
RoadLog displays the DVIR Menu screen. Complete your
DVIR using the new defect listing(s) you’ve created.
When all applicable defects for the part have been entered,
tap Done. RoadLog displays the DVIR Creation screen.
Defective parts are now in bold. Repeat these steps for any
remaining defective parts.
Perform post-trip inspections for the remaining assets. Once
all assets are checked and entries completed, tap Next.
New Part Added
DVIR Defect Details
DVIR Creation