
Owners Manual


18
REFRIGERATED GRIDDLE STANDS
OPERATIONS MANUAL
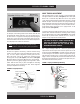
REMOVAL AND REPLACEMENT OF DOORS
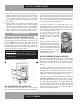
If you need to remove a door from your cabinet, first identify
the location of the spring-loaded hinge cartridge (see Figure 8).
Depending on the age of your cabinet, the cartridge is located
either on the top or the bottom of the door.
CAUTION: THE HINGE CARTRIDGE IS SPRING LOADED
AND THE BRACKET MAY SNAP TOWARDS THE DOOR!
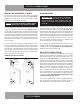
For doors with spring cartridge on the top: Open the door fully
(115°) and remove the mounting screws (see Figure 6) secur-
ing the hinge cartridge bracket to the cabinet above the door.
(The bracket should stay in the open position, but if it is moved
it may snap closed). Pick the door straight up, being careful not
to bump the cartridge bracket, and lift it off the pivot pin bracket
below the door. To reinstall a door, reverse this procedure and
follow the instructions above to set the hinge tension and adjust
the door properly.
For doors with spring cartridge on the bottom: Open the door
fully (115°) and remove the mounting screws securing the hinge
cartridge bracket to the cabinet below the door. Lower the door
down carefully, to avoid bumping the cartridge bracket, and slide
it off the pivot pin bracket over the door. To reinstall, reverse
this procedure and follow the instructions above to set the hinge
tension and adjust the door properly.
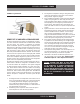
FIGURE 8: Door Hinge Components
RE-HINGING DOORS
IMPORTANT NOTE: DOORS ARE FIELD REVERSIBLE,
BUT DIFFERENT HINGE BRACKETS ARE REQUIRED.
HAVE YOUR MODEL & SERIAL NUMBER READY AND
CONTACT THE FACTORY FOR THE PARTS NEEDED FOR
YOUR UNIT.
Remove the door and hinge cartridge bracket from the cabinet,
as described above (see Figure 7). Remove the pivot bracket,
located at the opposite edge of the door (see Figure 8) by
loosening the (2) mounting screws. Remove the hinge cartridge
from the door by removing the (2) screws and sliding the car-
tridge out. Remove the plastic pivot insert from the opposite end
of the door by carefully prying it out with a flat-blade screwdriver
or putty knife. Remove the remaining “filler screws” from the
face of the cabinet and reinstall them in the threaded holes
where the brackets were originally mounted.
To re-assemble the reverse-hinged door, obtain the correct
cartridge bracket and pivot bracket for the top and bottom of the
“opposite-hand” door (see Figure 8 for parts identification).
Follow the steps above, in reverse order.
INSTALLING LEGS AND LEVELING
If your new unit is supplied with adjustable legs and leg support
plates, they will be packed in the accessory carton. Your cabinet
will have either four (4) or (6) threaded mounting holes on the
bottom of the cabinet (see Figure 9). In order to install the legs,
carefully tip the cabinet back, adding four (4) 2” wood blocks
underneath. Then simply screw the threaded leg studs into the
case bottom front leg holes. Repeat this procedure by tilting the
cabinet in the opposite direction and install the remaining legs.
Make sure the legs are tightened extremely well or the entire
model will sway or rock with each opening or closing of the
doors, possibly causing damage to the case bottom. This proce-
dure should be performed close to the final installation site and
allow access to the rear of the cabinet for condensate evapora-
tor installation (see “Installing Condensate Evaporator” under
“Installation and Location” section).
To assure your cabinet is level, all legs are equipped with bullet-
type leveling bolts. These bolts can be turned by hand or by
wrench, clockwise or counterclockwise to level the cabinet.