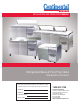
INSTALLATION AND OPERATIONS MANUAL Worktop and Undercounters Refrigerated Bases & Pizza Prep Tables Refrigerators & Freezers Please fill in the following information for your NEW unit, carefully read the instructions in this manual and file it for future reference. MODEL NO. SERIAL NO. PURCHASED FROM INSTALL DATE 1-800-523-7138 Continental Refrigerator A Division of National Refrigeration & Air Conditioning Products, Inc.
TABLE OF CONTENTS Page Receiving Your New Model.............................................................................................................. 3 General Information and Important Operating Facts................................................................................. 3 Uncrating Your New Model.............................................................................................................. 3 Installation and Location........................................
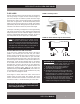
REFRIGERATED BASES & PIZZA PREP TABLES RECEIVING YOUR NEW MODEL Congratulations on your purchase of Continental Refrigerator superior foodservice equipment! When your shipment arrives, thoroughly examine the packaging for any punctures, dents, or signs of rough handling. It is in your best interest to partially remove or open the shipping container in order to examine the contents for any missing accessories, or concealed damage which may have occurred during shipment.
REFRIGERATED BASES & PIZZA PREP TABLES IMPORTANT NOTE: Do not under any circumstances, lay your new model on its front or sides. For a brief period of time, you may lay the cabinet on its back, but only when it’s properly blocked so as not to crush the louvered venting panel and also to allow provision for your hands, in order to set it in its upright position without damaging the cabinet.
REFRIGERATED BASES & PIZZA PREP TABLES FLOOR LOADS The floor at the final location site must be level, free of vibration and strong enough to support the total combined weights of your new model plus the maximum product load which might be placed into it. Keep in mind that all the weight is concentrated at the caster or leg locations. To estimate the possible product weight, assume that each cubic foot of storage space weighs approximately 35 pounds.
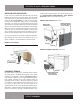
REFRIGERATED BASES & PIZZA PREP TABLES INSTALLING LEGS AND LEVELING If your new unit is supplied with adjustable legs, they will be packed in the accessory carton in the cabinet. Your cabinet will have either four (4) or (6) threaded mounting holes on the bottom of the cabinet (see Figure 4). In order to install the legs, carefully tip the cabinet back, adding four (4) 2” wood blocks underneath, and simply screw the threaded leg studs into the case bottom front leg holes.
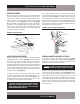
REFRIGERATED BASES & PIZZA PREP TABLES DOOR ADJUSTMENT All doors are aligned at the factory, however vibration during transit may cause them to shift and adjustment may be necessary. If a door requires realignment, carefully open the door (90°) and loosen, but do not remove the mounting screws securing both the top (see Figure 6) and bottom (see Figure 8) hinge brackets to the cabinet. Move the door to the desired position by hand or by gently tapping on the edge with a rubber mallet.
REFRIGERATED BASES & PIZZA PREP TABLES For doors with spring cartridge on the bottom: open the door fully (115°) and remove the mounting screws securing the hinge cartridge bracket to the cabinet below the door. Lower the door down carefully, to avoid bumping the cartridge bracket, and slide it off the pivot pin bracket over the door. To reinstall, reverse this procedure and follow the instructions above to set the hinge tension and adjust the door properly.
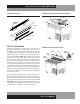
REFRIGERATED BASES & PIZZA PREP TABLES FIGURE 10: Sandwich Top Refrigerator Base Models FIGURE 9: Drawer Slide DRAWER SLIDE ASSEMBLY LEFT-HAND SHOWN (RIGHT-HAND OPPOSITE) SLIDE CLIP FORWARD & PRESS HERE TO DISENGAGE PUSH UP ON LEVER TO DISENGAGE CABINET MEMBER RELEASE LEVER STOP CLIP DRAWER MEMBER (EXPLODED VIEW) CENTER MEMBER PREP TOP PAN OPENINGS Sandwich top models are provided with a complete s
REFRIGERATED BASES & PIZZA PREP TABLES INITIAL CLEANING PROCEDURE Prior to start-up and before placing any product inside of your new model, the interior of the cabinet should be thoroughly cleaned. Washing with a mild soap and warm water solution is recommended for cleaning the aluminum and stainless steel surfaces of your cabinet. This should be followed by cleaning with a baking soda solution (three (3) tablespoons of baking soda to each quart of warm water).
REFRIGERATED BASES & PIZZA PREP TABLES The system should run smoothly and quietly in accordance with generally accepted commercial standards. If any unusual noises are heard, turn the unit off immediately and check for any obstructions of the condenser or evaporator fans. Fan motors, fan blades, or fan housings can be jarred out of position through rough handling in transit or during installation.
REFRIGERATED BASES & PIZZA PREP TABLES IMPORTANT NOTE: Turning a thermostat fully counterclockwise turns the refrigeration compressor “off.” IMPORTANT NOTE: All refrigerators and Pizza Prep Tables are designed with an automatic, “off-cycle” defrost system which means that defrosting occurs automatically when the compressor is not operating during an off-cycle. Do not set the thermostat too cold where the cabinet temperature will fall below 35°F (1.
REFRIGERATED BASES & PIZZA PREP TABLES MAINTENANCE SAFETY PRECAUTIONS THE FOLLOWING SAFEGUARDS SHOULD BE FOLLOWED WHEN OPERATING ANY APPLIANCES: DISCONNECT THE POWER CORD BEFORE ATTEMPTING TO WORK ON OR CLEAN EQUIPMENT. DISCONNECT POWER IF THE APPLIANCE WILL BE IDLE FOR A LONG PERIOD OF TIME. DO NOT ATTEMPT TO REMOVE ANY COVERS OR PARTS YOURSELF, AS THIS CAN EXPOSE DANGEROUS, HIGH VOLTAGE WIRING. SERVICE SHOULD ONLY BE PERFORMED BY A QUALIFIED TECHNICIAN.
REFRIGERATED BASES & PIZZA PREP TABLES PARTS AND SERVICE Continental is committed to providing the best customer service in the industry. All new units come with a Limited Extended Protection Warranty (see “Warranty” section of this manual for details). If a problem arises with your equipment, please contact our Service Department at 1-800-523-7138 (extension 3301, 3302, or 3303). One of our Service Specialists will do everything possible to solve the problem as quickly as possible.
REFRIGERATED BASES & PIZZA PREP TABLES OPTIONAL ACCESSORIES Continental offers a variety of accessories for your unit. INSTALLING OVERSHELF OR DOUBLE OVERSHELF IMPORTANT NOTE: Installing an overshelf is a two-person job. Due to the weight, size and height of the shelf, do not attempt to mount it alone, as this can cause injury. To mount an overshelf to your cabinet, a Phillips-head screwdriver (or a screw gun with Phillips bit) is required.
REFRIGERATED BASES & PIZZA PREP TABLES FIGURE 14A: CPAFRONT & CRA Front Breather Kit CPA BREATHER KIT INSTALLING FRONT BREATHER KIT (CRB Models) Disconnect cabinet power by unplugging cord from electrical supply. Remove back panel to gain access to the machine compartment (see Figure 14). Remove front grill and set aside (standard grill is not used on front breathing models). Position divider plate as shown and attach to cabinet with sheet metal screws at front and self-drilling screws at back.
REFRIGERATED BASES & PIZZA PREP TABLES through each of the four slots located in the rear of the cage and into the interior rear of the unit. IMPORTANT NOTE: These screws should NOT be tight! The purpose of these screws is not to secure the cage to the unit, but to limit the side-to-side movement of the rear of the cage. Once the drawers are installed, the cage rear should be able to find its own place so the drawers can open and close freely.
REFRIGERATED BASES & PIZZA PREP TABLES INSTALLING ELECTRIC CONDENSATE HEATER FIGURE 16: Caster Support Plates The condensate heater has a thermal limit switch and power cord attached. Remove the screws for the rear access panel from the cabinet and set aside. Place the condensate heater in the drain pan as shown in Figure 17. Position the end of the plastic drain tube in the pan. Make sure tubing isn’t kinked, is secure and doesn’t touch the heater.
REFRIGERATED BASES & PIZZA PREP TABLES DIAL THERMOMETER AND CALIBRATION Your NSF-approved dial thermometer has a remote sensing bulb, located in the refrigerated compartment. The display features a large 2” diameter face, with an easy-to-read scale that shows the internal cabinet temperature in Fahrenheit (°F) and Celsius (°C). Blue (safe) and red (caution) color bands provide a quick, visual indication of the temperature inside your refrigerator or freezer.
REFRIGERATED BASES & PIZZA PREP TABLES Since moisture levels greater than 100 PPM will result in system corrosion and ultimate failure, it is imperative that the compressor, components and entire system be kept sealed. 1. 2. 3. 4. 5. 6. 7. 8. All refrigerant lines and components must be clean, free of burrs and purged with nitrogen prior to and during brazing or soldering connections. Nitrogen purging during brazing or soldering will eliminate carbon or foreign matter contamination.
REFRIGERATED BASES & PIZZA PREP TABLES WARRANTY United States of America & Canada THREE (3) YEAR PARTS AND LABOR WARRANTY Continental Refrigerator warrants to the original purchaser of every new Continental Refrigerator self contained unit, including all parts thereof, that such equipment is free from defects in material and workmanship, under normal use, proper maintenance and service as indicated by Continental Refrigerator installation and operation manual, for a period of three (3) years from the date
REFRIGERATED BASES & PIZZA PREP TABLES TROUBLESHOOTING GUIDE PROBLEM PROBABLE CAUSE Condensing unit will not start - no hum. 1. 2. 3. 4. 5. 6. Condensing unit will not start - hums but trips on overload protector. 1. 2. 3. 4. 5. Condensing unit starts and runs, but short cycles on overload protector. CORRECTION 1. 2. 3. 4. 5. 6. Close start or disconnect switch. Replace Fuse. Determine reason and correct/replace. Relocate control. Repair or replace control. Check wiring against diagram.
REFRIGERATED BASES & PIZZA PREP TABLES TROUBLESHOOTING GUIDE PROBLEM Start capacitor open, shorted or blown. PROBABLE CAUSE CORRECTION 1. Relay contact not opening properly. 2. Prolonged operation on start cycle: (a) Low voltage to unit. (b) Improper relay. (c) Starting load too high. 3. Excessive short cycling. 4. Improper capacitor. 1. Clean contacts or replace relay. 2. (a) Determine reason and correct. (b) Replace with correct relay. (c) Correct by using pump down. 3.
REFRIGERATED BASES & PIZZA PREP TABLES REFRIGERATED BASE WORKTOP & SANDWICH UNIT REFRIGERATORS WD-R5 WIRING DIAGRAM 115/60/1 24 OPERATIONS MANUAL
REFRIGERATED BASES & PIZZA PREP TABLES AIR-COOLED PIZZA PREP & REFRIGERATED BASE REFRIGERATORS WITH OFF-CYCLE TIMER - WD-R5-TMR WIRING DIAGRAM 115/60/1 OPERATIONS MANUAL 25
REFRIGERATED BASES & PIZZA PREP TABLES REFRIGERATED BASE WORKTOP FREEZERS WD-F5 WIRING DIAGRAM 115/60/1 26 OPERATIONS MANUAL
A Division of National Refrigeration & Air Conditioning Products, Inc. 539 Dunksferry Road • Bensalem, PA 19020-5908 P 215-244-1400 • 1-800-523-7138 • F 215-244-9579 www.continentalrefrigerator.