
Instructions / Assembly

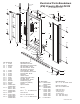


Locate the Adjustable
Pivot Jamb (#1), the
Adjustable Pivot Jamb
Brackets (#2) and six
#8 x 1/2” FH SMS
Screws (#24).
C. Secure the Adjustable
Pivot Jamb Brackets
(#2) to the Adjustable
Pivot Jamb (#1) with the
#8 x 1/2” FH SMS Screws
(#24). Tighten the bottom
three screws complete-
ly. Tighten the top three
screws only half way.
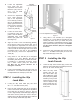
D. Locate the Pivot Bush-
ing (Bottom) (#14) and
press it into the Bottom
Adjustable Pivot Jamb
Bracket (#2) plate hole
(See Figure 2).
E. Align the center of the Pivot Bushing (Bottom)
(#14) with the mark on the shower dam. Use a
Level against the Adjustable Pivot Jamb (#1) to
align it straight up and down (See Figure 3). Using
a Pencil, mark the wall through each of the three
pre-drilled holes in the side of the Adjustable
Pivot Jamb (#1). Remove the Adjustable Pivot
Jamb (#1).
F. Using either a 1/8” Drill Bit (for a fiberglass
enclosure) or a 3/16” Masonry Drill Bit (for
tile/marble), drill holes where you made the marks.
If installing in a tile/marble enclosure, gently
tap a Screw Anchor (#19) into each hole.
DO NOT use the Screw Anchors for a
fiberglass enclosure.
G. Position the Adjustable Pivot Jamb (#1) and use
three #8 x 2
1
/2” FH SMS Screws (#21) to secure
the Adjustable Pivot Jamb (#1) to the wall.
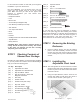
STEP 4 Installing the Slip
Jamb Male
A. Locate the Slip Jamb Male (#3) and three
#8 x 1
1
/2” PH SMS Screws (#18).
B. Place the Slip Jamb Male (#3) at the centerline
mark on the shower dam opposite the Adjustable
Pivot Jamb (#1) as shown in Figure 3. Use the
Level to align the Slip Jamb Male (#3) straight up
and down. Use the pencil tip in each of the pre-
drilled holes in the Slip Jamb Male (#3) to mark the
wall. Set the Slip Jamb Male (#3) aside.
#6100 I06100-0203
C. Using either a 1/8” Drill Bit (for a fiberglass
enclosure) or a 3/16” Masonry Drill Bit (for tile/
marble) drill holes where you made the pencil
marks. If installing in a tile/marble enclosure, gently
tap a Screw Anchor (#19) into each hole. DO NOT
use the Screw Anchors (#19) for a fiberglass
enclosure.
D. Position the Slip Jamb Male (#3) and use three
#8 x 1
1
/2” FH SMS Screws (#18) to secure the
Slip Jamb Male (#3) to the wall.
STEP 5 Installing the Slip
Jamb Female
A. Locate the Slip Jamb Female (#4) (comes with
Magnetic Jamb Seal (#23) pre-installed) and three
#6 x 1/4” “B”-Point Screws (#20).
B. Place the Slip Jamb
Female (#4) over the
Slip Jamb Male (#3)
with the Magnetic Jamb
Seal (#23) facing OUT,
towards you as you look
into the shower. Use the
Level to adjust the Slip
Jamb Female (#4) ver-
tically. DO NOT secure
at this time.
Figure 4
Figure 3
Level the Slip
Jamb Male
Level the Adjustable Pivot Jamb
4
B.
Figure 2
Adjustable
Pivot Jamb
Bracket
Adjustable
Pivot Jamb Bracket
Pivot
Bushing
(Bottom)