
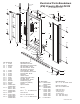
Instructions / Assembly


STEP 6 Installing the Pivot Pin
Assemblies
A. Locate the Pivot
Pins (#15), Span-
ner Washers (#16),
Kep Nuts (#17)
and Pivot Bushing
(Top) (#13).
B. Loosely assemble
the two Pivot
Assemblies: Pivot
Pin (#15), Spanner
Washer (#16) and
Kep Nut (#17).
Place the square
head of a Pivot Pin
(#15) into each
pivot slot of the
Door Top and
Bottom Rails (#6)
on the door panel.
Slide the Pivot Pin (#15) toward the narrow end
of the pivot slot in the Door Top and Bottom Rails
(#6) and hand tighten.
STEP 7 Installing the Door
NOTE: Installing the door may be slightly easier with
another person to assist you.
A. Carefully lift the door and set the bottom Pivot
Pin (#15) into the Pivot Bushing (Bottom) (#14).
Holding the door panel in place, set the Pivot
Bushing (Top) (#13) over the top Pivot Pin (#15)
(See Figure 5).
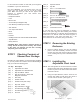
B. Lift the top Adjustable
Pivot Jamb Bracket
(#2) and align the top
Pivot Pin (#15) and
Pivot Bushing (Top)
(#13) with the hole in
the top Adjustable
Pivot Jamb Bracket
(#2). Lower the Adjust-
able Pivot Jamb Brack-
et (#2) onto the Pivot
Pin (#15) and Pivot
Bushing (Top) (#13)
and tighten the three
top screws.
C. Close the door and
adjust it so that there
is a 1/8” gap along the entire length of the door
on the strike side. Use the 7/16” wrench to
tighten the Kep Nuts (#17) at the top and bottom
of the door, maintaining the 1/8” gap.
D. Standing inside the shower, use the 7/64” Drill
Bit to drill a hole 6” down from the top of the Slip
Jamb Female (#4) through both Slip Jambs. Drill
another hole 6” up from the bottom and also one
in the middle. Secure the Slip Jamb Female (#4)
to the Slip Jamb Male (#3) with three #6 x 1/4”
“B”-Point Screws (#20) (See Figure 4).
Note: Once installed, if you find that the door will
not stay closed, the magnet needs to be turned
around. Remove the Magnetic Jamb Seal (#23)
and reinsert it the other way.
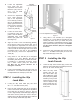
STEP 8 Installing the Drip Rail
and Drip Rail Gasket
A. Locate the pre-drilled Drip Rail (#11), Drip Rail
Gasket (#12) and two #6 x 1/4” “B”-Point Screws
(#20).
B. Measure the Drip Rail (#11) and add 1
1
/4” to
the measurement. Using a straight edge, cut the
clear Drip Rail Gasket (#12) to this length. On
one end along the “star” edge, notch the Drip
Rail Gasket (#12) 1/4”. This end will be on the
strike side when the Drip Rail Gasket (#11) is
installed.
C. Slide the “star” edge of the Drip Rail Gasket
(#12) into the channel in the bottom of the Drip Rail
(#11) and pull through. Make sure the notched end
is on the strike side.
D. Peel the backing off of the two-way tape on the
Drip Rail (#11). Position the Drip Rail (#11) so
that one end is flush with the Bottom Rail (#6) on
the hinge side of the door and 1/2” in from the
edge of the Pivot Strike Rail (#5) with the bottom
edge of the Drip Rail Gasket (#12) just touching
Figure 5
Pivot Jamb
Bracket
Top
Pivot
Bushing
Door
Panel
Pivot Jamb
Bracket
Figure 4
13
17
16
15
15
#6100 I06100-0203
5
Drip Rail
Screw
Screw
Inside Shower
Drip Rail Gasket
Figure 6
16
17