
Instructions / Assembly


3
Model 7800 / 8800 - PRIN-2245 -0117
Contractors Wardrobe
®
, 26121 Avenue Hall, Valencia, CA 91355 | Phone: 661.257.1177 Fax: 661.257. 4907 | www.CwDoor.com
DO NOT REMOVE your existing Tub/Shower Enclosure until you
check that your new Tub/Shower Enclosure is the right size for your
Tub/Shower Enclosure and that all the proper parts are in the box or
hardware bag.
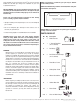
PARTS CHECKLIST:
No. Qty. Description
#1 2 Wall Brackets
#2 1
1” Round Tube Rail
(Pre-assembled)
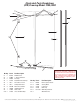
3”
Tub/Shower Curb needs to be
at least 3” of level/flat area.
Figure 1
PREPARATION:
Before beginning assembly of product, make sure all parts are
present. Compare parts with the checklist and package contents
list (on Pages 3 and 4). If any parts are missing or damaged, do
not attempt to assemble the product, and contact our
Contractors Wardrobe
®
Customer Service Department with any
questions or concerns you may have about this product at
661.257.1177.
Congratulations on purchasing your new Cw
®
unit. In this instruction
booklet we will walk you through the installation of your new
Tub/Shower Enclosure.
WARNING:
Manufacturer is not responsible for any damage to the unit or
personal property or personal injury caused by improper
handling or installation. Disregarding these instructions will void
your warranty and cause potential water damage in your home.
Tempered glass cannot be cut. Install the Glass Rail Tub/Shower
Enclosure on a surface that is level and able to accommodate
the weight of the unit. Make sure your Tub/Shower Curb has at
least a 3” minimum flat surface for installing this Door.
Remember to ensure that there is sufficient structural support
behind the shower wall to hold the weight of the Shower Door.
If there is insufficient support, then reinforce the Shower walls
with studs prior to Tub/Shower Enclosure installation. Please
consult local building codes and compliance standards prior to
installation and ensure conformity. Professional installation is
recommended.
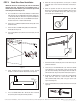
CAUTION: Always wear gloves and safety goggles whenever
drilling or cutting. (NOTE: Take extra care in handling frameless
tempered glass Panels. The sharp corners of the Panels can
damage tile and floor covering. Do NOT allow the Panels to strike
the tub/tile or each other. Do NOT let the corners of the frameless
glass Panels strike any hard surface, wall or floor. Tempered glass
may be shattered in this manner.)
NOTE: Do NOT use a razor blade to cut open the paper wrapping as
you may scratch the contents.
NOTE: If you ordered a custom unit, your parts may be different
based on what you order.
NOTE: Check the following conditions of the Tub/Shower Curb prior
to installation (See Figure 1).
#9 1 Floor Guide
#3 2 Rail Stops
#4 2
#5 1 Fixed Glass Panel
#6 1 Sliding Door Panel
#7 4 Wheel Assemblies
#8 1 Hollow Door Pull
Rail / Fixed Panel Clamps
(Pre-assembled)
#10 2 Glass-to-Wall Clamps
Please read and understand these instructions in their entirety
prior to assembly, operation and/or installation.
• Improper handling of the tempered glass can cause the tempered
glass to break.
• Do not set tempered glass directly on hard surfaces such as
concrete, tile, porcelain, etc.
• At least two (2) people are recommended for the installation.