
Instructions / Assembly


6
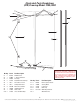
Model 7800 / 8800 - PRIN-2245 -0117
Contractors Wardrobe
®
, 26121 Avenue Hall, Valencia, CA 91355 | Phone: 661.257.1177 Fax: 661.257. 4907 | www.CwDoor.com
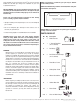
Figure 10
–5/16”
1210
13.5
8
3/8”–
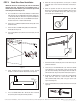
Figure 11
I. Remove Fixed Glass Panel (#5), and set it out of the way on
protective material.
J. Take one (1) of the Wall Brackets (#1) with the threaded
round mounting screw and place it over the round circle
you drew when marking the Rail height. Mark the holes to
drill on both sides of your tub/shower walls (See Figure 7).
K. Drill holes for Wall Brackets (#1) and Glass-to-Wall Clamp
(#10), and then insert the screw anchors. Mark the
Glass-to-Wall Clamp holes (#10) using your pencil (see
Figure 6 and Figure 7).
L. Fasten the Wall Bracket (#1) male thread to the wall (see
Figure 8).
D. Slide the Floor Guide (#9) under the Sliding Door Panel (#6),
mark the position and then remove Sliding Door Panel (#6)
and carefully set it inside the tub/shower enclosure again
(see Figure 11).
Figure 9
Q. With the Fixed Glass Panel (#5) now secured and in place,
you can now apply silicone to the vertical wall and the
bottom curb areas inside the tub/shower enclosure and
outside to help prevent water leakage.
O. Attach Glass-to-Wall Clamp (#10) to wall.
P. Tighten the Rail/Fixed Panel Clamps (#4) ensuring that the
Rail Stops (#3) are in their proper position. You can use the
smallest Allen Wrench (#16) as a tightening tool by
inserting it into the hole on the side of the Rail/Fixed Panel
Clamp (#4).
N. Attach Wall Brackets (#1) to male thread mounted to the
wall. Then tighten with Allen Wrench (#16) (see Figure 9).
M. Place Fixed Glass Panel (#5) in the U-Channel (#13) back in
the designated position. You should apply silicone to the
full length of the U-Channel (#13) to fill up approximately
1/4” of the inside of the U-Channel (#13) before placing the
Fixed Glass Panel (#5) into it. Then slide the Wall Brackets
(#1) on each 1” Round Tube Rail (#2).
E. Option A: Place the Floor Guide (#9) back on the marks you
just made, then mark and drill the holes (see Figure 11).
Apply silicone to the bottom of the Floor Guide (#9). Set into
place, and secure with screws. Wipe excess silicone
away.
Option B: To install the Floor Guide (#9) without using
screws, apply silicone to bottom of the Floor Guide (#9).
Use duct tape to hold in place until the silicone dries.
F. Install the Sliding Door Panel (#6) on the rail, carefully
setting the glass into the Floor Guide (#9). Install the two (2)
Wheel Assemblies (#7) into place. This should be the
bottom holes on the Sliding Door Panel (#6).
C. Make sure the Sliding Door Panel (#6) is level and plumb.
B. Step into the tub/shower enclosure. Carefully lift the Sliding
Door Panel (#6), and place the Wheel Assemblies (#7) onto
the 1” Round Tube Rail (#2).
STEP 5 Sliding Glass Door Installation
A. Take the Floor Guide (#9) and make sure it is set to the
proper glass thickness. Look on the bottom side and adjust
if needed by pressing the black plastic out and rotating the
notch into the proper spot based upon the glass thickness.
For 5/16” thick glass use 8 and for 3/8” glass use 10. Then
set it on the tub/shower curb next to the Fixed Glass Panel
(#5) so you can reach it to mark the holes with the pencil as
you set the Sliding Door Panel #6 (see Figure 10).
G. Install the Dam Strip (#14). Remove the two-way tape and
position the Dam Strip (#14) behind the U-Channel (#13) and
butt it up to the wall (see Figure 12).
Figure 12
Dam Strip