
Instructions / Assembly


C. Find the correct offset measurement using the
O ffset Measuring Ta b l e on page 3 (B
Measurement) for your particular installation. From
the front edge of closet opening inward, measure
using dimension from table and make a pencil
mark on wall. Do this on both walls, i.e., right and
left walls (See Figure 2).
Figure 2
D. Place front of Wood Strip (#4) up to pencil mark
on wall (See Figure 3). Do this on both sides.
Now attach Wood Strip (#4) according to your
O ffset Measuring Table on Page 3.
E. Cut the Bottom Track (#3) to your measurement
of the inside closet opening. Slide the Bottom
Track (#3) over Wood Strip (#4) and attach with
four #8 x 1/ 2″ Truss Screws (#7).
Figure 3
INSTALLING THE DOORS
Step 1 Removing the Existing Doors
Remove existing doors, brackets, top channel
and bottom track.
Step 2 Installing the Top Channel
A. Measure the opening at the top of the closet from
wall to wall.
B. Cut the new Top Channel (#2) to this dimension.
When cutting the Top Channel (#2) we recommend
that you use a Miter Box and Hacksaw for a
straight cut. Cut one side only.
NOTE: If your closet has bumper jambs you may need to
notch the Top Channel (#2) on each end.
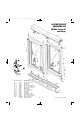
C. When cut to proper length, install Top Channel
(#2) up to the top front of closet opening making
sure that the front of the Mirror Fascia on the Top
Channel (#2) is flush with outside walls
(See Figure 1). Hold up the Top Channel (#2) in
the desired position and with your Pencil, mark
where the pre-drilled holes are in the To p
Channel (#2).
Figure 1
D. Remove the Top Channel (#2) and drill holes
using 1/8″ Drill Bit where you made the pencil
marks. Now install the Top Channel (#2) in place
using six #8 x 1
1
/2″ PH SMS Screws (#5).
Step 3 Installing the Bottom Track
A. Make sure that you have used the FLOOR
CHECK LIST to determine which floor and
installation you will use.
NOTE: If the floor board molding continues into the
c l o s e t opening, you may need to remove it so that
the Wardrobe Doors will close flush to the wall.
B. Locate Wood Strip (#4) supplied in kit and
measure inside bottom closet opening and cut to
length.
PENCILMARK
TO LOCATE
FRONT EDGE
OF WOOD
STRIP
PENCIL MARK
TO LOCATE
FRONT EDGE
OF WOOD
STRIP
4
Fantasy IV
®
/Asprey
®
- I3070-0802
ALIGN TOP
CHANNEL FLUSH
WITH THE WALL
ULTRAGLIDE
®
FELT
LINER
Fantasy IV/Asprey - Web 3/20/03 10:59 AM Page 4