Installation Instructions Model Concord , Silhouette and Eclipse ™ ® ® ® Contractors Wardrobe ® DESIGNERS • MANUFACTURERS • TOLL FREE: (800) CW-DOORS • (800) 293-6677 • www.cwdoor.
Illustrated Parts Breakdown (IPB) Model Concord , Silhouette and Eclipse 2 ™ ® ® 11 Top Guide Bracket (#5) (Enlarged View) 5 6 12 5 6 8 5 14 12 6 15 1 5 A 14 14 14 15 15 13 14 A 1 13 12 A A 14 14 7 8 13 15 14 7 13 11 12 14 A A 9,10 7 9,10 4 Steel Wheel Assembly (#13) No.
Congratulations on purchasing your new CW ® Wardrobe Doors. Now that you have opened the package, we want you to verify that you have all the necessary hardware supplied with your doors. FLOOR CHECK LIST 1. Do you have carpet? It is highly recommended that if you have carpet and do not have a cut-out in the carpet already, you should cut the carpet in order to install the Bottom Track (#3). We do not recommend installing the Bottom Track (#3) directly on top of carpet. PARTS CHECK LIST: No.
INSTALLING THE DOORS STEP 3 * Before you get started if you purchased our Silhouette® model it is almost the same as our Concord™ model. Any differences are noted with a Silhouette® Flag S . If you see this flag during an installation step please turn to Supplemental Page 6 for that installation section. STEP 1 Removing Existing Wardrobe Doors A. Make sure that you have used the Floor Check List on Page 3 to determine which floor and installation you will use.
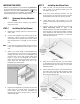
STEP 4 A. S Installing the Mirrored Glass Panels (Concord ™only) Make sure you have a pad or blanket to protect the Mirrored Glass Panels (#1) from scratches. Lay Mirrored Glass Panels (#1) with backside up on the floor. Locate one of the Steel Wheel Assemblies (#13) on the bottom of a Mirrored Glass Panel (#1). With a Phillips Screwdriver, turn the adjusting screw to the right to lower the roller. Do this until you have 1ʺ of roller showing.
SILHOUETTE ® SUPPLEMENTAL PARTS LIST NO. PART # #1 PART DESRIPTION #1 Tempered Glass Panels #12 A3900 Bottom Mold (Top Mold same as Concord™) #13 W8015 Concealed Wheel Assembly Concealed Wheel Assembly S STEP 4 A. Installing the Tempered Glass Panels #13 Adjustment Hole Make sure you have a pad or blanket to protect the Tempered Glass Panels (#1) from scratches. Lay Tempered Glass Panels (#1) with backside up on the floor.