Disclaimer Control4® makes no representations or warranties with respect to any Control4 hardware, software, or the contents or use of this publication, and specifically disclaims any express or implied warranties of merchantability or fitness for any particular purpose. Control4 reserves the right to make changes to any and all parts of Control4 hardware, software, and this publication at any time, without any obligation to notify any person or entity of such changes.
Contents General Description and Features .......................... 4 Install and Maintain Batteries .................................. 5 Install Batteries ............................................. 5 Use and Care Tips ........................................ 5 Replacement Safety Rules ........................... 5 What Happens During System Setup ...................... 6 About Control4 User Interfaces ............................... 7 About the System Remote Control ..........................
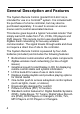
General Description and Features The System Remote Control (model # RCZ-SRC1-B) is intended for use in a Control4® system. It is included with the purchase of a home controller, but may also be purchased separately. It is used to access on-screen menus and to control associated devices. This device goes beyond a typical “universal remote” that simply learns IR codes from TVs, VCRs, CD players and DVD players; This remote control uses standardized ZigBee mesh networking for two-way wireless communication.
Install and Maintain Batteries Install Batteries Install the four AAA batteries provided into the back of the device, ensuring that you insert the batteries into the remote control according to the diagram provided in the battery compartment (with the + and - terminals aligned correctly). Use and Care Tips • • • • Keep battery contacts and compartment clean. Remove batteries from the remote control if it is no expected to be in use for several months.
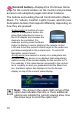
What Happens During System Setup When a Control4 home automation system is set up, the following general activities occur: 1. Each Control4 controller (such as Media Controller) comes with a Director software project pre-installed. 2. During setup, a trained installer modifies the Director project for the specific site (such as “Media ControllerSmith Family”): Using specialized setup software (such as Composer Pro installed on a connected PC), the trained installer performs these tasks: a.
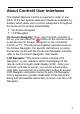
About Control4 User Interfaces The System Remote Control is required in order to use either of the two system-wide user interfaces available by default, which allow you to control subsystems throughout the home and to access stored Media: • • On-Screen Navigator LCD Navigator On-Screen Navigator: Once your Control4 controller is set up, you can press the button on the remote control to access the On-Screen Navigator on the connected monitor or TV.
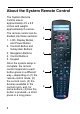
About the System Remote Control The System Remote Control size is approximately 2.5 x 8.5 inches and weighs approximately 8 ounces. 1 The remote control can be divided into these sections: 1. LCD, Display Button, and Power Button 2. Control4 Button and Subsystem Buttons 3. Navigation Buttons 4. Control Buttons 5.
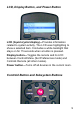
LCD, Display Button, and Power Button LCD (liquid crystal display)—Provides information related to system activity. The LCD uses highlighting to show a selected item. It includes a white backlight that stays on for 15 seconds when a button is pressed. Display button—Toggles the remote and its LCD between Control4 Menu (Set Preferences mode) and Control4 Remote (all other modes). Power button—Turns off all devices in the current room.
(Control4 button)—Displays the On-Screen Home page for the current location on the monitor and provides access to all subsystem pages and other locations. The buttons surrounding the red Control4 button (Radio, Music, TV, Videos, Comfort, Lights, House, and Info) are Subsystem buttons that respond differently depending on how they are pressed: A short press (a fraction of a second) on a subsystem button displays that subsystem’s menu in the LCD display and chooses the device to be controlled.
Radio • • Short press: Sets the tuner for the current room as the device to be controlled by this remote control and displays the following in the LCD: Personal Radio Playlist for AM, FM, XM, Satellite, or Net Radio. Long press: If a video device is currently on, displays the Radio options in the On-Screen display (instead of the LCD).
Comfort • • Short press: Displays comfort-related controls on the LCD (such as heating/AC thermostats, motorized blinds, curtains, or ceiling fans). Long press: If the video device connected to the controller is currently on, displays the Comfort options in the On-Screen display (instead of the LCD). Lights • • Short press: Displays a list of lighting scenes and/or lighting loads on the LCD.
Navigation Buttons The following buttons are for screen and menu navigation. • • • • • • PIP (Picture in Picture) MENU VOLUME - + PAGE UP S DOWN T MUTE W X S T (Also do channel up/down) • • • • • • SELECT (center of arrows) GUIDE RECALL INFO BACK W CANCEL Control Buttons These familiar buttons are for device control.
About the Modes This remote control has the following modes: • • • • 14 Set Preferences mode: In this mode you set the LCD’s brightness and contrast or view current battery level. Press the Display button to toggle to the “Control4 Menu” display in the LCD. On-Screen Navigator mode: In this mode you access or control all system components through a monitor or TV on-screen display (On-Screen Navigato access the Ontor).
The current mode of the remote control affects the behavior of its different sections. Here is a high-level summary of how functionality differs from mode to mode. Remote Control Section: Set Preferences mode: On-Screen Navigator mode: LCD Navigator/ Controller mode: LCD Display Set LCD Brightness or Contrast, or view current battery levels. NA Displays LCD Navigator menus related to current subsystem.
Use with On-Screen Navigator Note: If the video device connected to the controller (such as Media Controller) is already on, press and hold a subsystem button to display the associated subsystem menu on top of the current video display. 1 Press and hold (the Control4 button) to access the On-Screen Navigator menu on the monitor or TV.
Use to Control Devices To use this remote control to control system devices, you must first choose a system device. 1 Quickly press and release a subsystem button to simultaneously enter LCD Navigator mode AND to choose the device to control—that is, to choose the device associated with this subsystem for the current location.
Use LCD Navigator Use LCD Navigator to choose a variety of options. 1 (Optional) Set LCD Display preferences: a. Press the Display button to toggle to the “Control4 Menu” in the LCD. b. Using the arrows and the Select button, choose a menu option; then view or change a setting: • • • Set Brightness: Move slider bar with arrows to brighten or dim the LCD display. Set Contrast: Move slider bar with arrows to increase or decrease contrast in the LCD display.
Limited 1 Year Warranty This device has a limited one (1) year warranty on parts from the date of installation. Control4 will replace or repair any defective unit. Return unit to the place of purchase for replacement. For any damages incurred, the warranty will never exceed the purchase price of the device. This warranty does not cover installation, removal, or reinstallation cost.
of the FCC Rules. These limits are designed to provide reasonable protection against harmful interference in a residential installation. This equipment generates, uses, and can radiate radio frequency energy and, if not installed and used in accordance with the instructions, may cause harmful interference to radio communications. However, there is no guarantee that interference will not occur in a particular installation.
CE Declaration of Conformity DeClaration OF CONFORMITY Control4 Corporation 11734 S.
EMC EN 301 489-1 V1.4.1 — Electromagnetic compatibility and Radio spectrum Matters (ERM); ElectroMagnetic Compatibility (EMC) standard for radio equipment and services–Part 1 Common technical requirements. EN 301 489-17 V1.2.1 — Electromagnetic compatibility and Radio spectrum Matters (ERM); ElectroMagnetic Compatibility (EMC) standard for radio equipment and services; Part 17: Specific conditions for 2.4 GHz wideband transmission systems and 5 GHz high performance RLAN equipment.