
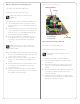
Setup guide


Power and Network Installations
Choose one of these six (6) options to connect the
Door Station’s wiring:
• Ethernet with PoE (preferred)
• Ethernet with AC
• Ethernet with DC
• WiFi with AC
• WiFi with DC
• WiFi with PoE
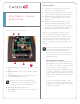
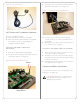
Option 1 (Preferred): Ethernet Connection with a
PoE Injector or a Third-Party Injector or Switch
This option sets up Ethernet with PoE.
PoE injects electrical current into the Ethernet cable
using a PoE Injector - model #AC-POE1-B, or a
third-party PoE solution to provide the Door Station
with power and a network connection.
To install the Door Station with a PoE and Ethernet
connection using a PoE Injector:
1 Plug the Ethernet cable into the Door Station
(see Figure 3).
2 See the section “Grounding Requirements” for
details about earth grounding.
Figure 3. Ethernet with PoE Injector
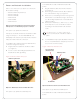
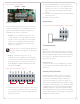
Option 2: Ethernet Connection with AC Power
This option sets up Ethernet and AC power.
Ethernet Connection
To install the Door Station with Ethernet and AC
power:
1 Plug the Ethernet cable into the Door Station
(see Figure 4).
2 Connect a ground wire from the Door Station to
one of the back box lugs (see Figure 12).
3 Connect a second earth-ground or house-ground
wire from the second back box lug to the home.
See “Grounding Requirements” for details about
earth grounding.
4 Connect the neutral (N) (-) and hot (L) (+) wires
to the AC power source for the Door Station
according to the national and local electrical
codes.
TIP: The hot or ‘L’ (+) wire’s connector is
closest to the bottom of the Door Station’s
plate.
5 Your installation may require alternative wires and
the use of a terminal block. Strip the power wires
to 1/4” on the end if necessary.
Figure 4. Ethernet with AC Power
Option 3: Ethernet Connection with DC Power
This option sets up Ethernet and DC power.
To install the Door Station with Ethernet and DC
power:
Ground Wire
Ethernet Cable
AC Connections
(Hot and Load)
4