
Installation Guide
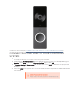
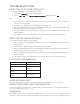

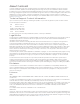
Table Of Contents

PREREQUISITES
l Control4 system running OS 3.2 or higher
l For the PoE model (C4-VDB-E)—Cat5e/6 or better wiring to PoE injector or PoE switch (802.3af
PoE, injector not included)
l If you want to use the external chime feature, a doorbell chime, doorbell transformer, and 18-22
gauge 2-conductor wire to the doorbell chime are required.
l The waterproof Ethernet connector assemble requires a 1” passthrough hole and space in the
wall cavity behind the bracket. If you are not using the doorbell wall box, make sure there is
plenty of room behind the metal bracket.
CONTENTS
l Video Doorbell (PoE) (C4-VDB-E)
l Mounting bracket
l Wood screws (3) and anchors
l Set screw (2) and Allen-type wrench
IMPORTANTNOTESANDCAUTIONS
Important! Installation and maintenance should only be performed by qualified technicians.
Important! The VDB should only be connected to a properly secured network.
Caution! Use with a power supply that is UL listed and Limited Power Source (LPS) certified. The
power supply should bear the UL listed and LPS marks. The power supply should also meet any
safety and compliance requirements for the country of use. The power supply should be properly
grounded.
INSTALLING THE VIDEO DOORBELL
Install the metal bracket and VDB as shown in the Quick Start Guide (
ctrl4.co/vdb-e-qsg). After
installation is complete, continue to the next topic. (CONNECTING THE VDB TO YOUR
NETWORK (POE MODEL))
CONNECTING THE VDB TO YOUR NETWORK (POE
MODEL)
1.
Power up the VDB by connecting the Ethernet cable going to the VDB to the PoE power
source.
The PoE VDB is configured for DHCP by default and will get an IP address automatically from your
network. When the VDB is online with an IP address, the LED shows solid white.