
Installation guide

IR Blaster
In addition to IR emitters, the HC-800 is also
equipped with an IR blaster located just left of the
front LEDs.
To use the blaster rather than an IR emitter:
1 In Composer, connect the Front IR Blaster Out
on the Controller to the IR In for the device you
want to control.
2 Test and verify that the HC-800 is positioned in
such a way that the blaster can reach the device
you want to control.
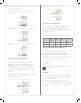
Antenna Considerations
Depending on the location of the HC-800 and the
network setup, you’ll need to consider which, if any,
antennas to connect to the HC-800.
Not Using WiFi
In this case, the standard CAT5 Ethernet cable works
well with the HC-800 installed on a rack. No WiFi
antenna is required.
Using as a ZigBee Access Point (ZAP)
Attach one (1) of the antennas provided to the HC-
800 RSMA connector labeled ‘ZigBee’ as needed.
If the HC-800 is mounted in a metal rack, use the
optional 10’ Antenna Kit (C4-AK3M, sold separately).
Using with a WiFi Connection
In this case, you’re connecting the HC-800 wirelessly.
NOTES: (1) This option is not recommended
if the HC-800 is mounted in a rack. (2) WiFi
is not supported on HC-800s as Primary
Controllers.
Use the WiFi antenna when you don’t have an
Ethernet connection, and you’re using the HC-800 as
a Secondary Controller.
NOTE: For best results, we recommend that
you use 802.11 n.
6
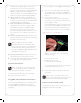
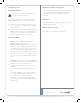
Install in a Rack (Optional)
To install the Controller in a rack (front or back):
1 Turn the Controller over and remove the four (4)
screws that secure the feet (each corner on the
Controller).
2 Remove the rubber feet.
3 Use the same screws to attach the rack ears
(Rack Ear Kit, C4-1UREK-B, sold separately) into
the screw holes.
4 Attach the Controller to the rack.
Setting Up External Storage Devices
You can store and access media from an external
storage device, for example, a NAS or eSATA drive, or
USB memory device by plugging the USB drive into
the USB port and then configuring and scanning the
media (if required) in Composer Pro. For information
about adding storage devices, see eSATA Installation
Guide in the Knowledgebase.
NOTE: When using eSATA or USB storage
devices on an HC-800, you can only use one
(1) partition with a 2TB maximum size. This
limitation applies to the USB storage on all
other Controllers also.
Composer Information
• Driver. Choose the Home Controller HC-800
driver in Composer (OS 2.2 and later) and add
it to your project. See Composer Pro Getting
Started for details.
• Properties. There is a special section for
configuring the video resolution. Select the video
output you are using from the Connections
view (HDMI or Component), and then select the
preferred video mode. The default is 720p @ 60
Hz for Component and HDMI. HDMI also uses
auto configuration to select the best possible
resolution for the display device. After making
the selection, click Set Resolution. If the video
resolution has to change, the Controller will
reboot; this is normal. See “Configuring an HC-
Class Controller” in the Composer Pro User Guide
on the Dealer website for more details.