Disclaimer Control4® makes no representations or warranties with respect to any Control4 hardware, software, or the contents or use of this publication, and specifically disclaims any express or implied warranties of merchantability or fitness for any particular purpose. Control4 reserves the right to make changes to any and all parts of Control4 hardware, software, and this publication at any time, without any obligation to notify any person or entity of such changes.
Important Information Graphical Symbols in this Guide Battery Replacement Safety Rules The following symbols and their descriptions draw your attention to important safe practices and additional information that can help you avoid injury, death, or loss of material or time. • • • CAUTION! This indicates a potentially hazardous situation that, if not avoided, may result in minor or moderate injury.
Contents Introduction ................................................................................................................. 5 Features...................................................................................................................... 6 Display ........................................................................................................................ 6 Options of Control ...............................................................................................
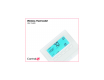
Introduction Congratulations on your purchase of the Wireless Thermostat from Control4. This intelligent programmable thermostat works as an integral part of the Control4 system. Having the thermostat integrated with the Control4 system allows you to control the temperature either using the Wireless Thermostat or any of the Control4 navigation control options: the 10.5” Wireless Touch Screen, the Mini Touch Screen, the System Remote Control (On-Screen display or LCD display), or the LCD Keypad.
Features • • • • • • Display Heat Point and Cool Point. The Wireless Thermostat works with your heating and cooling system to maintain a consistent temperature called a set point. With the Wireless Thermostat, you can specify separate heating and cooling set points. The Wireless Thermostat automatically engages the appropriate heating or cooling system until the room reaches the desired temperature.
Options of Control You can change the comfort settings using the following devices or displays: • Wireless Thermostat • Wireless Touch Screen • Mini Touch Screen • System Remote Control (OnScreen display or LCD display) • LCD Keypad From either the Wireless Thermostat or one of the navigation control options, you can do the following tasks: • Change Heating and Cooling System Mode. See next section. • Change Fan Settings. See page 11. • Change Hold Options. See page 13.
Change Heating and Cooling System Mode The Wireless Thermostat allows you to select the mode of operation for the climate control system. Using modes can help with efficiency. Modes include: • Off. When in the Off state, the Wireless Thermostat does not make any requests to the heating or cooling system. • Heat mode. During cold winter months, if you do not want to run your air conditioning system, set the Wireless Thermostat mode to Heat. The system then uses the furnace exclusively. • Cool mode.
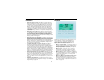
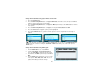
Change Thermostat Mode using Navigation Device or Display 1 From the Main Navigator screen, select Comfort. 2 From the options that appear, select Thermostat (name can vary and some navigation devices skip this step). Options on Menu or Bar Main Navigator Screen 3 From the Thermostat screen, select Mode. 4 From the pull-down menu, select one of the mode options: Off, Heat, Cool or Auto. Thermostat Screen The screen updates immediately to reflect the new mode and set temperature.
Change Thermostat Mode using System Remote Control LCD 1 Press the Comfort button. 2 Press the Down or Up Arrow buttons to highlight Thermostat on the LCD screen, then press the Select button to view the thermostat’s current settings. 3 Press the Down or Up Arrow buttons to highlight the Mode option and press the Select button to view the mode options. 4 Press the Down or Up Arrow buttons to highlight a mode option: Auto, Heat, Cool or Off.
Change Fan Settings You can turn the fan on manually or set it to be automatically controlled by the HVAC system. When you turn the fan manually to On, it stays on through the programmed schedule, creating more circulation. (The next preprogrammed time does not overcome the change you made.) You can set the fan to: • On — Turns fan on manually and it will continue to run until turned off manually.
Change Fan Setting using System Remote Control LCD 1 Press the Comfort button. 2 Press the Down or Up Arrow buttons to highlight Thermostat on the LCD screen, then press the Select button to view the thermostat’s current settings. 3 Press the Down or Up Arrow buttons to highlight the Fan option and press the Select button to view the fan options. 4 Press the Down or Up Arrow buttons to highlight a fan option: Auto or On. 5 Press the Select button to apply the option you highlighted.
Change Hold Options The Thermostat Hold options allow you to hold a desired temperature setting, overriding the programmed schedule. You can set the system to hold the temperature (1) until the next programmed event, (2) for two hours, or (3) permanently. To change the Hold options using one of the navigation control options, see the following sections: • Change Thermostat Hold Option using Wireless Thermostat. See next section. • Change Thermostat Hold Option using Navigation Device or Display.
Change Thermostat Hold Option using Navigation Device or Display 1 From the Main Navigator screen, select Comfort. 2 From the options that appear, select Thermostat (name can vary and some navigation devices skip this step). 3 From the Thermostat screen, select Hold. 4 From the Thermostat Hold screen, select one of the options: • Hold Until — Holds setting until next programming event. • Two-Hour — Holds setting for two hours. • Permanent — Holds setting permanently.
Change Thermostat Hold Option using System Remote Control LCD 1 Press the Comfort button. 2 Press the Down or Up Arrow buttons to highlight Thermostat on the LCD screen, then press the Select button to view the thermostat’s current settings. 3 Press the Down or Up Arrow buttons to highlight the Hold option and press the Select button to view the hold options. 4 Press the Down or Up Arrow buttons to highlight a hold option: Off, On (Until next event), 2 Hours, Permanent or Hold Cancel.
View or Change Temperature Heat and Cool Points You can set the system to hold a temperature adjustment that varies from the programmed schedule. When you manually set a temperature, the system automatically sets a two-hour hold. NOTE: The system automatically makes sure that the Heat Point (the setting that turns the furnace on) is at least two degrees lower than the Cool Point (the setting that turns the air conditioning on). This keeps the two systems from competing with each other.
View or Change Temperature using Wireless Thermostat 1 Press Button 1 to toggle between Cool or Heat icons that appear above Button 1. 2 Press repeatedly Button 4 to decrease or Button 5 to increase the temperature in one degree increments until the desired temperature is reached. When you change the temperature, it sets an automatic hold for 2 hours. View or Change Temperature using Navigation Device or Display 1 From the Main Navigator screen, select Comfort.
View or Change Temperature using System Remote Control LCD 1 Press the Comfort button. 2 Press the Down or Up Arrow buttons to highlight Thermostat on the LCD screen, then press the Select button to view the thermostat’s current settings. 3 Press the Down or Up Arrow buttons to highlight either the Heat Set Point or Cool Set Point and press the Select button to view the option you have highlighted.
Options for Program Scheduling Navigation Device or Display The Wireless Thermostat comes with a pre-programmed schedule. Using any of the navigation programming options, you can modify this pre-programmed schedule to meet individual needs. Navigation programming options include: Wireless Touch Screen, the Mini Touch Screen, and the System Remote Control (On-Screen display). There are six Program Events per day for each day of the week.
To Program a schedule: 1 From the Main Navigator screen, select Comfort. 2 From the options that appear, select Thermostat (name can vary and some navigation devices skip this step). 3 At the Thermostat screen, select the Program button. 4 From the Day Selection screen that appears, select the day or set of days you want to program. • Weekday (Monday through Friday) — Allows you to program the Wireless Thermostat for the 5-day week.
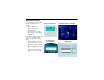
5 For the day (or set of days) you selected, program these six events as needed, beginning with Wake: Wake, Away, Return, Sleep, Custom 1 and Custom 2. Program Event Screen (Example: Wake) When you chose a day (or set of days) in Step 4, a programming wizard displayed the Wake event screen (like the example on the right). This is the first of six screens you can choose to edit.
Additional Programming Your authorized reseller can help you configure additional preferences for your Wireless Thermostat or Control4 system. These include: • The use of Celsius, instead of default setting Fahrenheit. • The use of the Remote Sensor, instead of the default setting On-board Temperature Sensor. • The use of a Custom Overshoot and Undershoot settings. • The use of Locked buttons to disable use of buttons, instead of default setting Unlocked buttons.
Low Battery When battery is low, a battery icon indicating a low battery power appears right of the temperature on Wireless Thermostat LCD screen. Battery Replacement To replace battery: 1 Detach front faceplate by releasing the latch at the bottom of the Thermostat and sliding the faceplate up and off. 2 Remove old battery. See “Battery Replacement Safety Rules” on page 3.
Regulatory Compliance This product complies with standards established by the following regulatory bodies: • Federal Communications Commission (FCC) • Industry Canada FCC • • • • • • FCC ID: R33CCZT11: This device complies with Part 15 of the FCC Rules. Operation is subject to the following two conditions: (1) this device may not cause harmful interference, and (2) this device must accept any interference received, including interference that may cause undesired operation.