OWNER’S MANUAL Portable Evaporative Cooler MASTERCOOL (MIC) ILL863-A MEGACOOL ILL1222-A (MIV) ILL863-A MILLENIA (MI) (English) (Mi MiC MiV) ®
CONTENTS SAFETY........................................................................ 1 General Safety Electrical Safety COMPONENT LOCATION........................................... 2 ASSEMBLY.................................................................. 3-4 Caution - Check Voltage To assemble the cooler DIRECTIONS FOR USE..............................................
SAFETY Portable evaporative air cooler important safety instructions Electrical Safety Please read these instructions before assembling the cooler and keep for future reference. Caution! before connecting the electrical power cord to a power outlet, check that the air cooler voltage is the same as your power supply (refer to the rating label located on the rear of the unit).
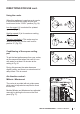
COMPONENT LOCATION KEY A B C D E F G H I J K L M N O Controls Front grille Water filling door Water reservoir Castors Water level indicator Front pillar (Millenia, Megacool) Base Rear panel retaining screws (2) Rear panel Power cord entry point Reservoir drain plug Rating label Cord storage hooks Rear pillar (Millenia, Megacool) I A J B C F K M D G L N E H ILL864-A ® 2 Millenia series Portable Evaporative Cooler O ILL865-B
ASSEMBLY CAUTION! - Check Voltage Before connecting your electrical power cord to a power outlet, check that the cooler voltage is the same as your power supply. The cooler voltage will be stated on the rating label at the rear of the cooler (Fig 6). 6 ILL866-A 7 To assemble the cooler Push the four castors into their locating holes in the base. Use a rotating motion to assist in the entry of the steel spring ring (“ ” Fig 7).
ASSEMBLY cont. Model Mastercool only 10 Place the reservoir onto the base and press down to engage the four clips in the base (Fig 10). To remove the cooler from the base, tip it upside down and release the clips in the base. A screwdriver may be necessary. How to get the best cooling performance Place the cooler with its back near to an open window or door so it can draw in 100% fresh air. ILL1219-A 11 Open another window or door on the opposite side of the room for “flow through” ventilation.
DIRECTIONS FOR USE cont. Using the cooler When this appliance is used as an air cooler, it should be filled with water and the cool knob turned to the “COOL” position (Fig 14). 14 Low fan speed (1) is selected for quietest operation (Fig 14). ILL1433-A High fan speed (3) is for maximum cooling (Fig 15). 15 Fan only (ventilation). This cooler may be used as a fan only. Set the cool knob to position “0” (Fig 15).
DIRECTIONS FOR USE cont. Air direction control Megacool 18 Model Megacool has motor driven vanes that are switched on and off by the fan control switch on the control panel (Fig 18). Set the control to the “sweep / fan” speed setting to operate the sweep vanes (shown). Set to “fan” speed settings for fixed direction. There are no manual adjustment levers. ILL1436-A 19 Safety instruction As this cooler contains water, ensure it is moved carefully and is not tilted, as water may spill (Fig 19).
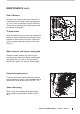
MAINTENANCE cont. End of Season 21 At least once a year at the end of summer it is advisable to do some simple maintenance on your cooler to maintain its high efficiency. This involves cleaning the water system and the Aspen cooling pad. To drain water Drain the water from the cooler by moving the cooler to a drain and removing the drain plug located on the bottom of the tank. When the cooler is empty replace the plug in the tank (Fig 21).
TROUBLESHOOTING CONDITION POSSIBLE CAUSE 1. Cooler will not operate at first. REMEDY 1.1 Power outlet or supply faulty. 1.1.1 Switch on power outlet. 1.1.2 Check power supply. 1.1.3 Check power outlet. 1.2 Wrong voltage. 1.2.1 Check that power supply is the same as specified on the rating label. 2.1.1 Wait 30-45 minutes for motor to cool down and it will restart automatically. If condition persists take the cooler to a service agent. 2. Cooler stops operating after running for some time. 2.
Description Tank (includes drain plug) Drain Plug Rear Panel Filter Pad Front Grille Assembly Badge - Front Grille Window Filler Door Mid Panel Assembly Inner Grille / Spreader Assembly Inner Grille Door Screws Front / Rear Pillar (pair) (Millenia / Megacool) Base (Millenia / Megacool only) Base - compact (Mastercool only) Castor & Pintle Assembly Control Panel Control Box Knob Mushroom Knob Mushroom & Shaft Assembly Water Valve Assembly Switch (2006 - ) Millenia / Mastercool Switch (2006 - ) Megacool Leve
Mastercool 15 13 14 22 8 6 Millenia Megacool 5 26 25 7 29 24 27 23 41 30 39 19 18 18.1 16 20 44 33 34 1 2 17 43 42 38 36 12 9 11 10 32 31 37 28 4 46 3 47 12 EXPLODED VIEW ILL1432-A 0609 As the policy of this company is one of continuous improvement, all specifications are subject to change without notice.
WARRANTY In this warranty: We or us means Seeley International Pty Ltd ABN 23 054 687 035, and our contact details are set out at the end of this warranty; You means you, the original end-user purchaser of the Goods; Supplier means the authorised distributor or retailer of the Goods that sold you the Goods in Australia; and Goods means the product, unit, appliance or equipment which was accompanied by this warranty and purchased in Australia.
WARRANTY cont. 4. We are not responsible in any way for any failure and/or inadequate performance of the Goods which arises from or is connected to the use in the Goods of non-genuine spare parts. We strongly recommend that only spare parts supplied or approved by us are used in the Goods. 5. No other person, firm or corporation is authorised by us to offer or give on our behalf any other or greater warranty than that given under this warranty.
WARRANTY cont. To ensure that service either pursuant to the above warranty or otherwise is readily available, we have established in all States authorised service centres, which are available to deal with service requirements. For further information about your nearest service centre and other enquiries please call our Service Centre on: 1300 650 644 Please retain your receipt as proof of purchase. Every request for warranty must be accompanied by proof of purchase.
It is the policy of Seeley International to introduce continual product improvement. Accordingly, specifications are subject to change without notice. Please consult with your dealer to confirm the specifications of the model selected. Warranty Service Australia 1-300-650-644 seeleyinternational.com ® 829524-D convair.net.