
User's Manual


Convergent Design 14 January 2020
2
Erika User Manual
Quick Steps to Use Erika
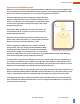
1. The Erika Mic is black, and the Erika Receiver is white.
Plug the cable into the Erika Mic (Black) into your computer for 1 second,
then remove the Erika Mic from the cable and plug in the Receiver.
2. Assemble the two-piece receiver stand (white); route the cable so that the Erika Receiver is in a
vertical position. This vital step elevates the Receiver from your table.
3. Ensure that the Erika Mic is not face down. The Mic port, if facing down, turns off the Mic.
The Green LED on the Receiver should be on, indicating that the Erika Mic is powered up, is in range,
is paired and is unmuted.
If the Receiver LED is Red, then most likely the Erika Mic is face down, is out of range, or needs
recharging. In unusual cases, it may mean that the Mic needs to be paired with the Receiver.
Our factory pairs the Mic and Receiver before shipping.
4. You may now attach Erika using one of the supplied magnets.
5. In most situations, your Windows 10 computer will recognize your Erika Mic, and your software, such
as Zoom, Microsoft Teams, and Google Meet, will immediately use your new Erika Mic.
6. Erika should be ready for you, so you may now speak naturally, with the full freedom to move around
in your area.
7. When finished using Erika, you may set the Erika face-down to power it off.
Or you may use the USB cable and a USB power source or a USB computer port to recharge your Erika.
A flashing Blue LED indicates that it is still charging. A solid Blue LED indicates that the charge is
complete.
The Erika Mic is muted when charging.
8. After using Erika for the first time or testing, please recharge the Erika Mic.
The Erika Receiver (white) never needs to be charged.
9. We encourage you to read the rest of our User Manual to get the most out of your Erika.