D50 Instruction Manual Suction Bracket Type Car Digital Video Recorder (DVR)
Contents I. Precautions.............................................................................................................................................................................................................................2 II. Warranty Items....................................................................................................................................................................................................................2 III. Package Contents...........
driver should take the initiative to avoid danger in accord with the road conditions. 4) The camera is an electronic product. Things such as video recording interruption may occur to it due to parts failure, unstable memory card, power interruption during use, dropping off of the 3M bracket, etc. So it can not replace the insurance. 5) The video content recorded by the camera should be used for legal purposes and the company shall not provide any legal guarantee for the place and purpose of its use.
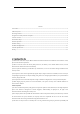
8 Bracket socket 10 Speaker 9 to install suction bracket Display 2.45 inch TFT color LCD display. Button sound prompt, play video recording audio sound when playing video recorded 11 Red indicator light When the machine is turned on, the long red light indicates that recording is stopped, and 12 Blue indicator light 14 Infrared LED lights 4 infrared LED lights to enhance the night vision effect in the car. the flashing red light indicates that the machine is in recording state.
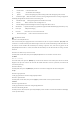
Separate front, inner and PIP display V.
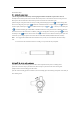
VI. Installation Steps 6.1 Install the memory card: 1) Please use genuine microSD memory cards ranging from 32GB to 256GB, with a speed of Class 10 or U3. Carefully insert the memory card into the slot of the device until you hear a click sound. To remove the card, please turn off the power and turn off the device first, and then push the card into the slot until it clicks again.
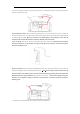
5) Connect the attached car charger to the power port of the device, carefully route the power cord along the windscreen and insert it under the trim strip. 6) Install pull-back camera: When inserting the pull-back camera, you need to disconnect the power and keep the device in the shutdown state, or the device may not detect that the pull-back camera has been inserted, and there will be no pull-back display problem.
VII. Basic Operation 7.1 Use the automatic recording function If you start the car engine, the recorder will automatically start and turn on the recording function. In addition, the blue charging indicator light is on, and the red video indicator light flashes. If the car engine is turned off, the recorder will automatically save the recorded content and shuts down. The recorded images are saved in sections on the Micro SD card.
VIII. Menu Setting After the device is powered on, you can short press 【 please press 【 】to enter the menu settings.( If the device is recording a video, 】first to stop recording, and then press 【 8.1 File list 】to enter the menu settings.) 在待机状态下,短按【 】进入菜单模式,短按【 表”。短按【 】将光标移动选择所需回放的文件夹,短按【 短按【 】或【 】或【 】将光标移动选择所需回放的视频文件,短按【 In standby mode, you can short press 【 list" option, and short press 【 】确认即可播放该录像文件。 】to enter the “file list" .
overwritten and deleted by the loop. Unlock all: short press【 】or【 】to move the cursor to select to unlock all. Then all locked file video can be unlocked. 【 Note 】 : The unlocked video file is still in the locked folder, but the locked icon is deleted and it can be overwritten and deleted by the loop. Delete the current: short press 【 press 【 be deleted. 】to move the cursor to select the locked video file to be deleted and short 】or【 】to enter unlock menu mode to select to delete the current.
device will not display the recording year, month, day and time of the current video file. It is suggested that the users not close the date label when using it, so as to avoid failure to find the corresponding time node reference when accidents occur or you want to query previous video files. 8.4 Satellite positioning In standby mode, you can short press【 positioning option, and press【 】to enter the menu mode, short press【 】to move the cursor to the satellite 】to enter the satellite positioning.
8.4. Loop recording In standby mode, you can short press【 recording option, and press【 】to enter the menu mode, short press【 】to enter loop recording. You can short press【 desired loop recording time, and short press 【 】to move the cursor to the loop 】or【 】to move the cursor to the 】to confirm the loop recording time. 【Note】The loop recording time is divided into four levels of off, 1 minute, 3 minutes, and 5 minutes. You can set it according to your needs. The device defaults to 1 minute.
loop recording video of the device. When the storage of emergency video takes up 30% of the storage amount of the memory card, please copy the emergency video to a PC or other device for storage, so as to ensure that device can store and write video files well. It is suggested that the memory card be formatted manually every 2-3 weeks. 8.7. Motion detection In standby mode, you can short press【 detection” option, and press【 】to enter the menu mode, short press【 】to enter motion detection.
8.10. Sound setting In standby mode, you can short press【 setting ” option, and press【 press 【 or【 【 】or【 】to enter the menu mode, short press【 】to move the cursor to the “sound 】to enter items of the key sound, switch audio, playback sound setting. You can also short 】to set and adjust the required items, and short press【 】for confirmation. Short press 【 】, and you can adjust the setting value. Confirmation can be made by short pressing【 】 】.
2) After the “parking monitor" mode is turned on, if, in the shutdown state, the vibration intensity of the vehicle reaches the level when the device is turned on, the recorder will automatically start and record for 30 seconds. After the 30 seconds’ recording, the device will automatically save the recording files and shut down. At the moment, the recorded video files are locked images and will not be covered by the loop.
【Note】When in use, it is a straight choice between the “time-lapse recording" and the “parking monitor". When you choose “time-lapse recording", the parking monitor function can not be used at the device end then. 8.13 Fatigue warning In standby mode, you can short press【 warning option, and short press【 】to enter the menu mode, short press【 】to move the cursor to the fatigue 】to enter fatigue warning.
9.3. When the installation is completed and the APP is opened, there will be prompt whether you want "roadcam" to access the photos of the phone, please click “Yes”. 9.4. There is a WIFI setting option in the menu settings, please select “On”. For the first connection, you need to enter the phone Settings to search for WIFI and enter the password. And there is no need to enter a password for a second connection. 9.5.
high-definition video, please download the video file to the mobile phone and then play it, or you can insert the Micro SD card into your computer and then watch it.) 9.8. Video download and deletion: Please click "Select" and then tick the video file required to download. And you can download the selected video file by clicking “Download". Please click “Select" and then tick the video files required to delete. And you can delete the selected video files by clicking “Delete" . 9.9.
X. Product Specifications Main control chip Image sensor ROM RAM Display Viewing angle Recording method Video format deo encoding method Front camera resolution Inner camera resolution Rear camera resolution Camera resolution Seamless video recording Automatic recording at boot Gravity sensing Manual lock Languages Video segmentation time Recording WIFI NT96670 In-vehicle, out-vehicle IMX 307sensor GC2053 sensor rear recording NT96671 Ethernet plus 32Mb SPI FLASH 2GBit DDRIII RAM 2.
Parking monitor Storage medium Support capacity USB port GPS Super capacitor Power consumption Power supply Storage temperature Operating temperature support Micro SD 32GB--256GB Micro UBS/5Pin support (optional) 5.5V 3.5F(Support instant power to save the last recorded video) 750MA vehicle power supply 5V/2A -10℃~70℃ -10℃~60℃ XI. FAQ If the machine fails to work, please try the following methods to eliminate the failure. If it cannot be eliminated, please contact our after-sales service.
and used in accordance with the instructions, may cause harmful interference to radio communications. However, there is no guarantee that interference will not occur in a particular installation. If this equipment does cause harmful interference to radio or television reception, which can be determined by turning the equipment off and on, the user is encouraged to try to correct the interference by one or more of the following gmeasures: Reorient or relocate the receiving antenna.