6 Qt. Digital Pressure Cooker Model EPC-678 INSTRUCTION MANUAL & RECIPES Before operating your new appliance, please read all instructions carefully and keep for future reference.
TABLE OF CONTENTS IMPORTANT SAFEGUARDS________________________ 2 PARTS & FEATURES ____________________________ 4 BEFORE USING YOUR PRESSURE COOKER ____________ 5 OPERATING INSTRUCTIONS _______________________ 8 CARE & CLEANING _____________________________ 7 RECIPES _____________________________________ 8-19 WARRANTY & CUSTOMER SERVICE _________________ 20 SHORT CORD PURPOSE NOTE: A short power cord is provided to reduce the risk of personal injury resulting from becoming entangled in or tripp
IMPORTANT SAFEGUARDS When using pressure cookers, basic safety precautions should always be followed: 1. Read all instructions before operation. 2. Do not operate while unattended. 3. Do not touch hot surfaces. Use handles or knobs. 4. Close supervision is necessary when the pressure cooker is used near children. 5. DO NOT allow children to operate under any circumstance. 6. Do not place the pressure cooker in a heated oven or on a stove top. 7.
IMPORTANT SAFEGUARDS (cont.) 25. The pressure cooker should not be used for pressure cooking for more than 6 hours continuously. 26. Serious Injury and/or damage may occur if any safeguards are ignored. 27. If steam escapes around the Lid during the cooking process, please unplug from the power supply immediately, let cool, remove contents and return the product to the manufacturer for exchange or repair. The Pressure Discharging Device has activated.
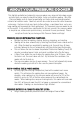
ABOUT YOUR PRESSURE COOKER This digitally controlled and automatic pressure cooker uses advanced technology so you and your family can enjoy the benefits of better, faster and healthier cooking. Your Elite Pressure Cooker seals in steam to cook hotter and faster while maintaining important nutrients for healthier meals. Cook fast and with less water to save vital natural resources and energy.
PARTS & FEATURES 5
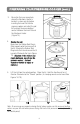
BEFORE FIRST USE Working Pressure PSI Maximum Pressure Keep Warm Temperature 0~70kPa 12 PSI 90kPa 140ºF ~ 175 ºF Delay Timer 1~24 Hours 0.5 Hour Increments up to 10 hours thereafter 1-hour increments 1. 2. Remove packaging materials such as cardboard, plastics or Styrofoam and discard appropriately. Clean all the parts by wiping with a soft damp cloth or sponge and dry thoroughly.
BEFORE FIRST USE (cont.) How to Clean the Filter: If you wish to clean the filter, you may remove it by pulling vertically. To re-attach, simply line up the filter and press down to secure the filter (Figure 7). 7 PREPARING YOUR PRESSURE COOKER 1. Open the lid: Hold the handle firmly, turn the lid clockwise until it loosens and lift vertically. (See Figures 8-9); the lid can stand on the support (Figure 10). 2. Remove the inner pot and add desired ingredients.
PREPARING YOUR PRESSURE COOKER (cont.) 3. Be certain the inner receptacle, where the Electronic Heater is located, is clean and dry before inserting the Inner Pot into the pressure cooker and adjust the pot left and right to ensure optimal contact between the Inner Pot and the Electronic Heater ( Figure 14). 14 4. Closing the Lid: Make sure the Rubber Seal Ring is fitted properly onto the inner part of the lid.
PREPARING YOUR PRESSURE COOKER (cont.) 6. Adjust the pressure limiting valve to the “Airtight” position, and ensure that the Float Valve sinks (Figures 19-20). 19 20 NOTES & TIPS #1: • Please note that the Pressure Limiting Valve will be loose when you are not using the unit for cooking. It will rock slightly and will turn 360° manually.
HOW TO USE YOUR PRESSURE COOKER HOW TO USE THE M E N U S E L E C T B U T T O N S : There are Seven Preset Menu Buttons programmed for your pressure cooker (Vegetables/Fish, Soup/Stew, Potatoes, Beef/Meat, White Rice, Chicken, and Bean/Chili). These are preset for quick and easy cooking for small portions of food in addition to manual programming. (When cooking food that is more than 3lbs. or more than 6-cups, please use the Timed Cooking function.
HOW TO USE YOUR PRESSURE COOKER (cont.) NOTES & TIPS #5: • When cooking soups or stews with other hearty ingredients such as potatoes or meat, as much as 5 or 6 cups of liquid must be used to prevent ingredients from over-cooking or burning. 10) When cooking has completed, the pressure cooker will beep 6-times and automatically go to Keep Warm. The LED Screen will display END. 11) The Keep Warm indicator light will begin to flash/flicker. This means the Pressure Cooker is naturally releasing the pressure.
HOW TO USE YOUR PRESSURE COOKER (cont.) 4) 5) 6) 7) 8) 9) Plug the power cord into a 120V power outlet. The LED screen will display 00 00. Set the desired cooking time by pressing the Pressure Cooking Time button. Each push of the Pressure Cooking Time button will increase the cooking time by 1 minute or hold the button for rapid increase of time. The maximum amount of time is 99 minutes. Press start button to start cooking, the indicator light will stop flickering and the display will show T TP.
HOW TO USE YOUR PRESSURE COOKER (cont.) NOTES & TIPS #7: • It is recommended to release the pressurized steam when the “Keep Warm” LED stops flickering as the pressure cooker will have lower pressure. This will require a little more time. (Approximately 5-10 minutes). • During the cooking process, when the pressure cooker enters into the Pressurized Sequence, the first digit on the LCD screen will display the letter “P”.
HOW TO USE YOUR PRESSURE COOKER (cont.) 4) 5) 6) 7) 8) Press the Keep Warm button. The indicator light will illuminate solid. It should not be blinking. The pressure cooker will start maintaining a lower temperature to keep warm. To cancel, simply press the Cancel button until indicator light is no longer illuminated. Remove food and serve. Unplug power cord and allow to cool completely before dismantling and cleaning. HOW TO USE THE STEAM BUTTON: 1) Place wire rack (included) into Inner Pot.
HOW TO USE YOUR PRESSURE COOKER (cont.) It is not recommended to pressure cook larger cuts of frozen meats such as a whole roast, a block of frozen ground meat or a whole chicken. Larger cuts will require increased cooking times of up to one third more, and the results may not be the same when compared to meats that were thawed (or at least partially thawed) and browned before cooking.
HOW TO USE YOUR PRESSURE COOKER (cont.) proceeding to Naturally Release the pressure. (See Notes & Tips #6) Open lid once pressure has completely released which is indicated by the Keep Warm indicator light staying illuminated. Carefully remove jars using special canning utensils or tools. CAUTION: Jars are hot! Set jars on a towel or cooling rack and allow to cool completely in a draft-free location. Follow recipe instructions on cooling and storage.
FAQ (FREQUENTLY ASKED QUESTIONS) 1) Is the Airtight/Exhaust Valve Knob on the top of the lid supposed to be loose? - If you are not cooking or using the unit, the Valve Knob will be loose. It will turn 360 degrees and may even come off if you pull on it. Once you start using the pressure cooker and the pressure has built up, and the Valve Knob is set to “Airtight” properly, it will not be loose anymore. - Sometimes during cooking and pressurizing, steam may escape from the Valve.
FAQ (FREQUENTLY ASKED QUESTIONS) cont. 5) Steam is being released from the Pressure Limiting Valve during the pressurizing sequence. How do I fix this? - The Valve may not be positioned properly. Simply use tongs or similar utensil or oven mitt and carefully adjust it so it is seated properly. If the steam continues to release, you may need to Cancel all the functions. Exhaust any remaining pressure and steam. Remove the Pressure Limiting Valve and check the thin wire spring on the underside of it.
COOKING TIME CHART Courtesy of www.healthfoods.com Please note that all the below information is for your reference only and can be adjusted according to the user’s preference. Meat/Poultry • Always cook meat or poultry with at least 1-3 cups of liquid. If the cooking time exceeds 15 minutes, use 2 cups of liquid. If weight of meat or poultry is 3lbs, use 3 cups of liquid. Preserved or salted meats should be immersed in water.
Vegetables • Always cook with at least 1-2 cups of liquid. • Add 1-2 additional minutes to cooking time when preparing frozen vegetables. • Use the quick-release release method at the end of cooking cycle so vegetables will not become soggy. (Below chart is for quantity approximately half a pot).
Dried Beans and Other Legumes • • • • Place beans or legumes in pressure cooker. Add 3 cups of water for each cup of beans or legumes. Add 1 tablespoon of vegetable oil for each cup of water to cut down on foaming. Do not add salt until after cooking. Let pressure drop naturally after cooking. Cooking times may vary according to the quality of the beans or other legumes. If still hard after recommended cooking times, continue cooking uncovered. Add additional water, if necessary.
RECIPES Recipes included in this manual are courtesy of www.recipezaar.com and www.fastcooking.ca. Please visit the Peggy Under Pressure Blog for recipes and instructions featuring the Elite Platinum Pressure Cookers. www.peggyunderpressure.com Please note that all of the information is for your reference only and can be adjusted according to the user’s preference.
RECIPES BEEF IN PEPPER SAUCE CONTINUED... 1/2-1 teaspoon cayenne pepper (depends on how spicy you like it) 1/2 teaspoon ground cardamom Remaining Ingredients 2 tablespoons olive oil 2 lbs boneless sirloin steaks, cut into strips salt & pepper 1 cup water 1/2 teaspoon paprika 1/2 teaspoon cumin 1/2-1 onions, sliced 1 green bell pepper, sliced Directions - Remove 1 tablespoon of tomato sauce from the can to be used later.
RECIPES - Add shallots and garlic to pressure cooker and sauté in oil, scraping bottom of pan to loosen browned particles remaining from chicken. Stir in broth, lemon juice, sherry, salt, pepper, basil, and olives. Mix well. Add chicken pieces skin side down back into the pressure cooker with other ingredients. Close the lid and press the BEEF/MEAT Preset Menu Button. When cooking is complete, follow instructions to reduce pressure. Lift lid.
RECIPES CHICKEN ADOBO SERVES 4 -5 Ingredients 8-9 chicken thighs 2 cups water 2 cups low sodium soy sauce 1 large onion (cut into rings) 8 garlic cloves (chopped up) 3 bay leaves 2 tablespoons cooking sherry 1 teaspoon ground black pepper 3 tablespoons molasses 1 tablespoon olive oil Jasmine rice Directions - In the pressure cooker, heat olive oil over heat. Brown the chicken thighs on both sides. (Follow the Browning/Sautéing instructions on Page-6 of this manual.) Remove and set aside.
RECIPES TUSCAN LAMB SHANK CONTINUED... Add shallots and garlic to the pressure cooker, and sauté 2 minutes using the Browning/Sautéing instructions on Page-6 of this manual. Add the beans, 1/4 cup water, reserved 1 1/2 teaspoons flour mixture, red wine, and the next 4 ingredients (wine through broth). Close the lid and press the BEANS/CHILI Preset Menu Button. During cooking of the sauce, go back to the lamb that was set aside. Remove lamb meat from bones; discard bones, fat, and gristle.
RECIPES SOUTH OF THE BORDER SPICY CHILI SERVES 6 Chili is a nutritionally sound and complete meal. You can make it more or less fiery by adjusting the amount of chili powder used.
RECIPES TRADITIONAL MEAT LOAF SERVES 4 Ingredients 1 1/2 lb mixture of chopped or ground lean beef, pork and veal 1 teaspoon salt Freshly ground pepper 2 slices bread, soaked in water and squeezed dry 2 tablespoons parsley 1 medium onion, minced 1 garlic clove 1 egg 2 tablespoons chicken stock 2 teaspoons Worcestershire sauce 2 tablespoons olive oil 1 cup tomato sauce 1 cup water Directions: - - In a bowl, combine the chopped meat, salt, pepper, bread, parsley, onion, garlic, egg, chicken stock and Wor
RECIPES JAMBALAYA SERVES 4-6 Ingredients 1 tablespoon vegetable oil 1/2 lb boneless skinless chicken breasts, cut into 1" pieces 1/2 lb fully cooked Andouille or Italian sausage, sliced 1/2 lb uncooked shrimp, peeled and deveined 2 teaspoons Creole seasoning 1 teaspoon dried thyme leaves 1/8 teaspoon cayenne pepper 1 onion, chopped 3 garlic cloves, minced 1 green bell pepper, chopped 3 stalks celery, sliced 1 cup long grain rice 16 oz canned chopped tomatoes, un-drained 1 cup chicken stock 3 tablespoons f
RECIPES CORNISH HENS BRAISED IN WHITE WINE SERVES 4 Ingredients 2 tablespoons olive oil 2 Cornish hens, trussed 1/2 teaspoon salt 1/4 teaspoon freshly ground black pepper 1/2 teaspoon thyme 1/2 teaspoon basil 1 tablespoon minced parsley 1 tablespoon flour 1/2 cup dry white wine 1/2 cup chicken stock 1/4 lb mushrooms, cleaned and sliced Directions: - In the pressure cooker, heat the olive oil and brown the Cornish hens on all sides. Sprinkle them with salt and pepper, thyme, basil and parsley.
RECIPES TORTILLA SOUP SERVES 8-10 Ingredients 1/3 cup vegetable oil 2 onions, diced 4 cloves garlic, peeled 1 can tomatoes, drained 3 quarts chicken broth 2 Cups Cooked Shredded Chicken Tortilla chips cilantro, chopped 1 lb grated cheese lime wedges (optional) Directions: - Sauté onions and garlic in the oil in the pressure cooker until they are deep golden brown. (Follow the Browning/Sautéing instructions on Page-6 of this manual.
RECIPES OLD FASHIONED RICE PUDDING SERVES 4 Ingredients 1 egg 1/4 cup evaporated milk 1/2 teaspoon vanilla Cinnamon 1 tablespoon butter 1/4 cup long grain rice 2 cups milk 1 cup water 1/3 sugar 1/2 teaspoon salt Directions: - Melt the butter in the pressure cooker and stir in the rice, coating it with the butter. Pour in the fresh milk and water, and then stir in the sugar and salt. (Follow the Browning/Sautéing instructions on Page-6 of this manual.
RECIPES Carefully remove only the pears and transfer to a deep container. PEARS STEWED IN RED WINE CONTINUED... Boil down the remaining sauce until it is syrupy by pressing START. Cool, then pour over the pears and keep at room temperature overnight. To serve, defrost and purée the raspberries in a processor until smooth. Spoon 4 tablespoons of the purée on four dessert dishes or shallow bowls. Place a pear upright in the center or each dish. Spoon some syrup over the pears.
LIMITED WARRANTY* ONE (1) YEAR WARRANTY IS ONLY VALID WITH A DATED PROOF OF PURCHASE 1. Your small kitchen appliance is built with precision, inspected and tested before leaving our factory. 2. It is warranted, to the original purchaser to be free from any manufacturing defects under normal use and conditions for one (1) year, cord excluded. This Warranty applies only to the original purchaser of this product. 3.
RETURN INSTRUCTIONS RETURNS: A. Any return of defective merchandise to the manufacturer must be processed accordingly by first contacting customer service (contact information shown below) to obtain an RA # (Return Authorization Number). We will not accept any returns of merchandise without an applicable RA #. B. IMPORTANT RETURN INSTRUCTIONS. Your Warranty depends on your following these instructions if you are returning the unit to Maxi-Matic USA: 1.