DIGITAL AIR FRYER & COOKER Model No: 803849 220-240V, 50/60HZ 1200-1400W PLEASE READ AND RETAIN THESE INSTRUCTIONS FOR FUTURE REFERENCE 1
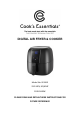
DIGITAL AIR FRYER & COOKER INSTRUCTION MANUAL Product Overview Congratulations on the purchase of this high quality product. This versatile Digital Air Fryer & Cooker uses hot air in combination with high-speed air circulation (rapid hot air) and a top grill to prepare a variety of tasty dishes in a healthier, fast and easy way. Your ingredients are heated from all sides at once and there is no need to add oil to most of the foods that you cook.
General description 1. Concealed Handle and Air Inlet 2. LED Display 3. Touch Sensitive User Controls 4. Basket / Tray Release Button Cover 5. Basket / Tray Release Button 5. Handle 6. Power Inlet 7. LED Display 8. Air Outlet 9. Cooking Basket 10. Cooking Tray 11. Pan 12. Power Cord (Not Shown) Health and Safety The use of any electrical appliance requires the application of the following common sense safety rules.
Mains Cable The mains cable should reach from the socket to the base unit without straining the connections. Do not let the mains cable hang over the edge of a worktop where a child could reach it. Do not let the cable run across an open space e.g. between a low socket and table. Do not let the cable run across a cooker or toaster or other hot area which may damage the cable. If the supply cable is damaged, DO NOT USE THE APPLIANCE.
Teach children to be aware of dangers in the kitchen, warn them of the dangers of reaching up to areas where the child cannot see properly or should not be reaching. Safety Considerations Specifically for this Product IMPORTANT. This appliance is fitted with a removable Power Cord. Please make sure you only use the cord supplied with your product as this is fused appropriately to provide correct protection. IMPORTANT.
WARNING. This is a CLASS I Product and as such needs to be connected to an EARTHED supply. Electrical Requirements When using electrical appliances basic safety precautions should always be followed. Check that the voltage indicated on the rating plate corresponds with that of your local network before connecting the appliance to the mains power supply.
How to use your Digital Air Fryer & Cooker To begin using your Digital Air Fryer & Cooker, first, carefully unpack it and check that it has not sustained any damage during transportation. Also check that all the items shown in the PRODUCT OVERVIEW are present. We recommend that you retain your packaging so that, in the unlikely event of a fault developing, you are able to return the product in the correct packaging for best protection. Before first use 1. Remove all packaging material. 2.
A. B. C. D. Offer up the Handle Assembly (e) to the Cooking Tray / Basket. Align the fixing holes. One at a time, insert a Screw (b). Place a Toothed Washer (d) over the Handle side of the Screw thread. E. Place on a Domed nut (c) and tighten by hand. F. Repeat 2-5 for the second fixing. G. Fully tighten using the Screwdriver and Spanner (f) 3. Thoroughly wash the Cooking Basket (9), Cooking Tray (10) and Pan (11) in hot soapy water using a non-abrasive sponge. Rinse and dry. 4.
User Controls User Controls (3) Layout LCD Display (7) USER CONTROLS SYMBOL LCD DISPLAY SYMBOLS FUNCTION Temperature Setting, adjusted by UP/DOWN keys. SYMBOL FUNCTION This symbol will illuminate when the unit is heating. Press to increase the 0 temperature. 5 C for each 0 press. Range 60-200 C. This symbol will illuminate when mains power is on. Press to decrease the 0 temperature. 5 C for each 0 press. Range 60-200 C. Preset Programmes. Press sequentially to select 01-06. See table below.
Preset Cooking Programmes The Preset Programmes shown below are useful when you are cooking simple dishes. As with all temperature settings and cooking times these are approximate only. Both time and temperature will vary depending on food varieties and quantities as well as your own personal preferences. Although these Programmes are preset, you can, if you wish, adjust both temperature and time both prior to and during the cooking process. PROGRAMME No.
default of 10 minutes. These default settings allow you to immediately begin cooking and then adjust time and temperature if needed afterwards. 7. To start cooking in the "Fast Cooking Mode" simply press the (Start / Pause) button. 8. If you do not wish to use the default "Fast Cooking Mode" then proceed as follows to adjust the time and temperature to your requirements: a. TEMPERATURE: To change the temperature press the or 0 buttons to increase or decrease the time in 5 C increments.
minutes (to help cool the appliance down), a rotating (Fan)symbol will show in the display. 12. When the fan stops running the unit will "Beep" once and shutdown. The display will show just three horizontal bars. NOTE: You can adjust the time or the temperature at any time during the cooking process. NOTE: The Air Fryer indicates when it has reached the set temperature by turning the (Heat On) symbol off.
audible alarm "beep" four times to alert you that you have to shake the ingredients. However, this means that you have to set the timer again for the remaining cooking time and press ON again after shaking. If you set the time to the full cooking time, there is no audible alarm during cooking just at the end of the cooking cycle.
Fryer before adding your cake mixture to the Baking Tin and placing it in the Basket of the Air Fryer. Proceed as follows; 2. Follow the instructions in the previous section to set the temperature then set the time to 4 minutes. Press . When the Air Fryer has reached your set temperature the (Heat On) symbol will turn off. You can then remove the Pan and fill the Basket, return the Pan to the Air Fryer and set the temperature and timer to the required cooking settings. Press to start.
Cleaning and Storage Cleaning We recommend that the Cooking Basket, Cooking Tray and Pan are cleaned as soon as they have cooled down after use to prevent the build up of any residues. Proceed as follows: 1. Disconnect the appliance from the Mains Supply and allow to cool down completely. 2. Remove the Pan from the Air Fryer and Cooker by pulling gently on the handle. 3. Remove the Basket from the Pan as follows. Slide the Button Cover over the Basket / Tray Release Button (2) forwards to expose the Button.
Troubleshooting In the unlikely event that you experience a problem with your Air Fryer and Cooker please take a couple of minutes to check these possible causes before you contact the Help Line. PROBLEM POSSIBLE CAUSES The LED Display is not illuminated No Power The Unit will not operate The Pan is not correctly located in the Air Fryer body. Interlock switch not operated. More than 1 minute elapsed before starting the cooking process The food being cooked contains high levels of fat.
This page is intentionally blank.